This article will discuss how to track widget form submissions with Google Tag Manager keeping original source data intact.
This article is intended for marketers and web developers familiar with Google Tag Manager. If you need help setting this up, reach out to our success team.
In this example, I used two different GTM containers under the same account. One container is added to the BidClips widget configuration. The other is the container for the parent page that is hosting the BidClips widget.
If you also choose to use two containers, part 1 indicates the work is done in the BidClips widget container and part 2 indicates the work is done in the parent page container.
This article assumes you have already added your GTM code to the BidClips widget. If you haven't, follow this article to configure the integration.
Part 1: The BidClips Widget
Configure the Service Request Form Submission Trigger
First, we will add a trigger that tracks when someone views the Service Request Submission thank you page. The BidClips widget is built with React, therefore we will use the built-in 'History' variables.
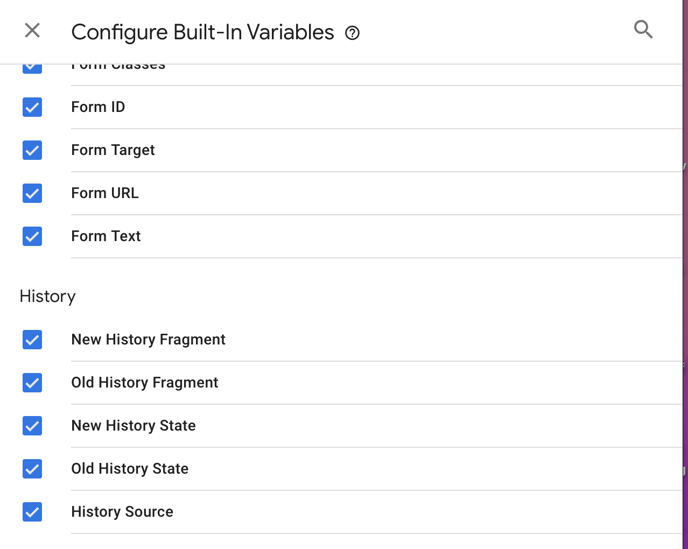
To turn on the 'History' variables:- Navigate to 'Variables' from the left sidebar in your workspace
- Click 'Configure'
- Check on all 'History' variables
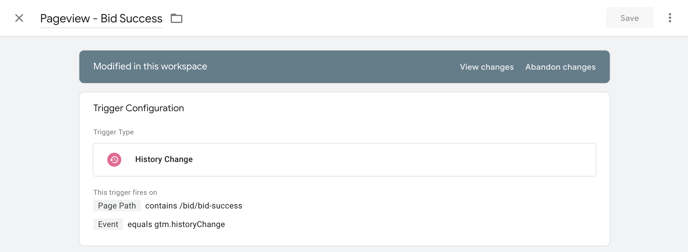
Next, we will create a trigger that tracks views of the Service Request submission thank you page.
To create the trigger:
- Navigate to 'Triggers' from the left sidebar in your workspace
- Click 'New'
- Name your trigger
- Choose 'History Change'
- Choose 'Some History Changes'
- Add 'Page Path' > 'Contains' > /bid/bid-success
- Add 'Event' > 'Equals' > gtm.historyChange
- Click 'Save'
Configure the Service Request Form Submission Tag
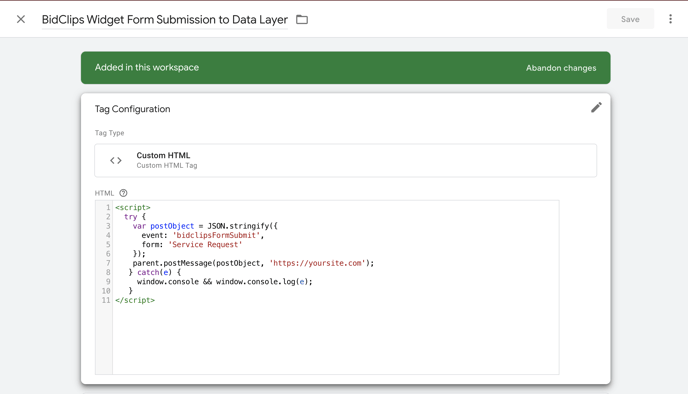
Next, we will create a custom HTML tag that sends the Service Request form submission information to the data layer.
- Navigate to 'Tags' from the left sidebar in your workspace
- Click 'New'
- Name your new tag
- Click 'Tag Configuration' and choose 'Custom HTML'
- Copy the following code into the tag. Replace 'https://yoursite.com' with the URL of the page the widget is hosted on.
<script>

  try {

    var postObject = JSON.stringify({

      event: 'bidclipsFormSubmit',

      form: 'Service Request'

    });

    parent.postMessage(postObject, 'https://yoursite.com');

   } catch(e) {

     window.console && window.console.log(e);

   }

</script> - Add the History Change trigger we set up in the previous step.
- Click 'Save'
Part 2: The Parent Page
Configure the Conversion Event Listener Tag
Now that the form submission event is being sent to the data layer, we will need to set up a tag on the parent page that listens for the conversion event.
- Navigate to 'Tags' from the left sidebar in your workspace
- Click 'New'
- Name your tag
- Choose tag configuration > 'Custom HTML'
- Add the following code:
<script>

(function(window) {

    addEvent(window, 'message', function(message) {

    try{

          var data = JSON.parse(message.data);

          var dataLayer = window.dataLayer || (window.dataLayer = []);

            if (data.event) {

              dataLayer.push({

                'event': data.event,

                'postMessageData': data

              });

            }

            }catch(e){}

    });


// Cross-browser event listener

    function addEvent(el, evt, fn) {

          if (el.addEventListener) {

            el.addEventListener(evt, fn);

        } else if (el.attachEvent) {

            el.attachEvent('on' + evt, function(evt) {

              fn.call(el, evt);

        });

        } else if (typeof el['on' + evt] === 'undefined' || el['on' + evt] === null) {

            el['on' + evt] = function(evt) {

              fn.call(el, evt);

        };

        }

        }

        })(window);

</script> - Add the 'Trigger' > 'All Pages'
- Click 'Save'
Configure the 'bidclipsFormSubmit' custom event trigger
Now that the parent page is tracking the 'bidclipsFormSubmit' custom event, we can use it to trigger different types of tracking tags.
- Navigate to 'Triggers'
- Click 'New'
- Name the trigger
- Add the 'Custom Event' trigger type
- Add 'bidclipsFormSubmit' to the event name input
- Choose to fire on 'All Custom Events'
- Click 'Save'
Now you can use this trigger to fire different types of tags like Google Analytics, Google Ads Conversion Tracking, etc.
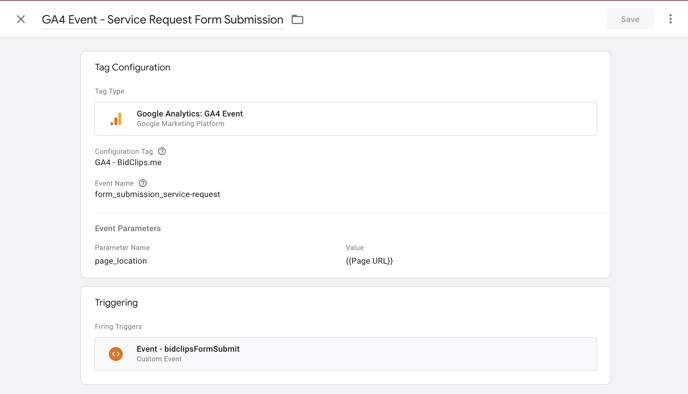
In the example below, I used the trigger to send a Google Analytics Event to GA4: