Learn how to work with your shop service offerings
Once you have activated your Provider Portal account, and have successfully added at least one shop to your Provider Portal, you are now ready to configure the service(s) provided by your shop(s).
This article will discuss:
Adding a service for a shop
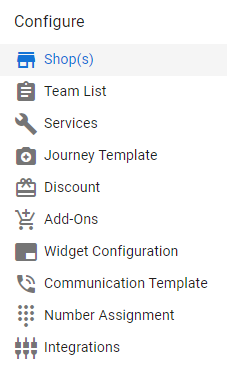
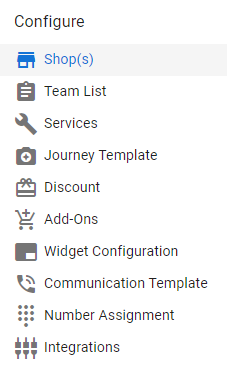
You will start this process by clicking on the 'Shop(s)' link in the 'Configure' section of the Provider Portal navigation bar that is located on the left side of the screen.
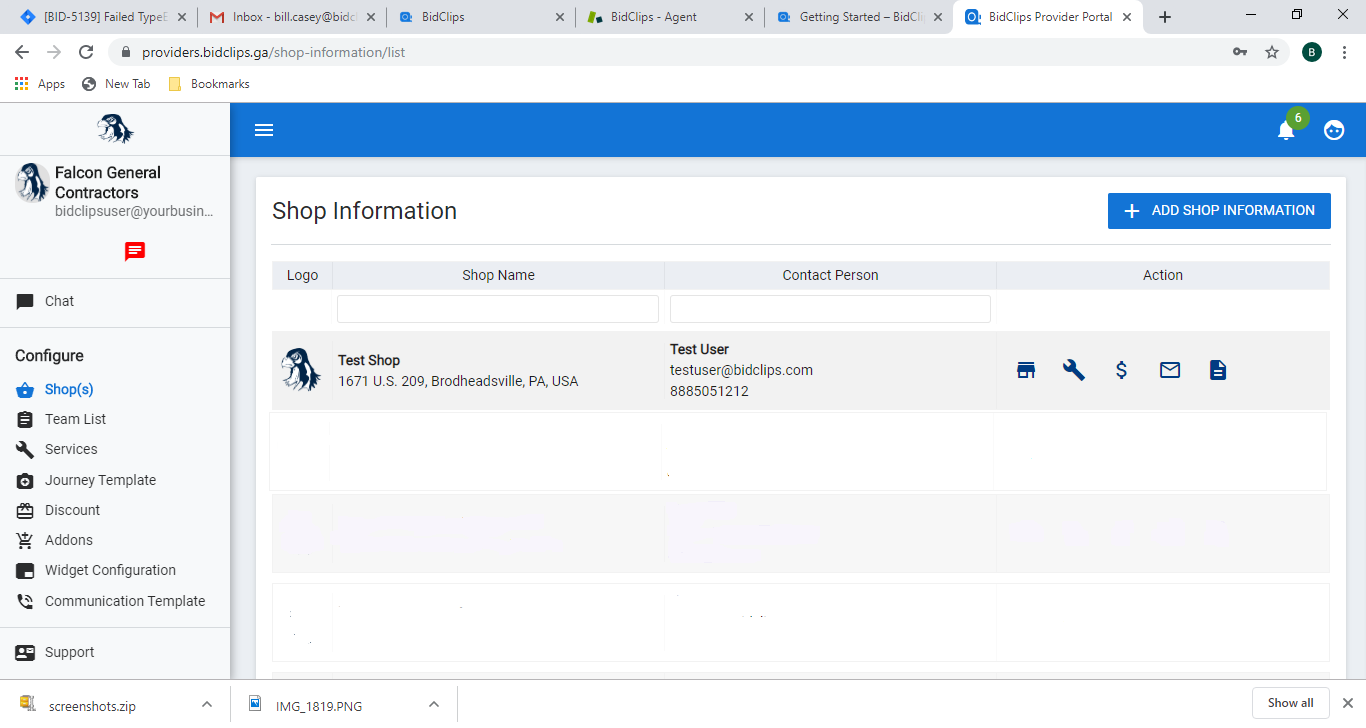
Next, you will click on the wrench ( ) icon in the 'Shop Information' page and will be redirected to the 'Service Selection' page:
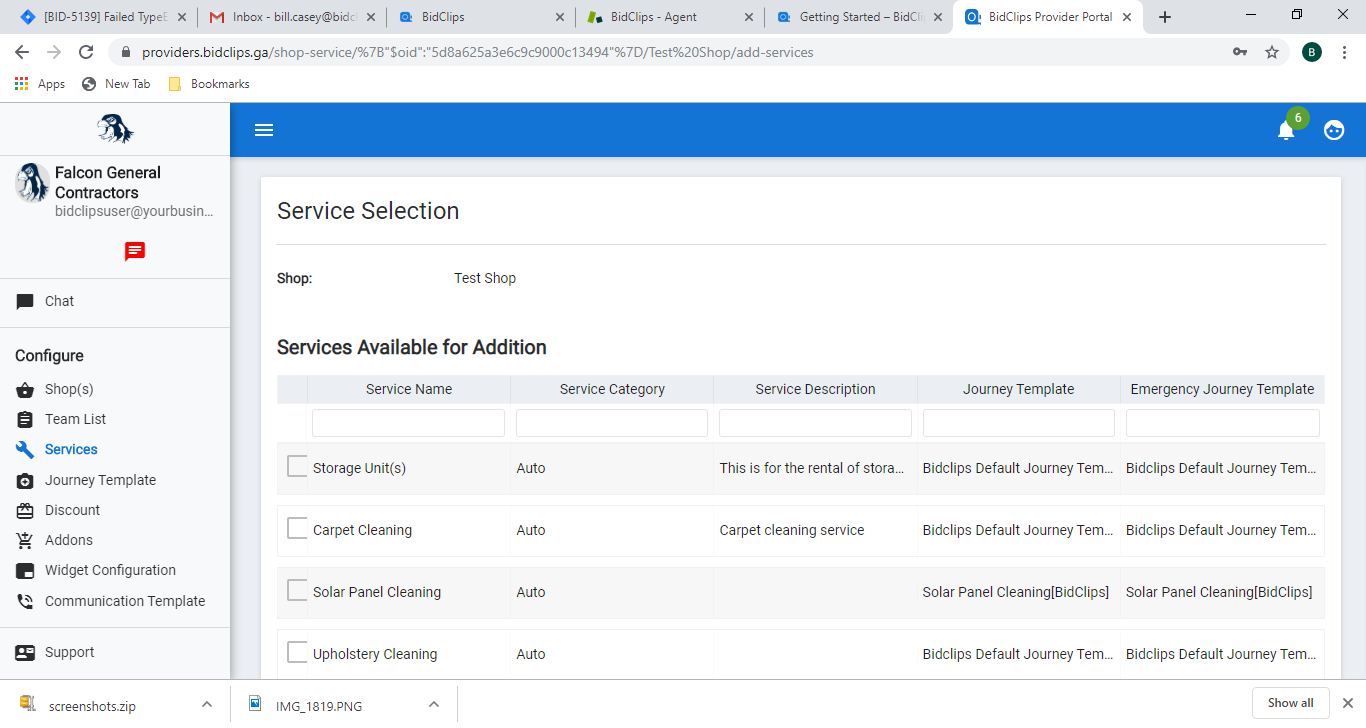
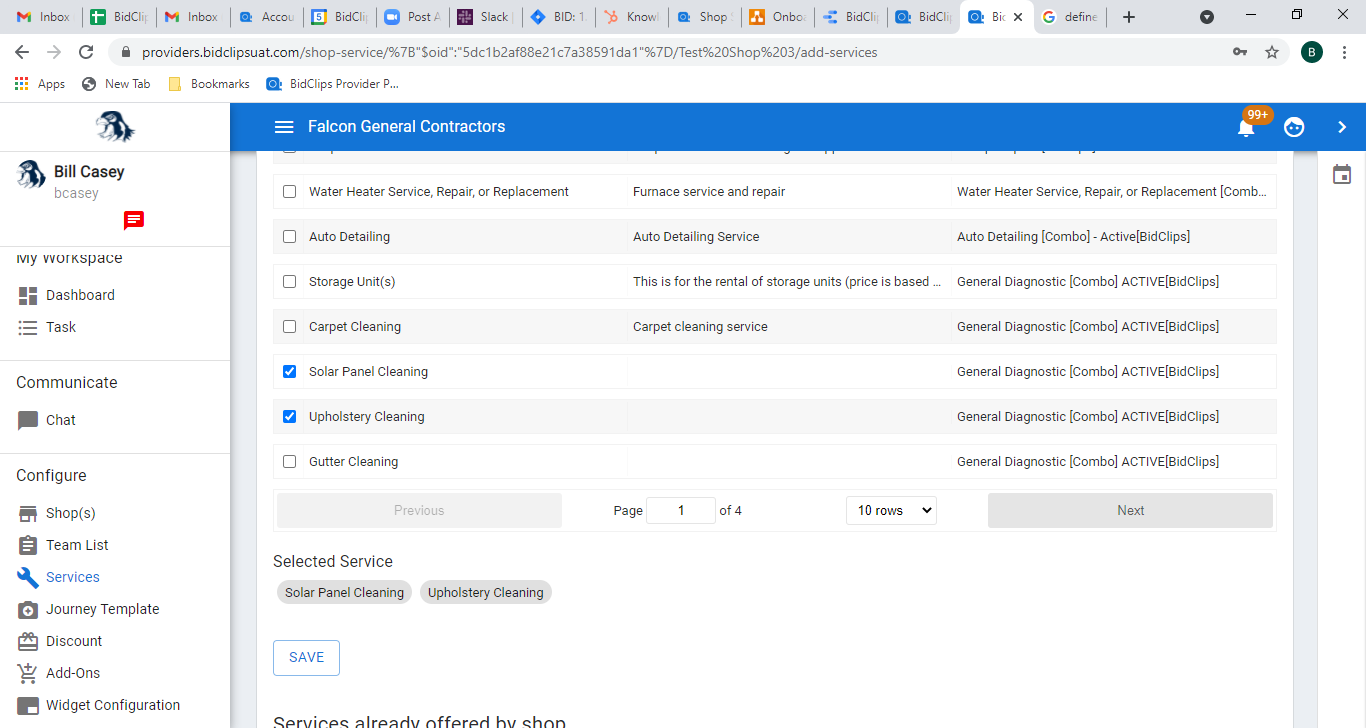
The upper portion of the 'Service Selection' page will display which service(s) are available for addition to the selected shop. The bottom portion of the page will display which service(s) are already being offered by that shop.
Services Available for Addition
Services already offered by shop
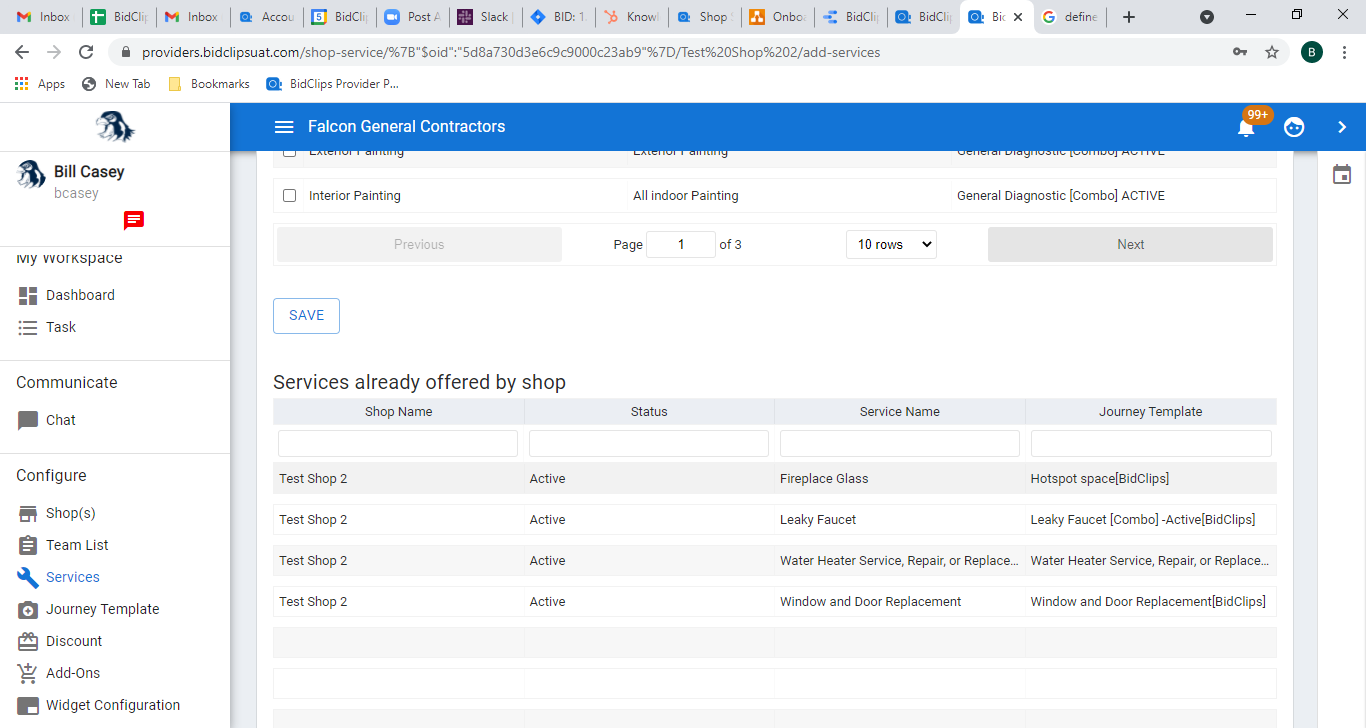
Check the box next to the service(s) that you would like to add to your shop. Once you select a service offering, it will be added to a list above the 'SAVE' button that will apply all of the services in that list upon saving.
Use the 'Previous'/'Next' buttons to navigate through all of the existing, prebuilt BidClips service offerings and click the 'SAVE' button.
If you do not find an existing BidClips service offering that is needed for your shop, please submit a support request for the BidClips support team to have it added.
Congratulations! You have just successfully added a service offering to your shop.
Editing an Existing Shop Service
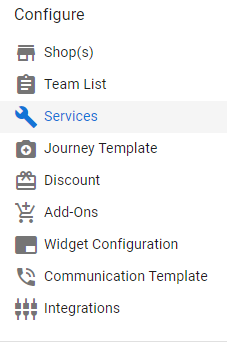
You can edit an existing shop service by clicking on the 'Services' link in the 'Configure' section of the Provider Portal navigation bar that is located on the left side of the screen.
All service offerings available in BidClips are prebuilt by the BidClips support team for Provider Portal users. The service offerings utilize prebuilt Journey Templates and have a default on-site (shop) and mobile (customer location) service duration.
The service offerings also inherit the global shop pricing settings such as gross profit percentages and part/cost distribution percentages that were established when setting up a shop. Once a service offering has been added to a shop, you can modify the following settings:
- Promote a Shop Service
- Override Journey Template Selection
- On-site and Customer Location Service Duration
- On-site and Customer Location Scheduling Options
- Service Note/Message
- Override Pricing Selection
- Override Distribution Selection
- Override Distribution Selection Option on All Bids
- Activate/Inactivate a Shop Service
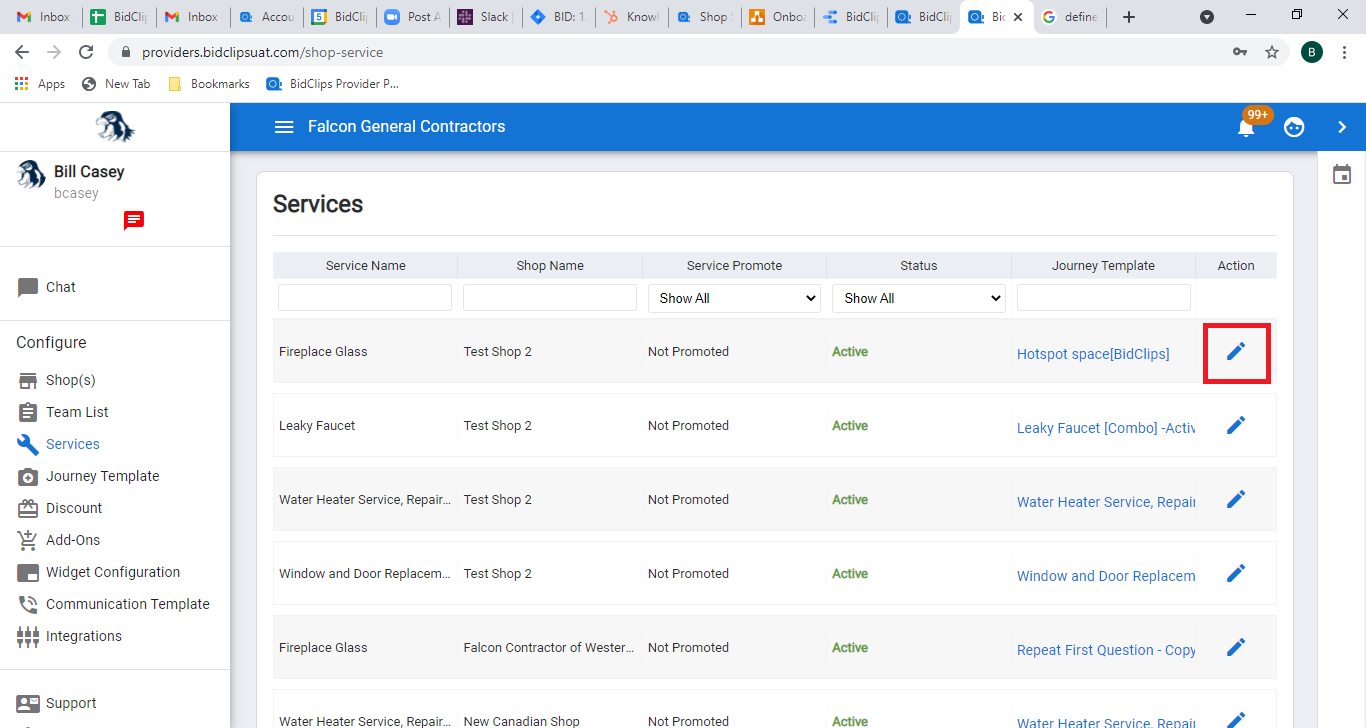
Click on the "edit" ( ) icon or the grid row for any of the service offerings provided by your shop to begin editing your service settings.
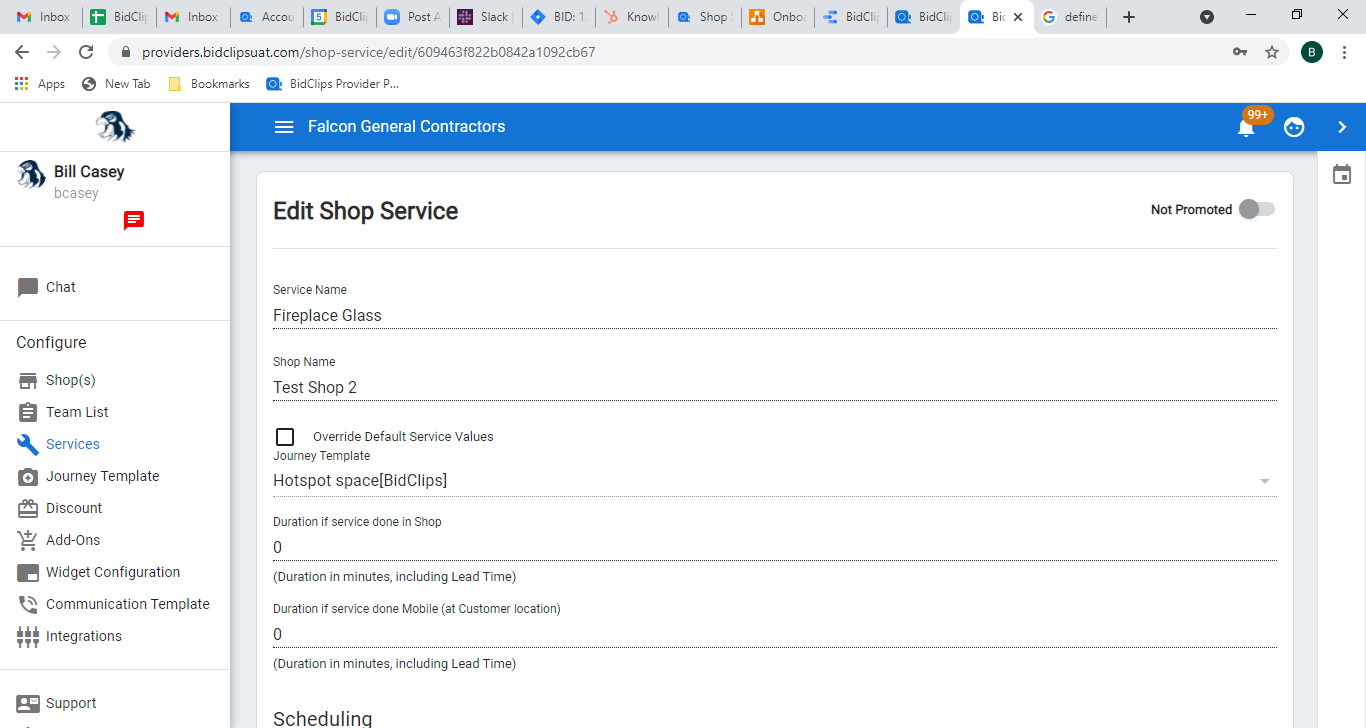
This will redirect you to the "Edit Shop Service" page:
Important!: Please note, you must click the 'SAVE' button at the very bottom of the Edit Shop Service page before leaving the page. Failure to click the 'SAVE' button before navigating away from the Edit Shop Service page will result in lost work.
Promote a Shop Service
With promoted services, the widget will highlight the services you can select without having to type anything into the search bar. This helps your customers visualize some of the services you offer and access your popular offerings more easily.
In the right-hand corner of the screen, click on the toggle to change it from 'Not Promoted' to 'Promoted'

Below is what the promoted services feature will look like on your widget.
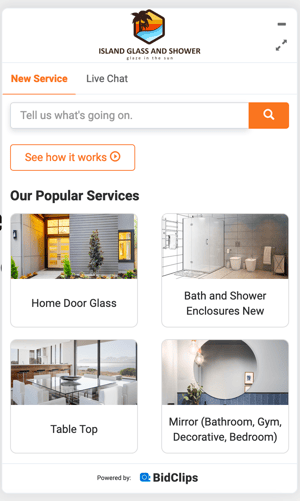
Note: Service photos are currently set by the BidClips team. If you feel the chosen photo does not reflect the service please reach out to our team.
Override Default Service Values Selection
Each service offering available to providers in the BidClips platform has been prebuilt by the BidClips support team. All shop services are associated with one Journey Template and will initially be associated with a Journey Template built by the BidClips support team.
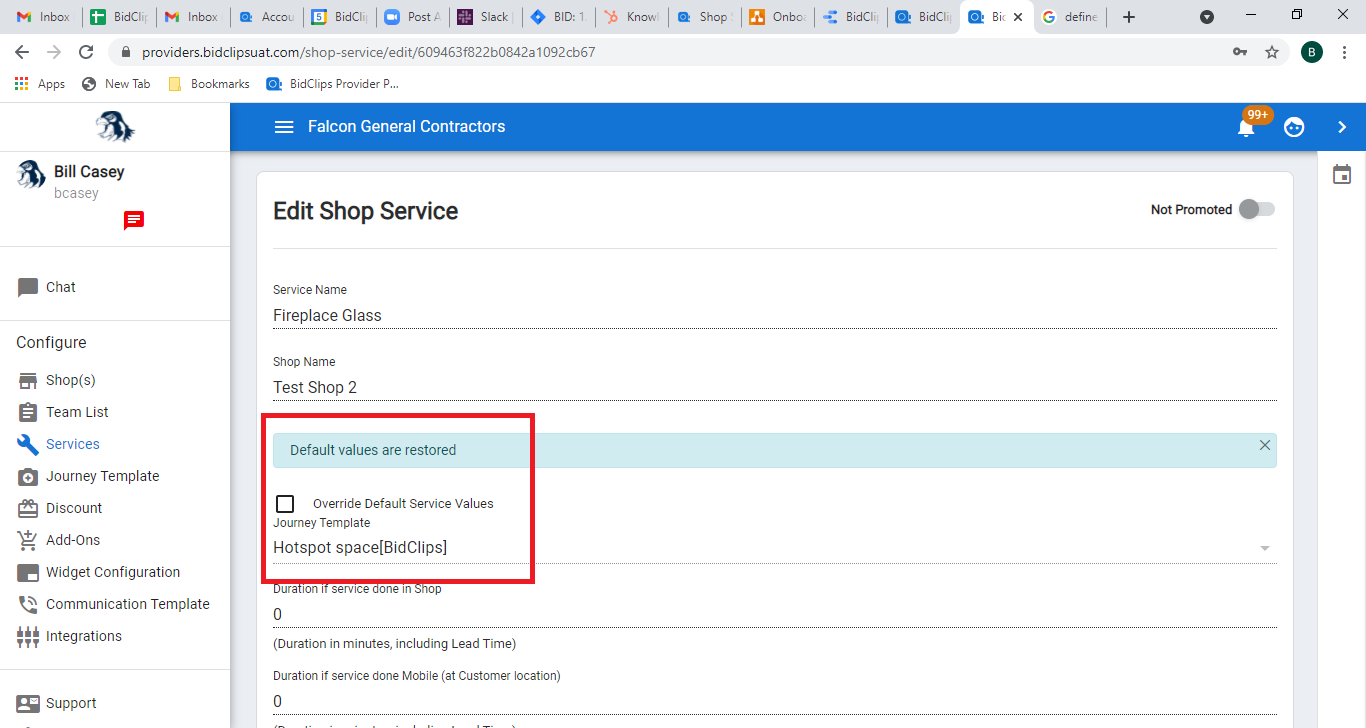
You have the ability to override the default Journey Template template and can do so by selecting the "Override Default Service Values" checkbox. You can either select another existing Journey Template created by the BidClips team or use a Journey Template that you created specifically for your organization.
In order to apply Journey Template override functionality:
- Check the "Override Default Service Values" option
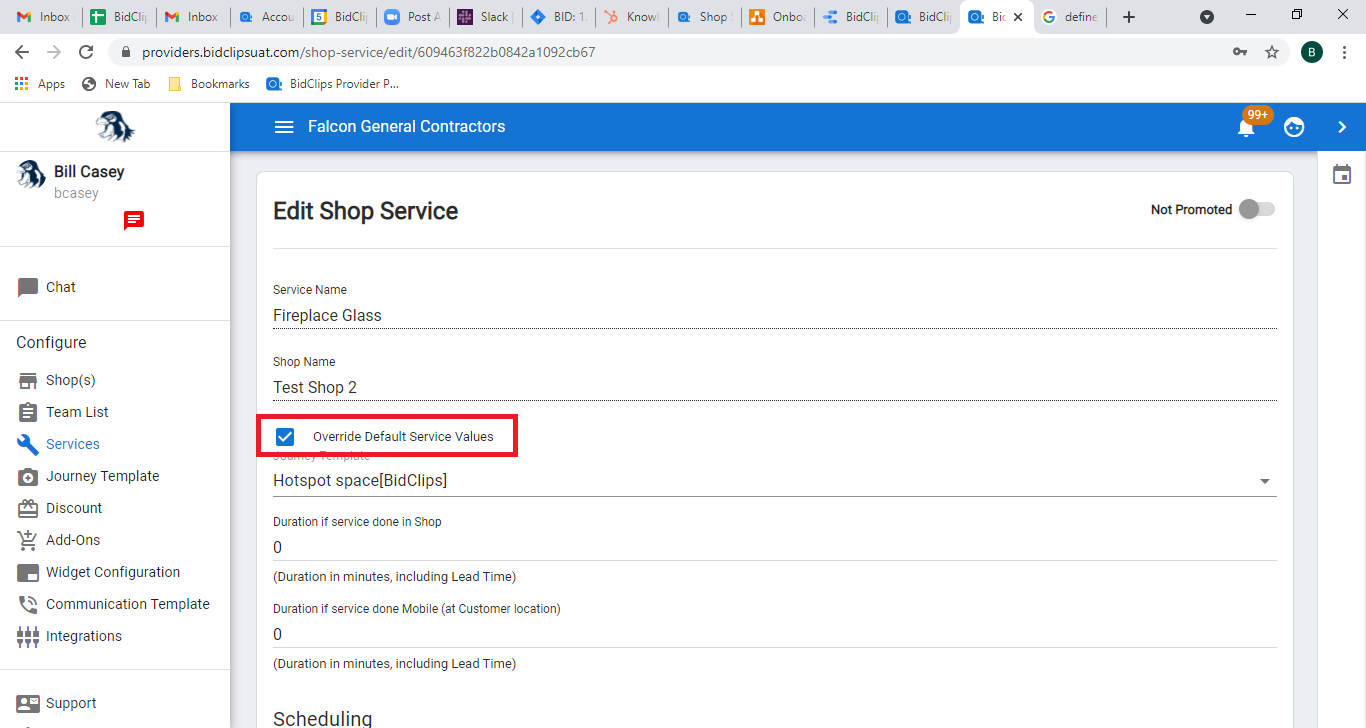
- Click on the Journey Template field line and either select a journey template from the drop-down list or start typing in the name of a journey template and select the desired journey template
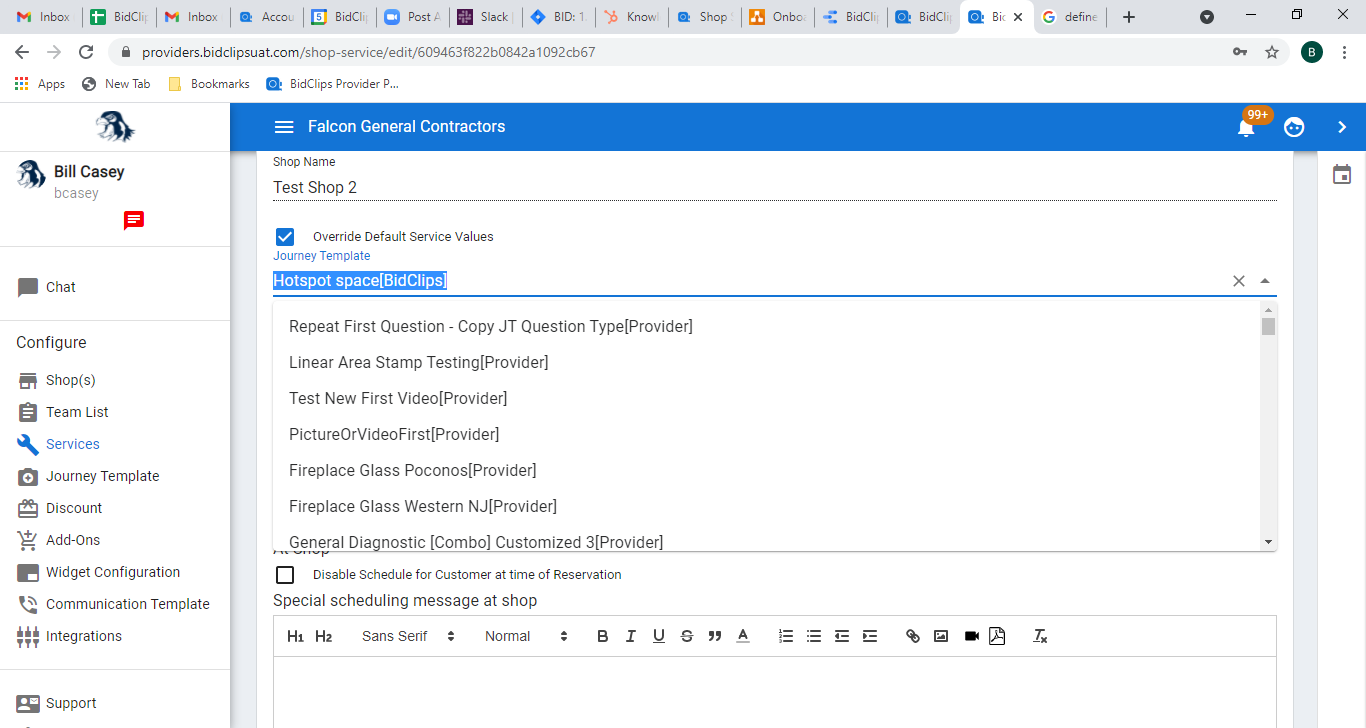
- Shown here is a change from using the "Hotspot Space [BidClips]" journey template to the "PictureOrVideoFirst[Provider]" journey template.
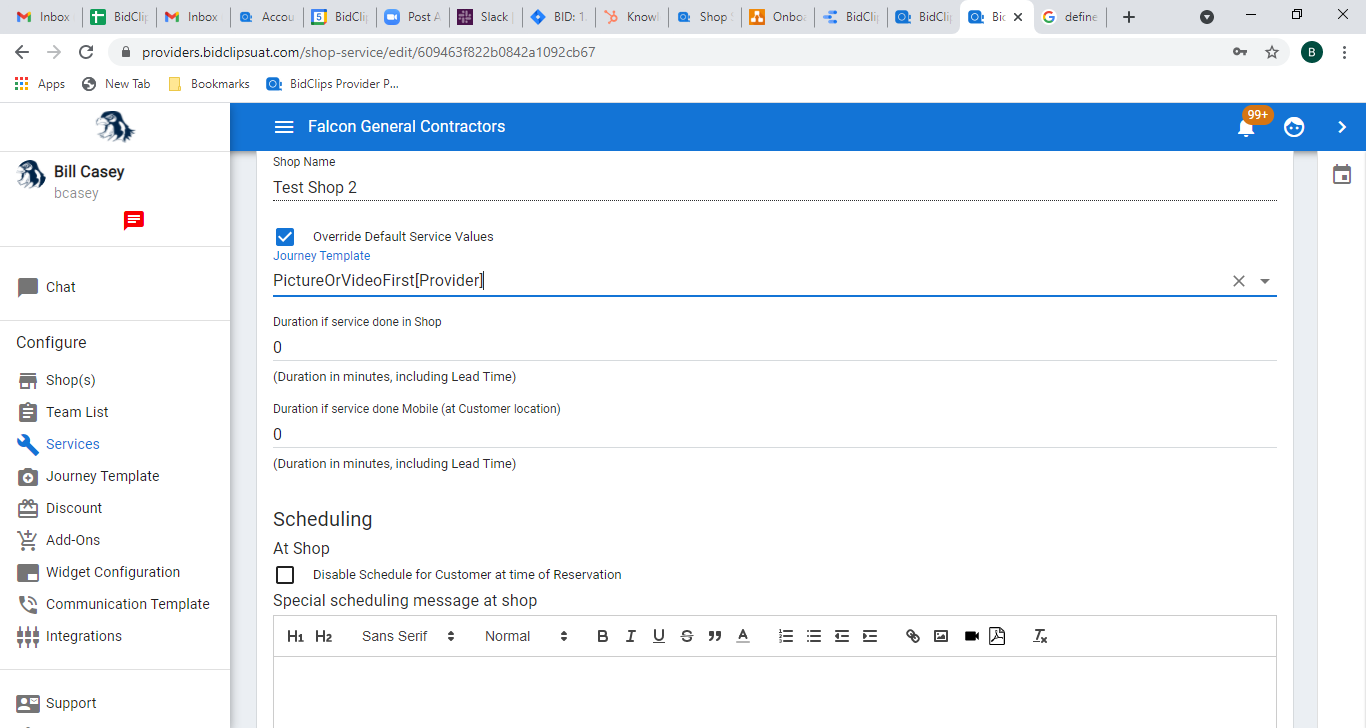
If you want to remove the override and revert to the prebuilt, default journey template; simply deselect the Override Default Service Values checkbox. You will notice that the original journey template values have been restored.
On-site and Customer Location Service Duration
Each service offering available in the BidClips platform has a default on-site (shop) and mobile (customer location) duration value. These duration values, in minutes, are established to ensure the shop is not overbooked.
The shop calendar in BidClips will be updated when a job is booked using the duration of the service.
Here, you are given the opportunity to change these values. Just as you do with overriding a default Journey Template, you must first select the "Change Default Service Values" checkbox.
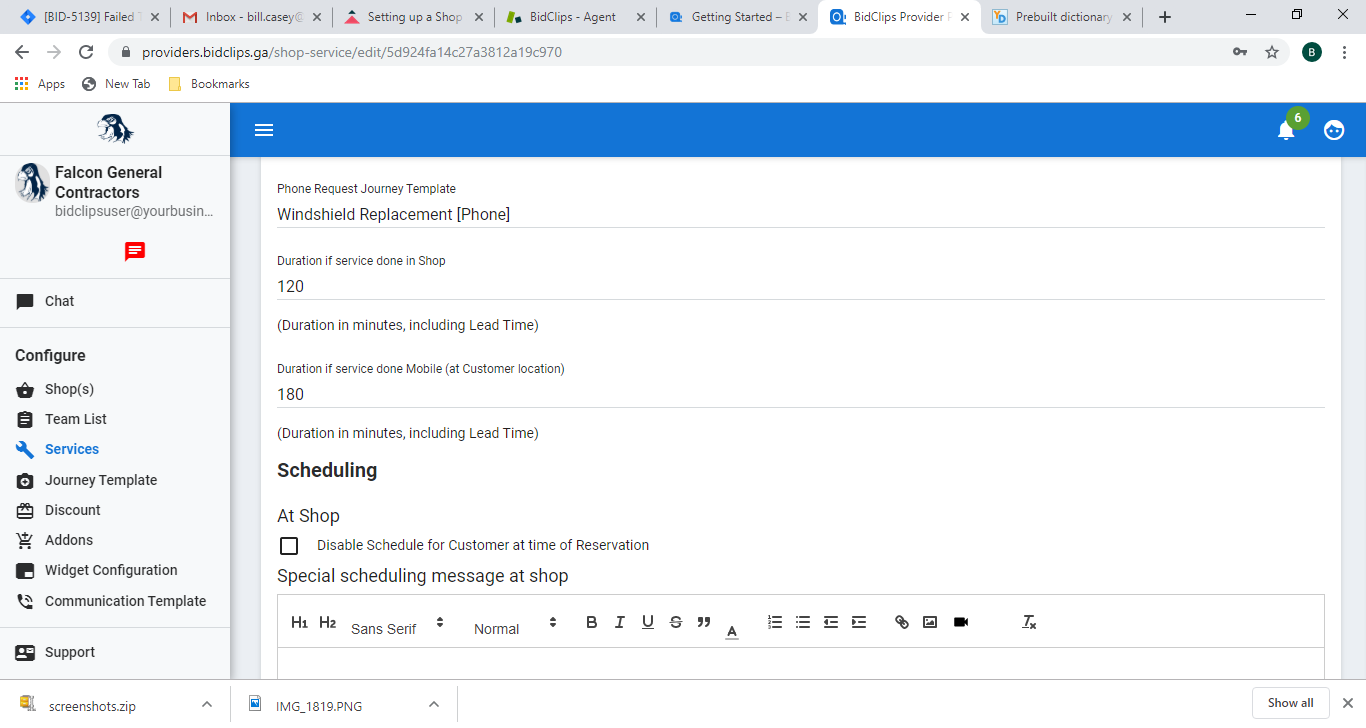
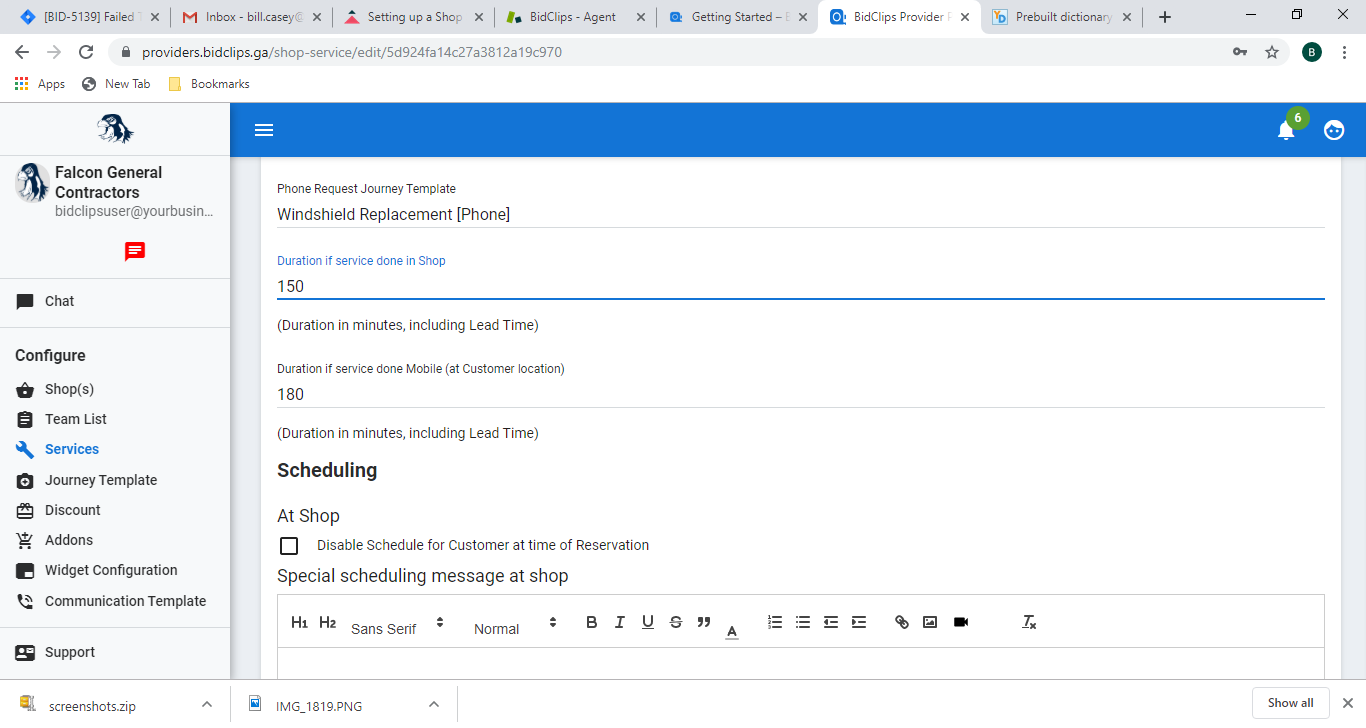
The example shown below demonstrates how you would change a Windshield Replacement service from having a 120-minute on-site service duration to a 150-minute duration.
Existing 120-minute shop duration:
Click on the 'Duration if service is done in Shop' field and enter a value of 150:
On-site and Customer Location Scheduling Options
Disable schedule for the customer at time of reservation for shop
You have the option to enable/disable scheduling at the time of reservation for a particular service.
If disabled, the customer will not be able to schedule service when they accept your bid. Instead, someone from within your organization would have to follow-up with the customer for scheduling purposes.
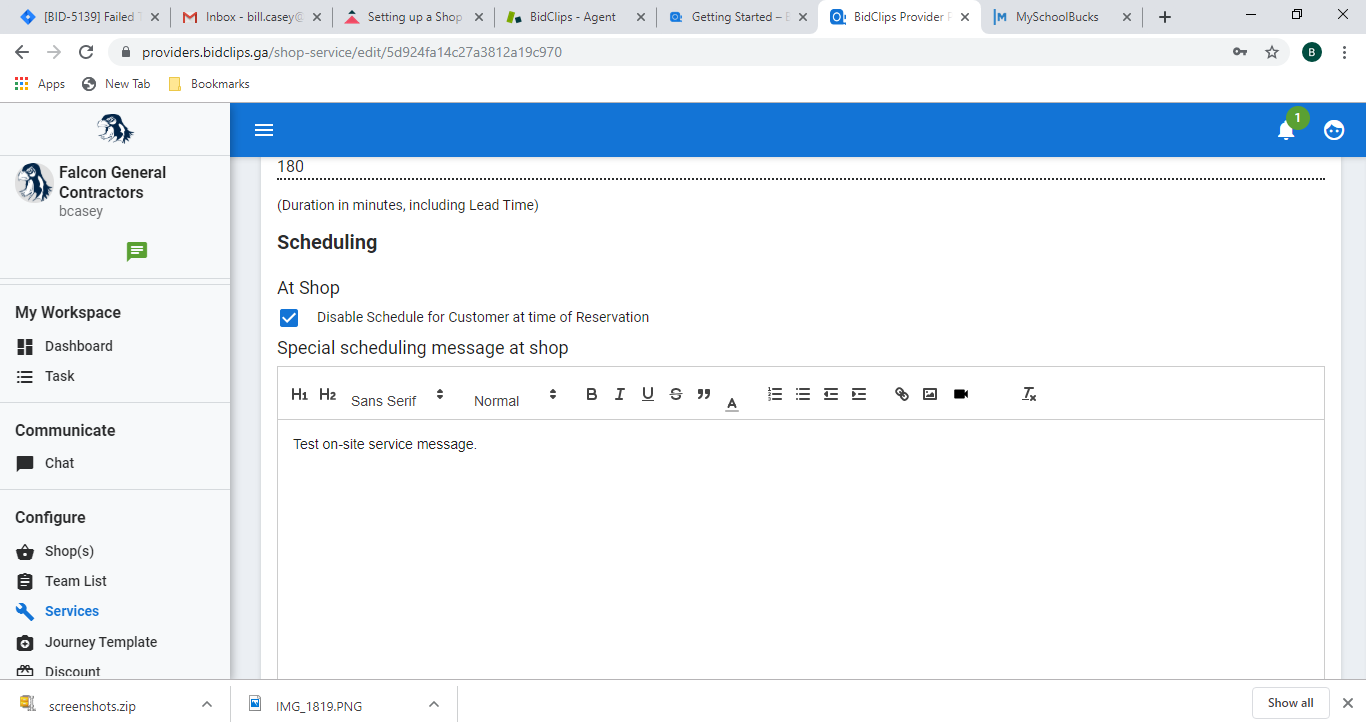
To disable scheduling for the customer at the time of reservation, check the similarly named checkbox.
To enable scheduling for the customer at the time of reservation, leave this box unchecked.
Special shop scheduling message
You have the ability to display messages to your customers in the BidClips widget when they select a service to be completed at the shop. This example shows a simple text-based message. However, you also have the ability to utilize rich-text formatting options and add hyperlinks, images, and videos.
Example of disabling scheduling at time of reservation and adding a shop scheduling message in the Provider Portal:
Example of a shop service message displayed in the BidClips widget without scheduling enabled:
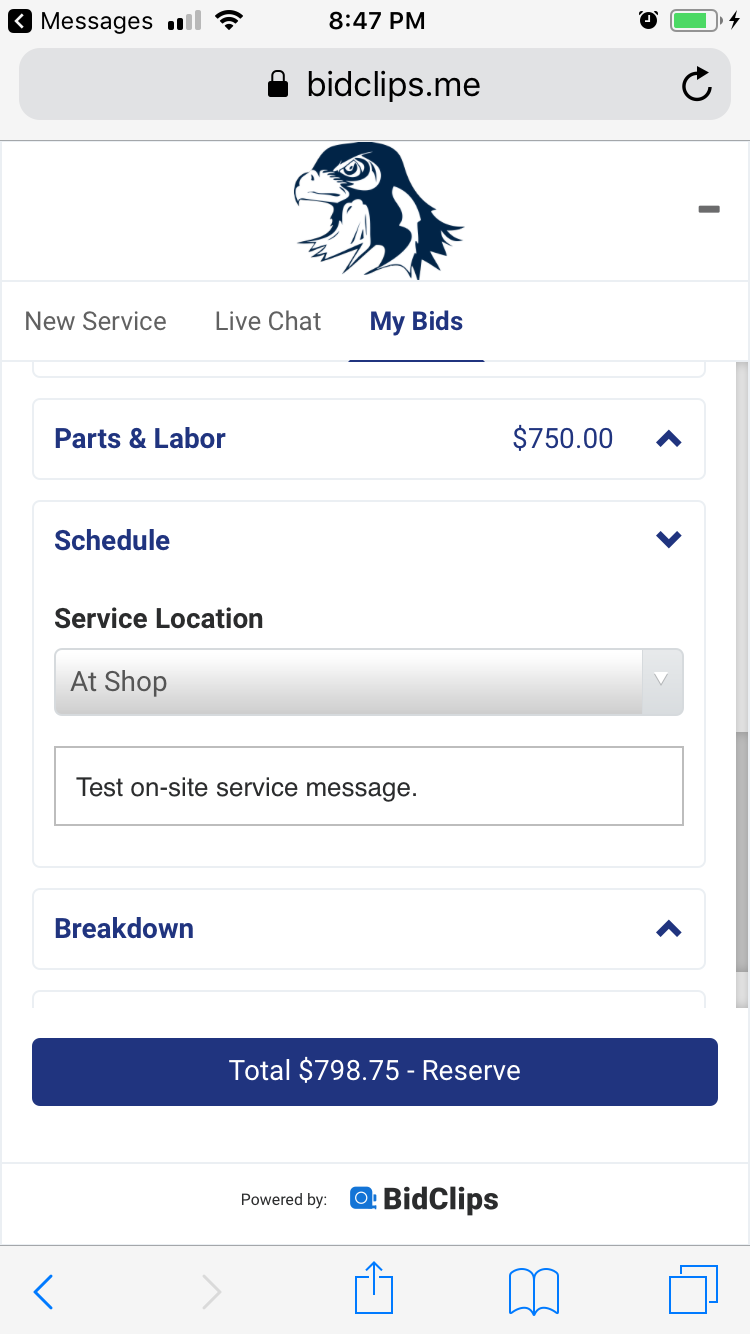
Example of a shop service message displayed in the BidClips widget with scheduling enabled:
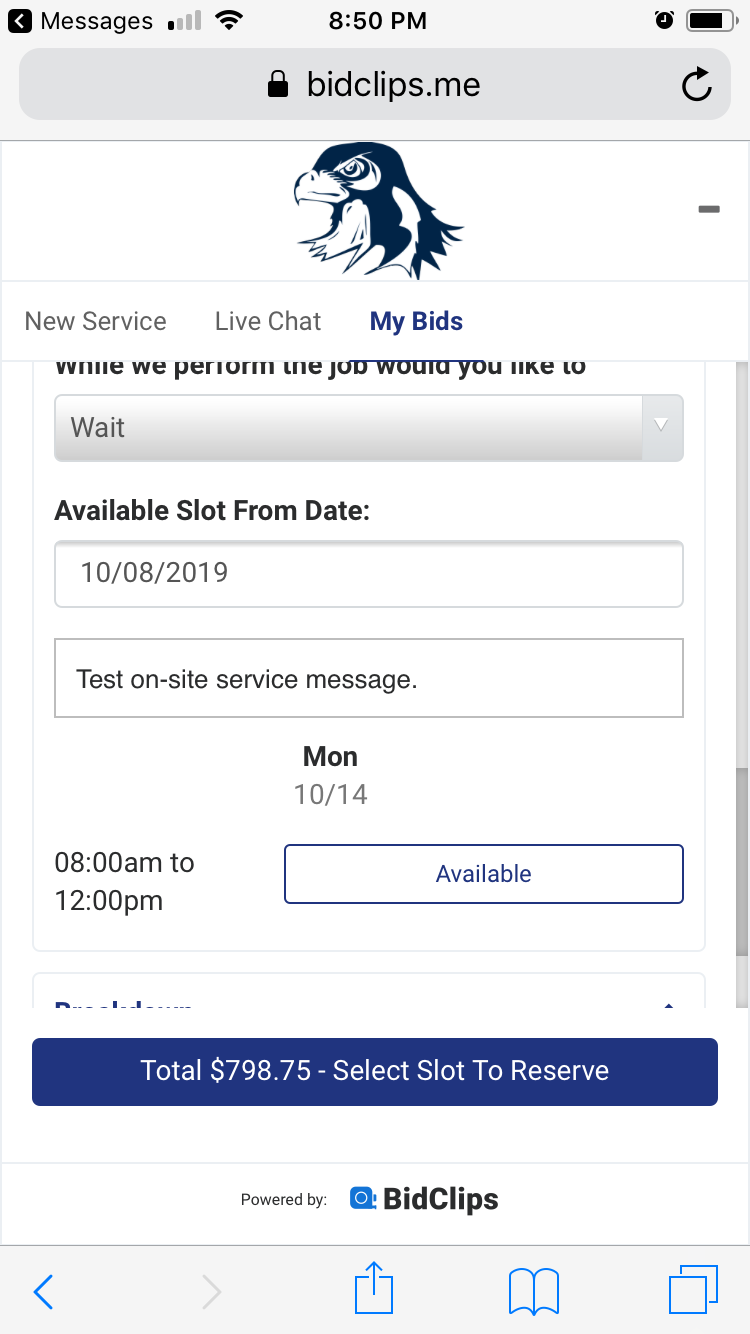
You have the same scheduling and messaging options for services that will be performed at the customer location.
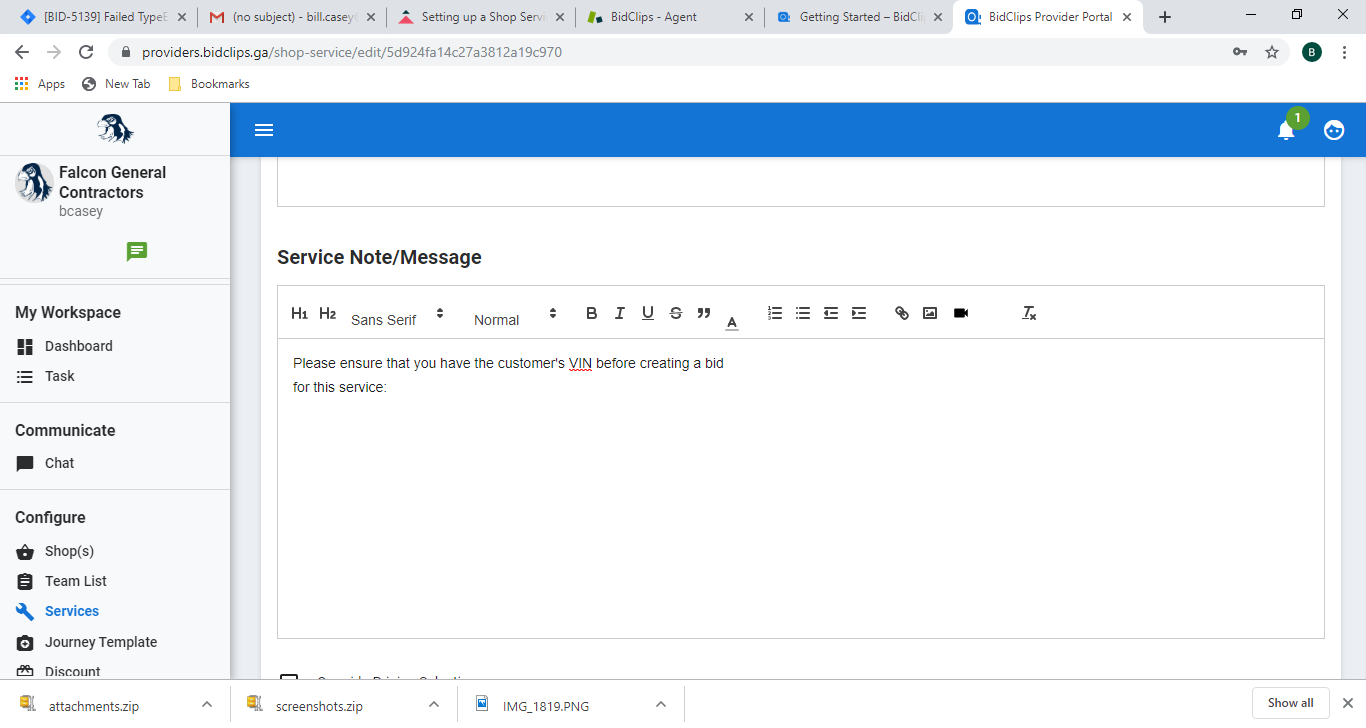
Service Note/Message
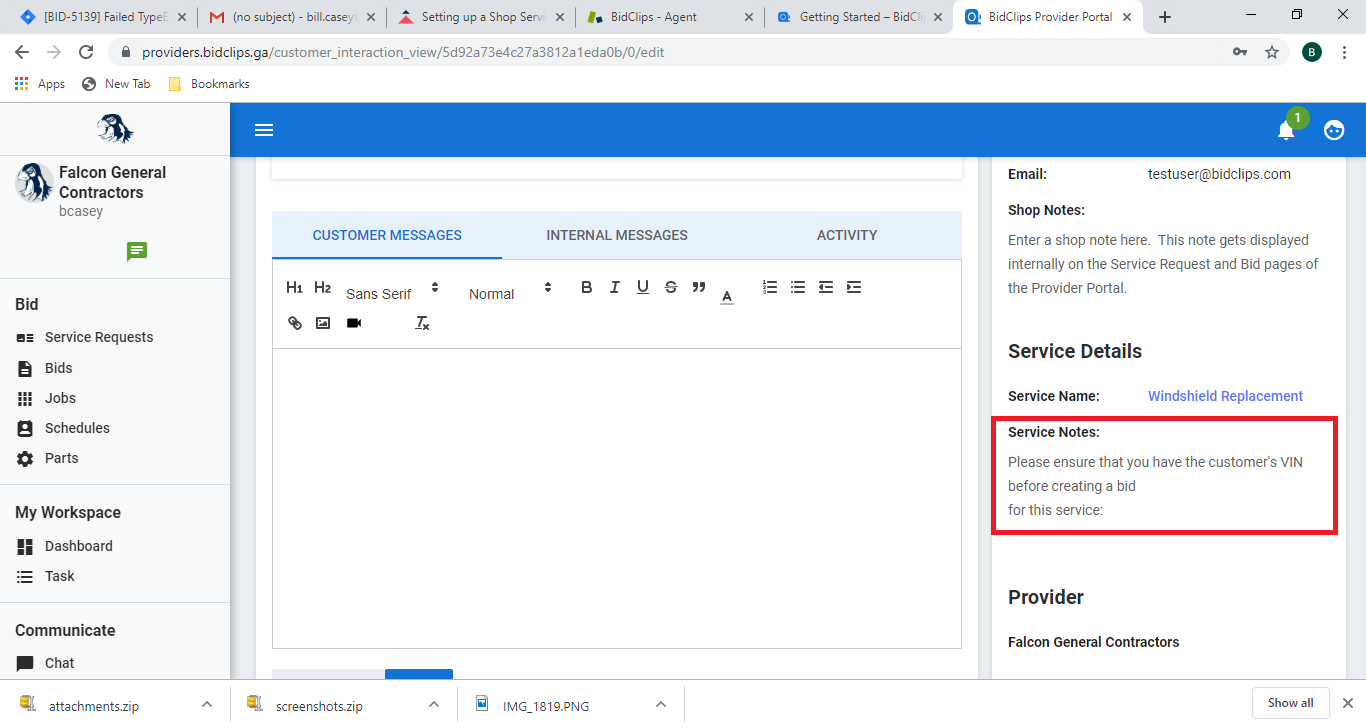
You have the ability to create an internal service note message. This message is displayed to Provider Portal users in the Service Request and Bid pages of the portal, but not displayed to users.
An example of this setting in the 'Edit Shop Services' page and how it appears in the Service Request and Bid pages is shown below.
Example of 'Service Notes' settings as they appear on Service Request and Bid pages:
Override Pricing Selection
All services will inherit the global pricing options that were established at the shop level. You have the ability to override these values at the service level if so desired. Use the override selections described below to override global shop settings for a particular service.
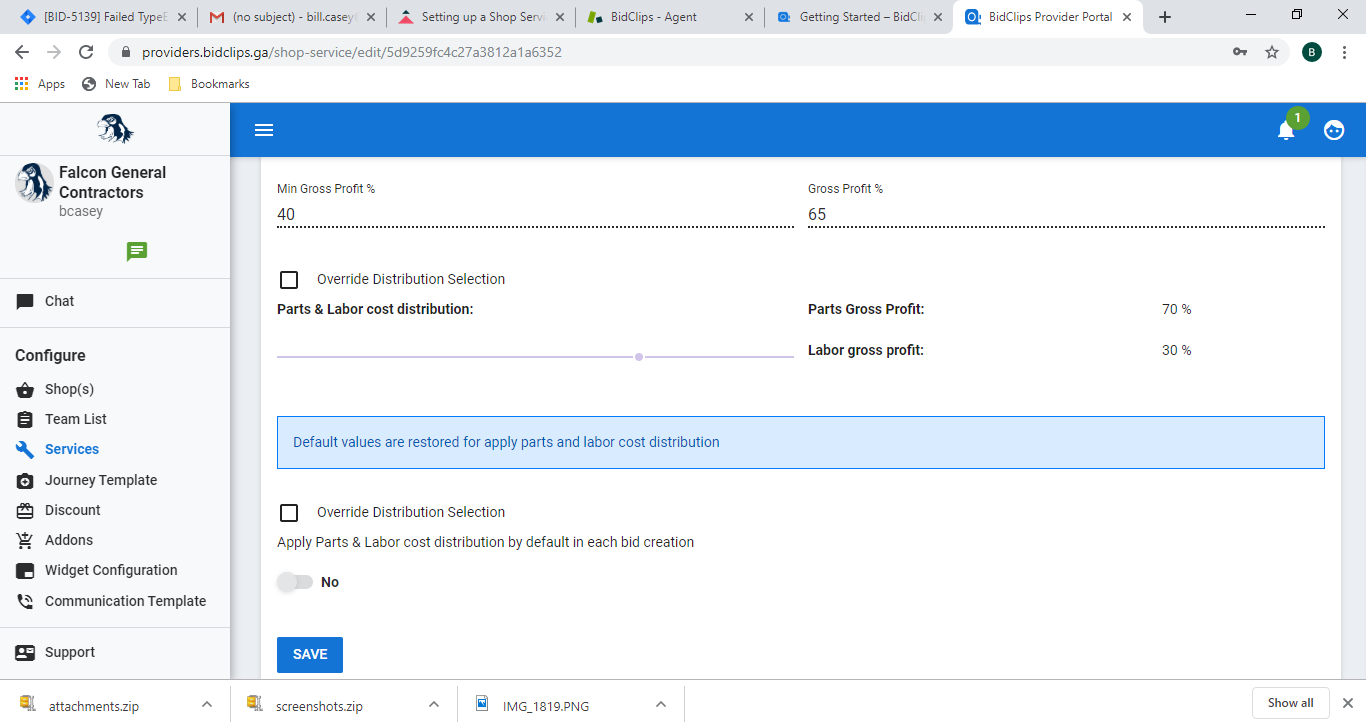
In the example shown below, the default shop settings for minimum gross profit percentage and gross profit percentage are 40% and 65%, respectively.
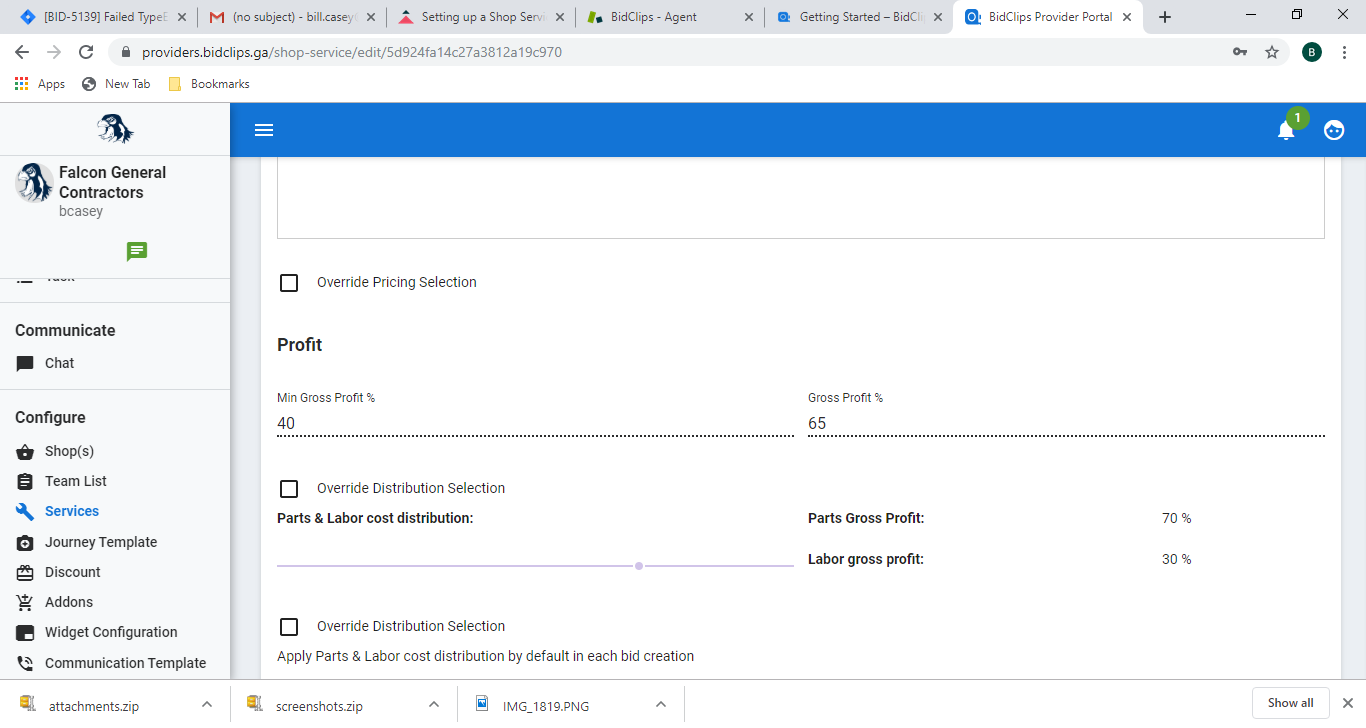
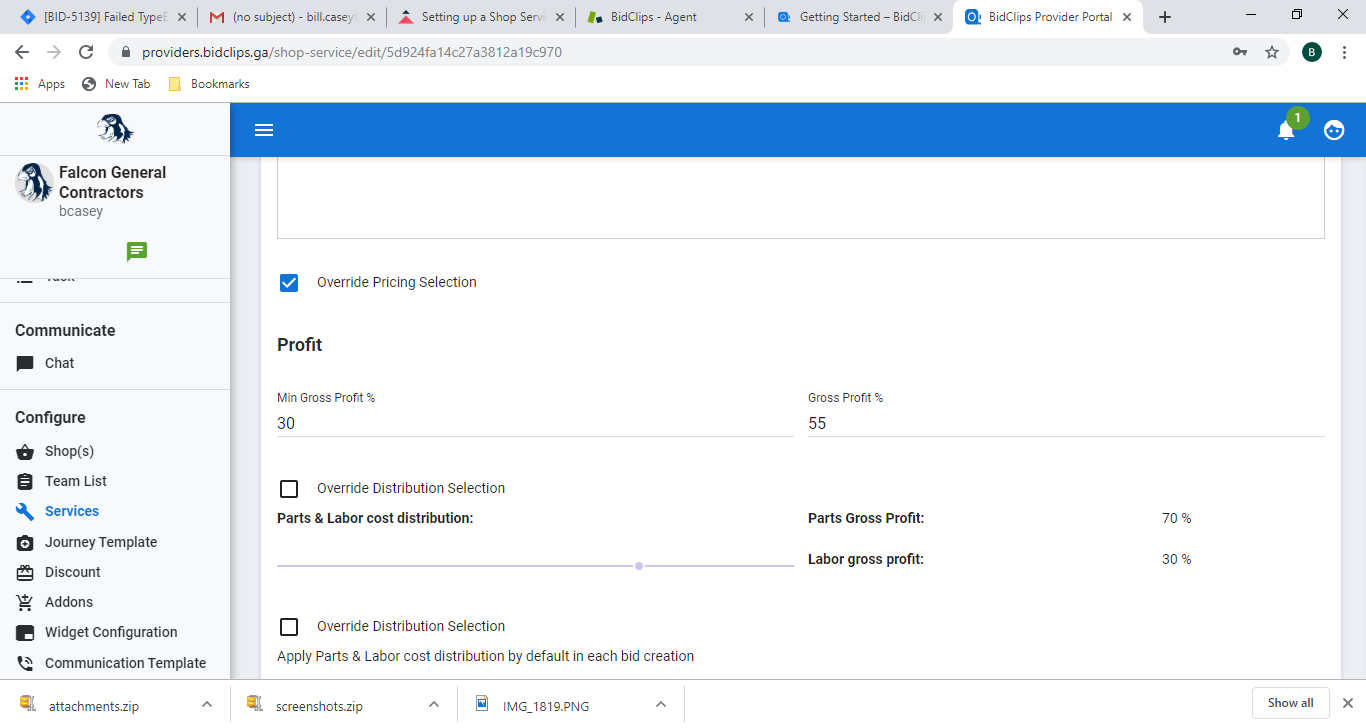
If you want to change these settings for a particular service, you can select the 'Override Pricing Selection' box and enter the new desired values for these settings.
The example shown here changes the minimum gross profit percentage to 30% and the gross profit percentage to 55%:
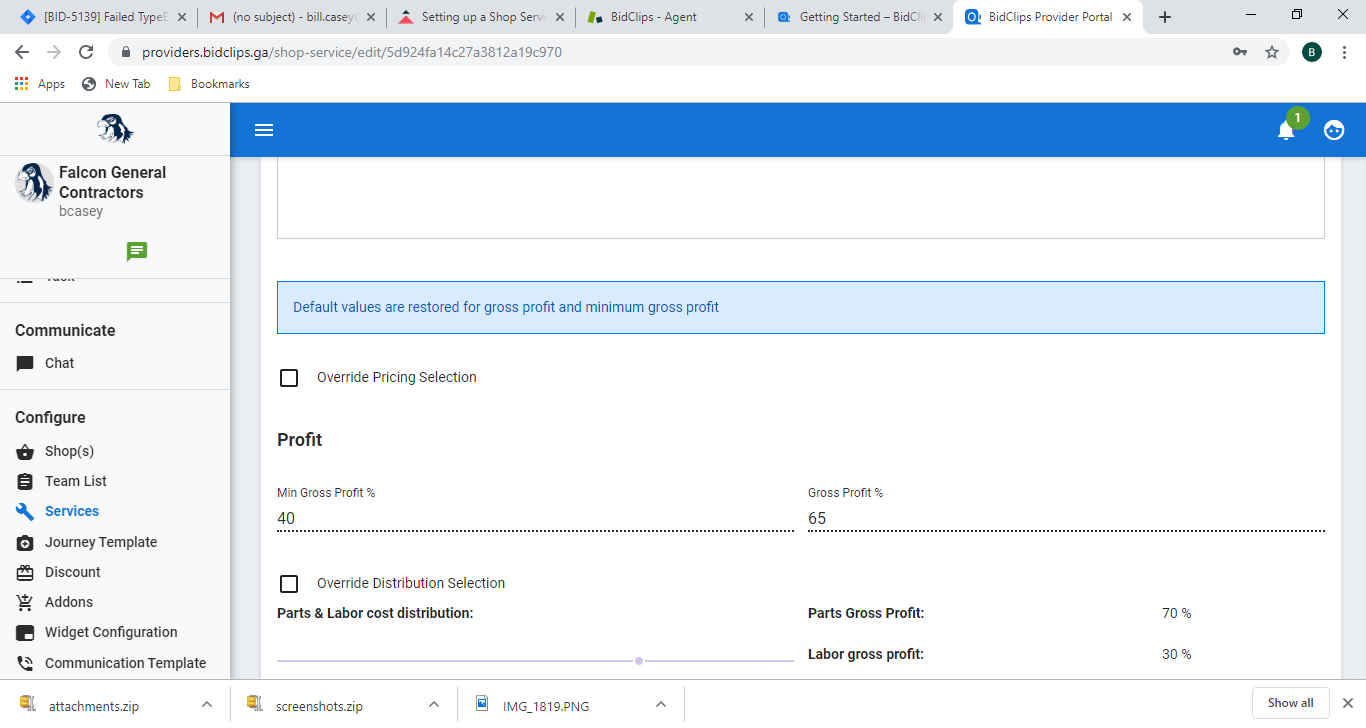
If you want to remove the override and revert back to the global shop settings, simply deselect the 'Override Pricing Selection' checkbox. You will notice that the global shop pricing settings have been restored.
Override Distribution Selection
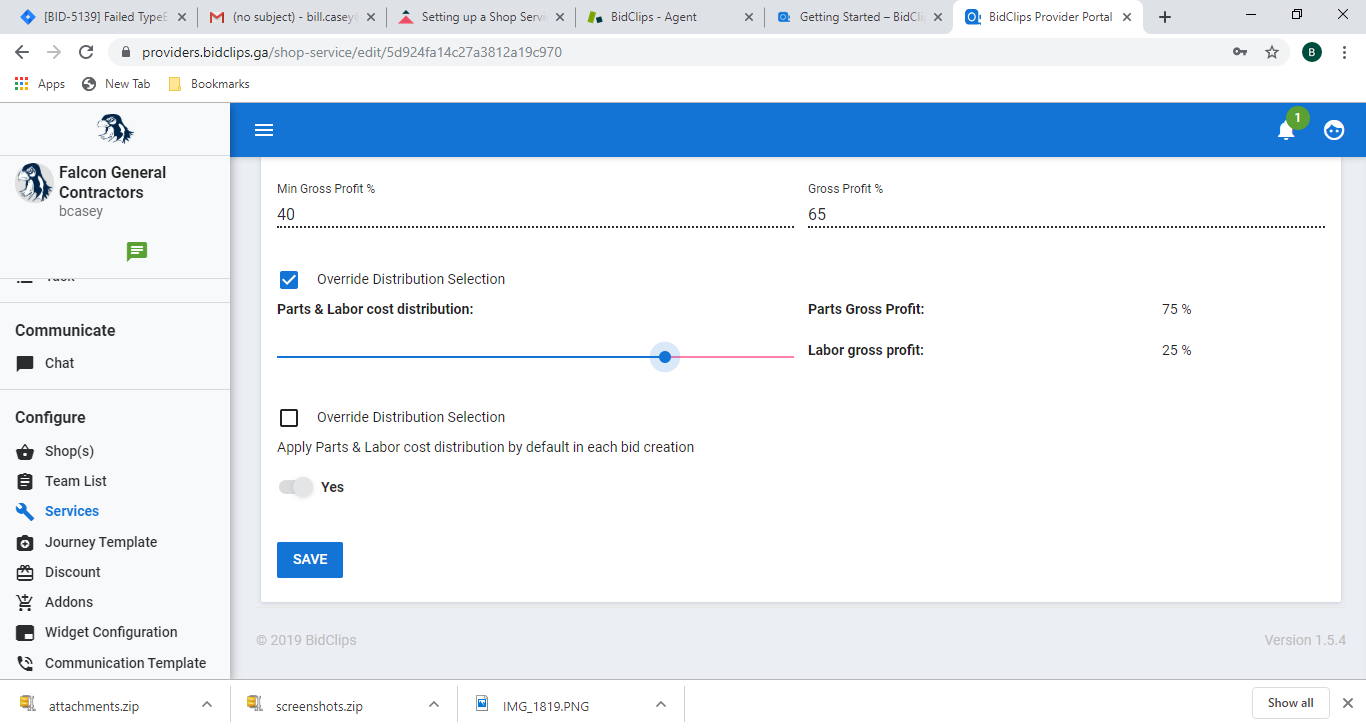
In the example shown below, the default shop settings for parts/labor distribution are set to 70% and 30%, respectively.
If you want to change these settings for a particular service, you can select the 'Override Distribution Selection' box and use the slider bar to set the desired distribution percentages. The example shown here changes the parts/labor distribution percentages to 75% and 25%.
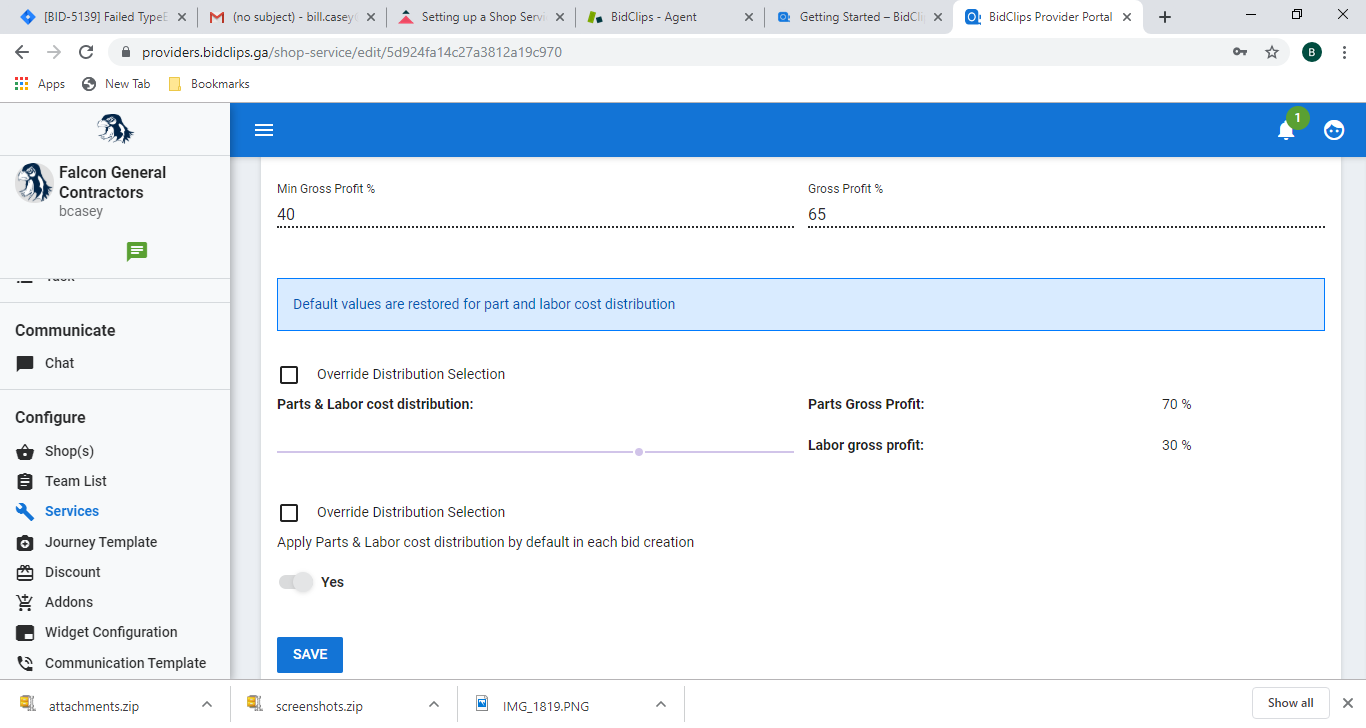
If you want to remove the override and revert to the global shop settings, simply deselect the 'Override Distribution Selection' checkbox. You will notice that the global shop pricing settings have been restored.
Override Distribution Selection Option on All Bids
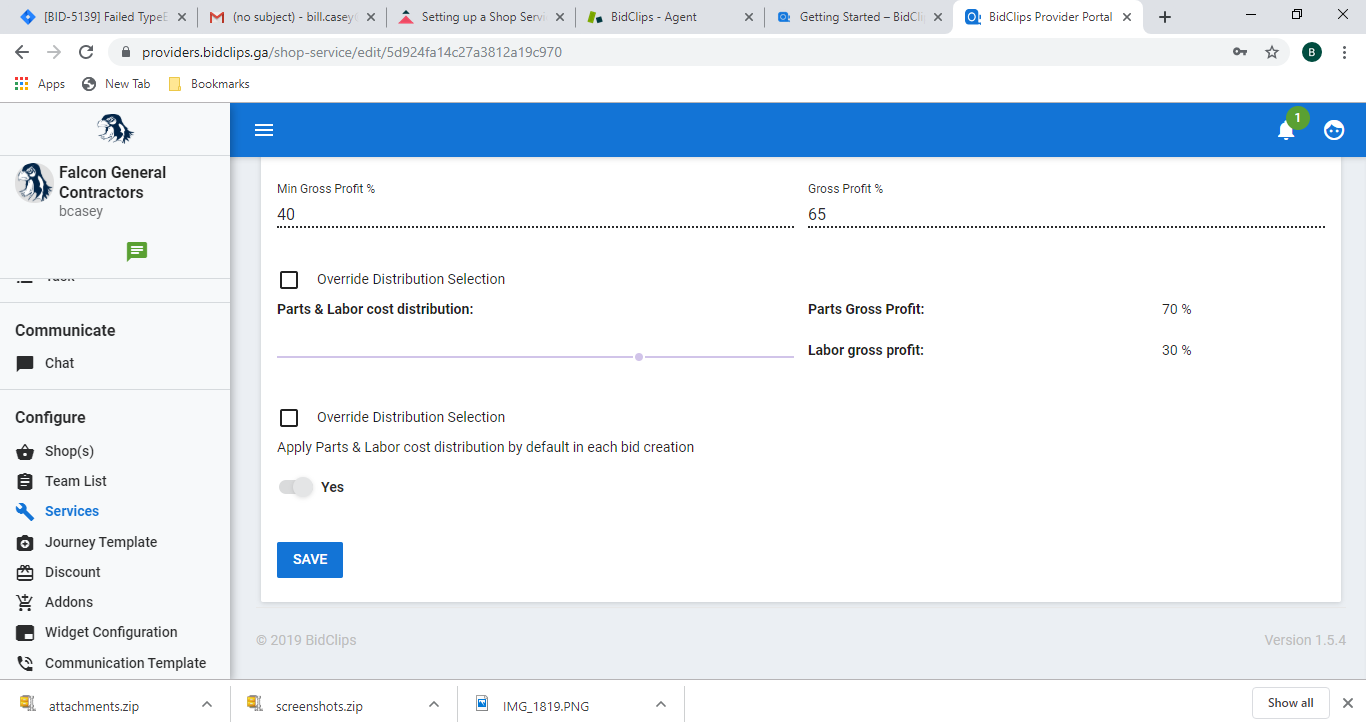
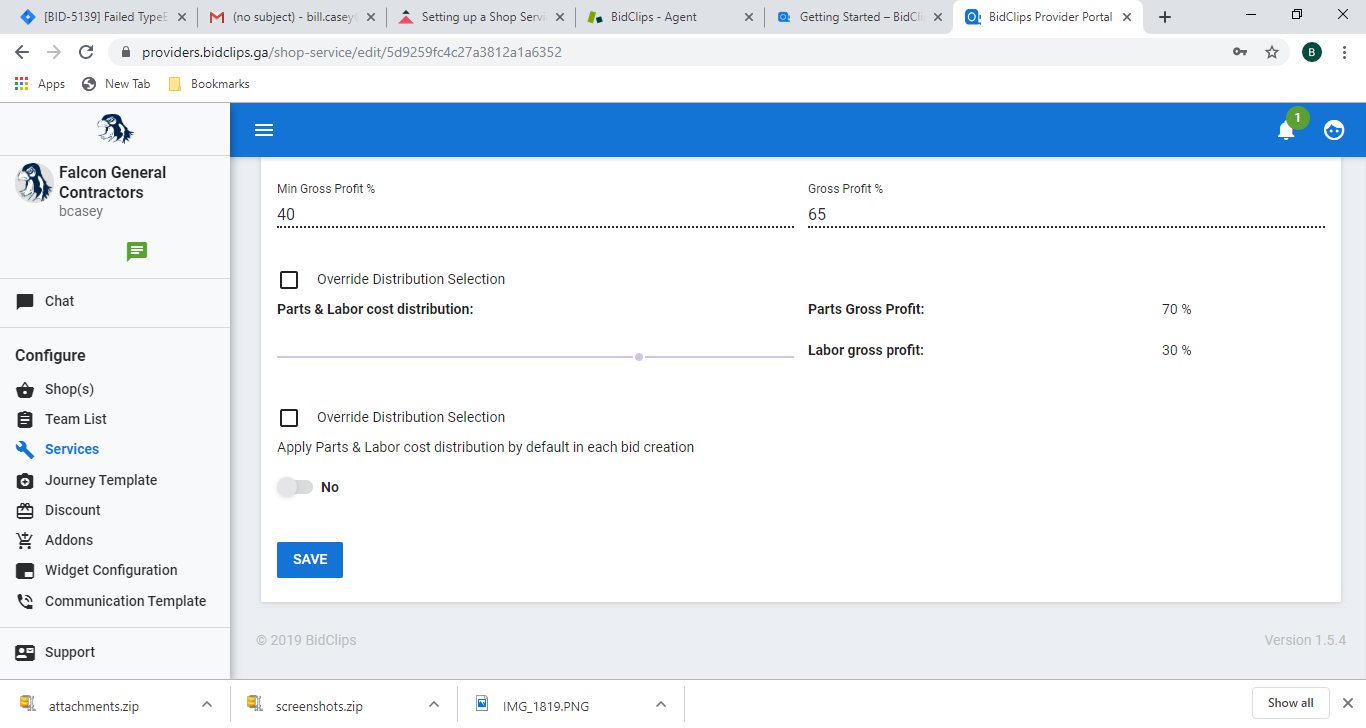
In the example shown below, the default shop settings for 'apply the parts/labor distribution to all bids' is set to 'No'.
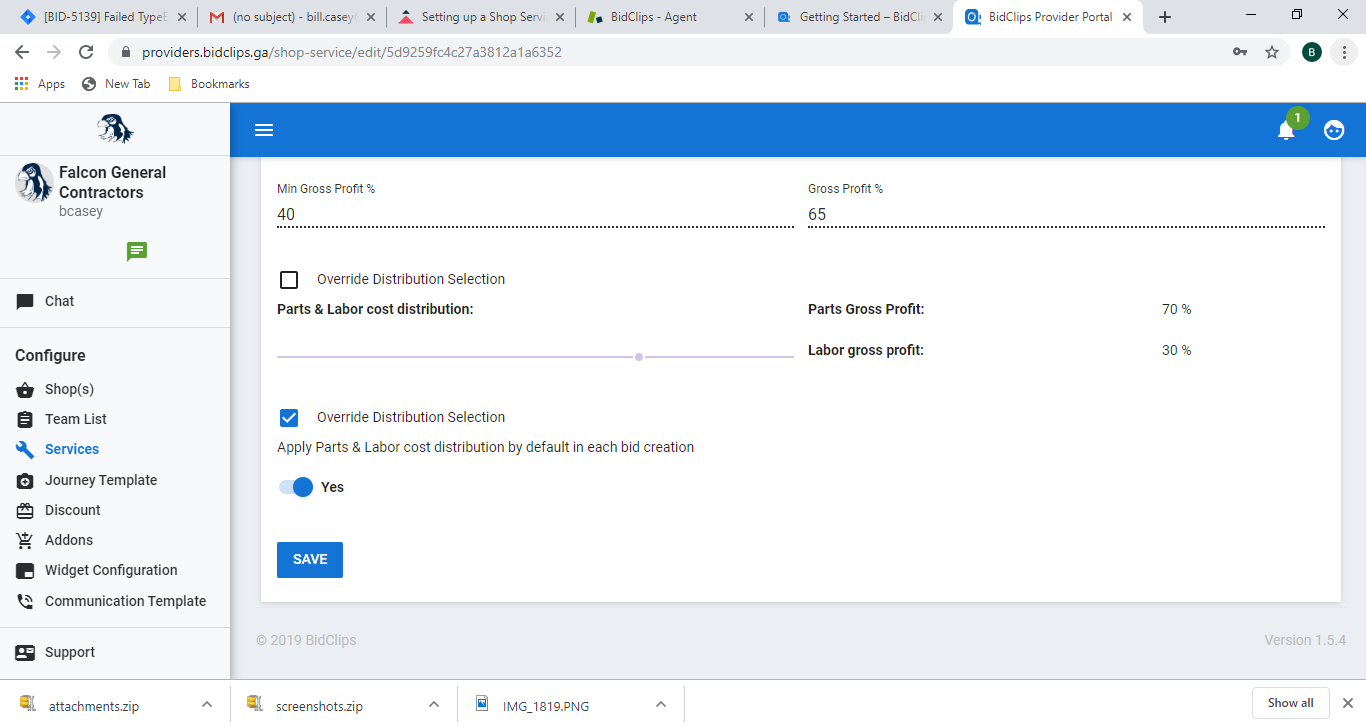
If you want to change these settings for a particular service, you can select the 'Override Distribution Selection' box and use the 'Yes'/'No' checkbox.
The example shown here changes the apply distribution to all bids to "Yes".
If you want to remove the override and revert to the global shop settings, simply deselect the 'Override Distribution Selection' checkbox. You will notice that the global shop pricing settings have been restored.
Overriding Shop Bid Expiration Setting
You can override the global shop settings and apply an expiration for all quotes related to a specific service. At the shop service level you must elect to override the global shop setting and can specify:
- Never
- Expire Bid in Days
In this example, we will show an override to have bids for a specific service offering to expire in 20 days. With this shop service setting all of your bids, for this specific offering, will expire in 20 days unless overridden at the bid template or bid at run time.

Example of how a bid expiration, if applied, would appear to the customer in the BidClips widget:

Activating/Inactivating a Shop Service
At the very bottom of the Edit Shop Service page, you will see an 'Active/Inactive' toggle switch. You will notice that the service is currently shown as 'Active'.

Change the value to 'Inactive' and click the 'SAVE' button.
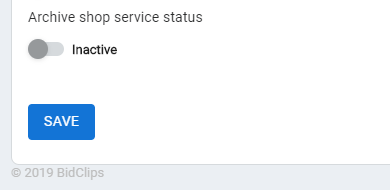
You will notice a successful update message in the upper right corner of the screen upon saving.
In order to see that the service has been archived properly, you can click the 'Shop(s)' link in the 'Configure' section of the navigation menu on the left side of the screen.
This will bring you to the Shop Information page where you can pick the shop where the service was just archived; in this example, it would be the Test Shop.
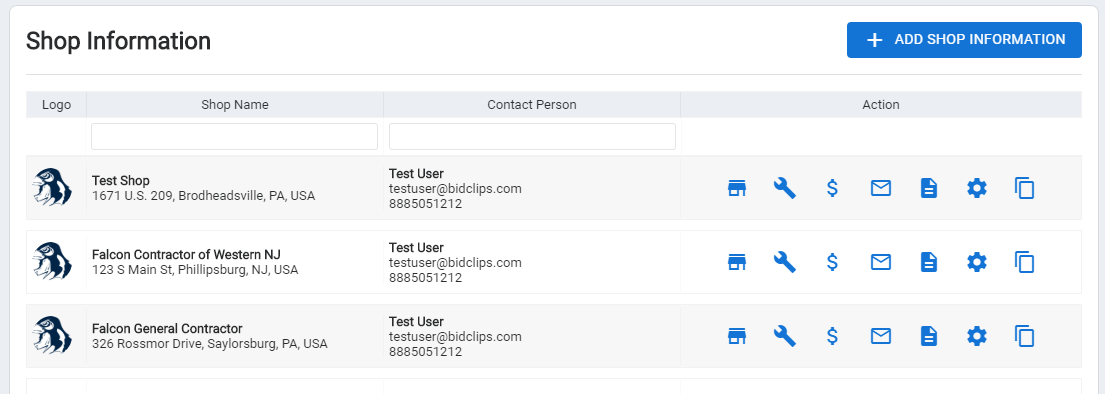
Click on the 'Services' ( ) icon to see a list of active and inactive services for this shop. You will notice that the service has been marked 'Inactive'.

You will no longer be able to create service requests for this shop in your provider portal. Additionally, the service offering will not be available to a customer using the BidClips widget. You can activate this service again at any point, by repeating the steps above and changing the toggle switch value from 'Inactive' back to 'Active'.
Save Your Settings
Important!: Please remember, you must click the 'SAVE' button at the very bottom of the page before leaving. Failure to click the 'SAVE' button before navigating away from the page will result in lost work.
Once you click 'SAVE' you should see the Shop Service Updated message appear in the upper right-hand corner of your screen.
You have now successfully saved all desired service settings in your Provider Portal.
