Learn how to create a new bid (quote) for a customer service request in the BidClips platform.
Once you have gathered all of the information from the customer that is necessary to generate an accurate quote for the service requested; you are now ready to create a bid in BidClips.
The bid creation process can be started in two ways: as the last step while creating a new Service Request or navigating to an existing service request and selecting the 'Create Bid' option.
Creating a Bid during Service Request creation
Once you have concluded answering all of the journey template questions for which you have answers, you will use the Service Request Actions button at the bottom of the page.
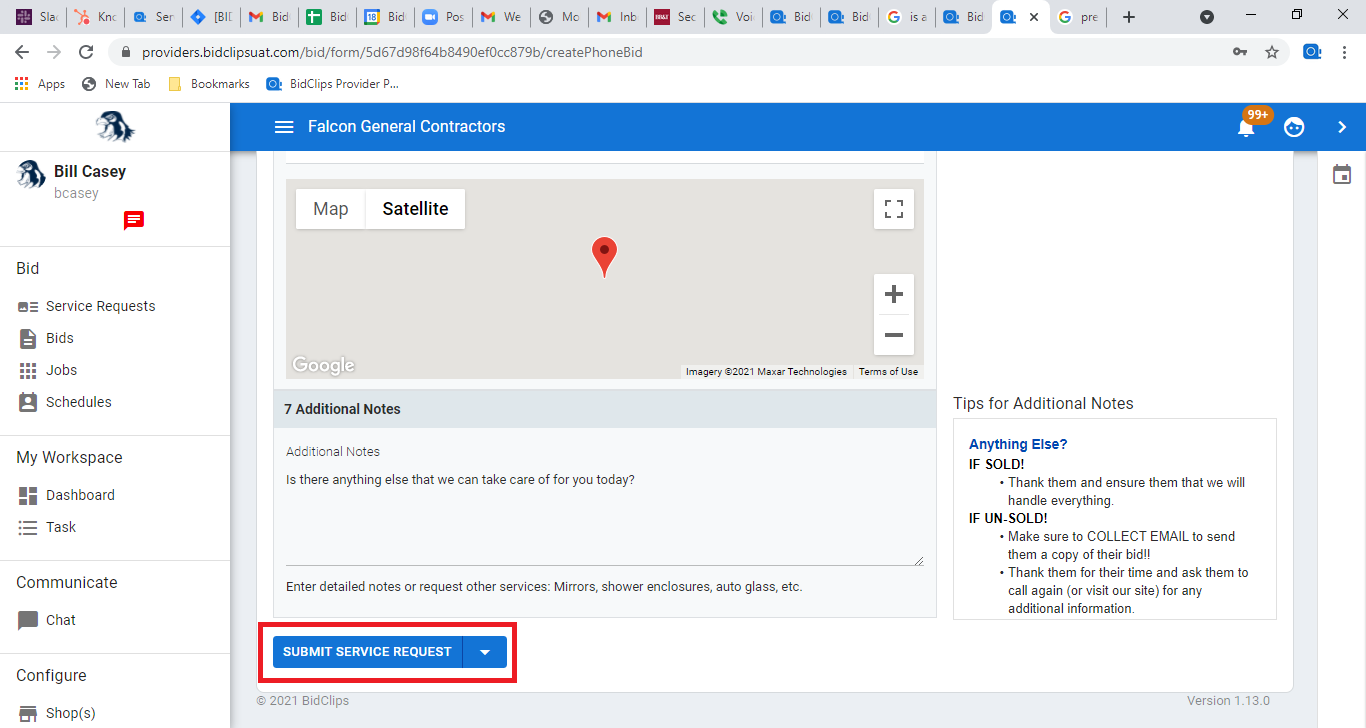
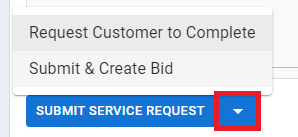
Click the down arrow next to the default option and select the Submit & Create Bid option from the list.
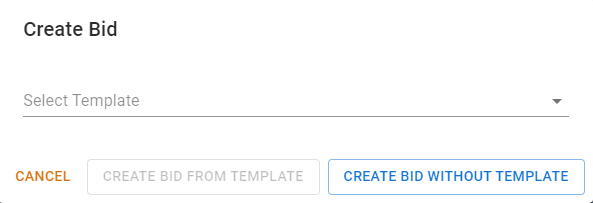
Once you have selected the 'Submit & Create Bid' option, you will see the following 'Create Bid' panel.
Creating a Bid from an existing Service Request
The Service Requests page will be the page you are directed to when you first log into the BidClips Provider Portal. If you need to navigate to the Service Requests page from the Provider Portal, you can do so by clicking on the 'Service Requests' link from the 'Bid' section of the navigation bar on the left side of the screen.
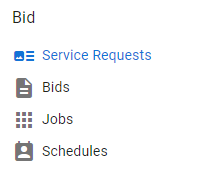
Navigating to the Service Requests page will show you a list of all existing requests.
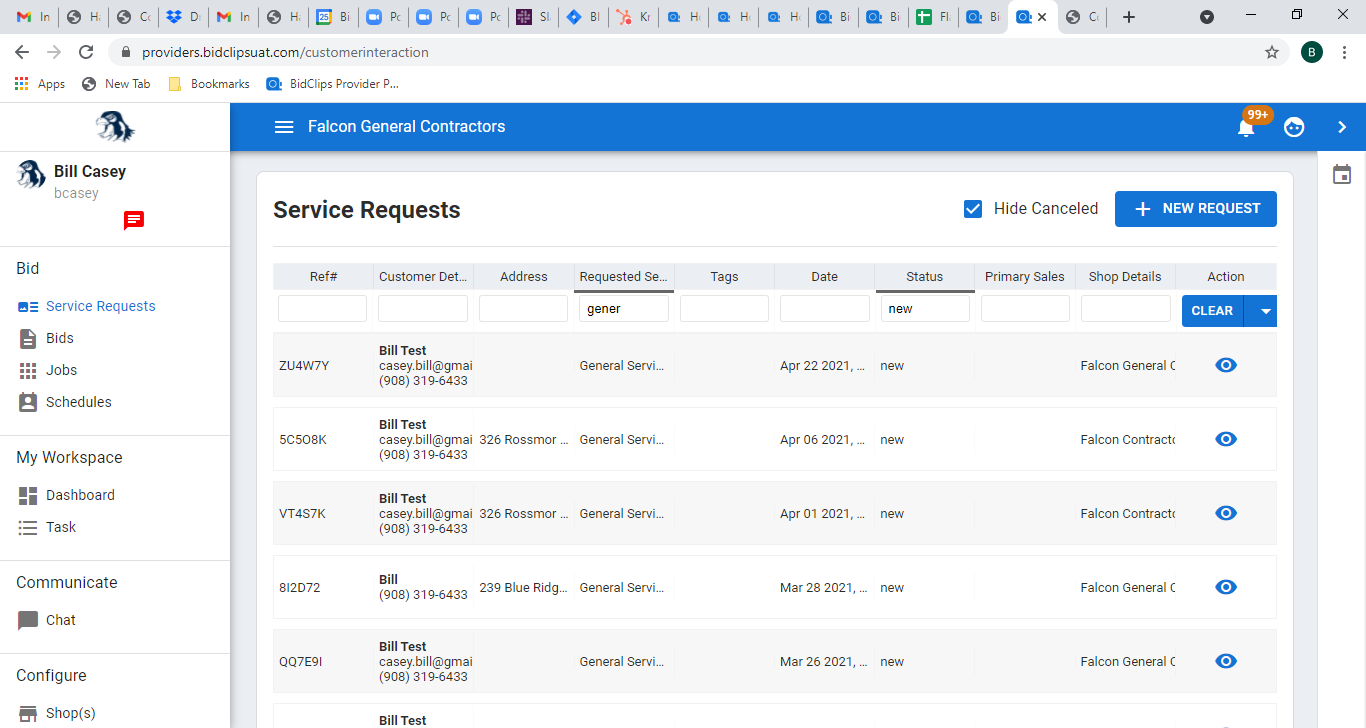
In order to create a bid, you will first have to locate the correct service request. For more information on how to efficiently navigate the Service Requests page click here.
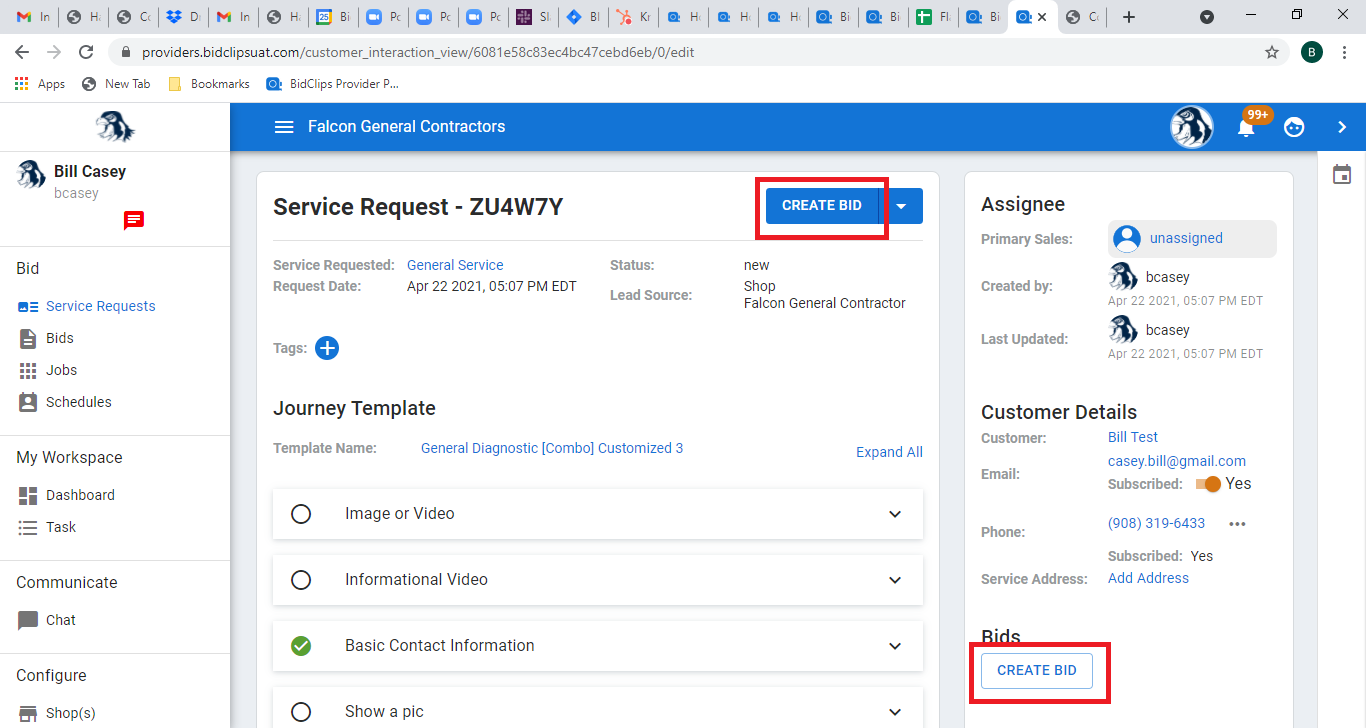
Once you have located the service request you for which you want to bid, either click on the grid row or the 'view' You will be redirected to the Service Request details page. Click either of the 'CREATE BID' buttons located on the service request details page, as shown in the screen shot below, to start the process of creating a bid.
Creating the Bid
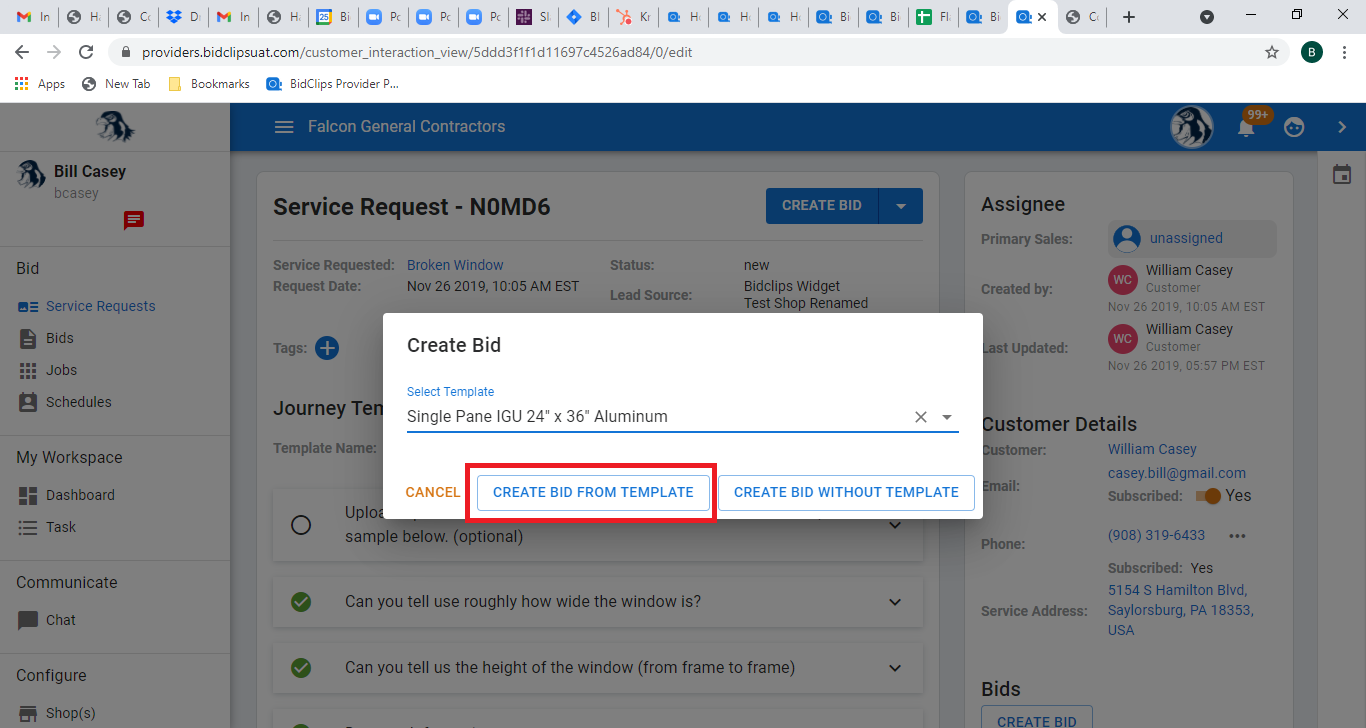
Regardless of whether the bid creation process was initiated as the last step of creating a new service request or navigating to an already existing service request and selecting the 'CREATE BID' option; you will now see the 'Create Bid' panel appear:

You can create a new bid from an existing, pre-built bid template or without the help of a bid template. Both of those methods are described below using a 'Broken Window' service offering as an example.
Creating a Bid from a Bid Template
If you click in the 'Select Template' line or select the drop-down arrow you will see a list of all existing Bid Templates that have been associated with a given service type. You can either select the desired template from the drop-down list or start typing a template name in the field to search for matches.
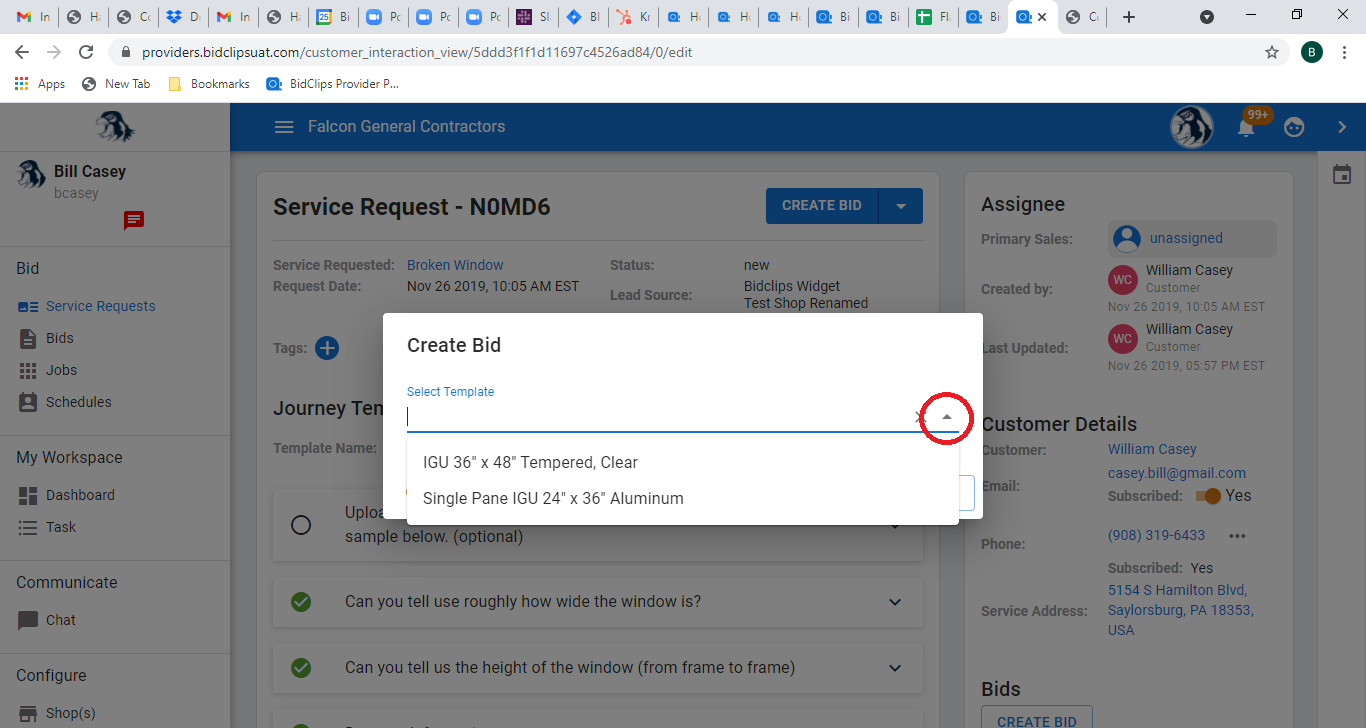
Once you see the desired bid template, click on it. The example shown below will use the 'Single Pane IGU 24" x 36" Aluminum' template that has already been set up for the Broken Window service for this shop. After you have selected the desired bid template, click on the 'CREATE BID FROM TEMPLATE' button.
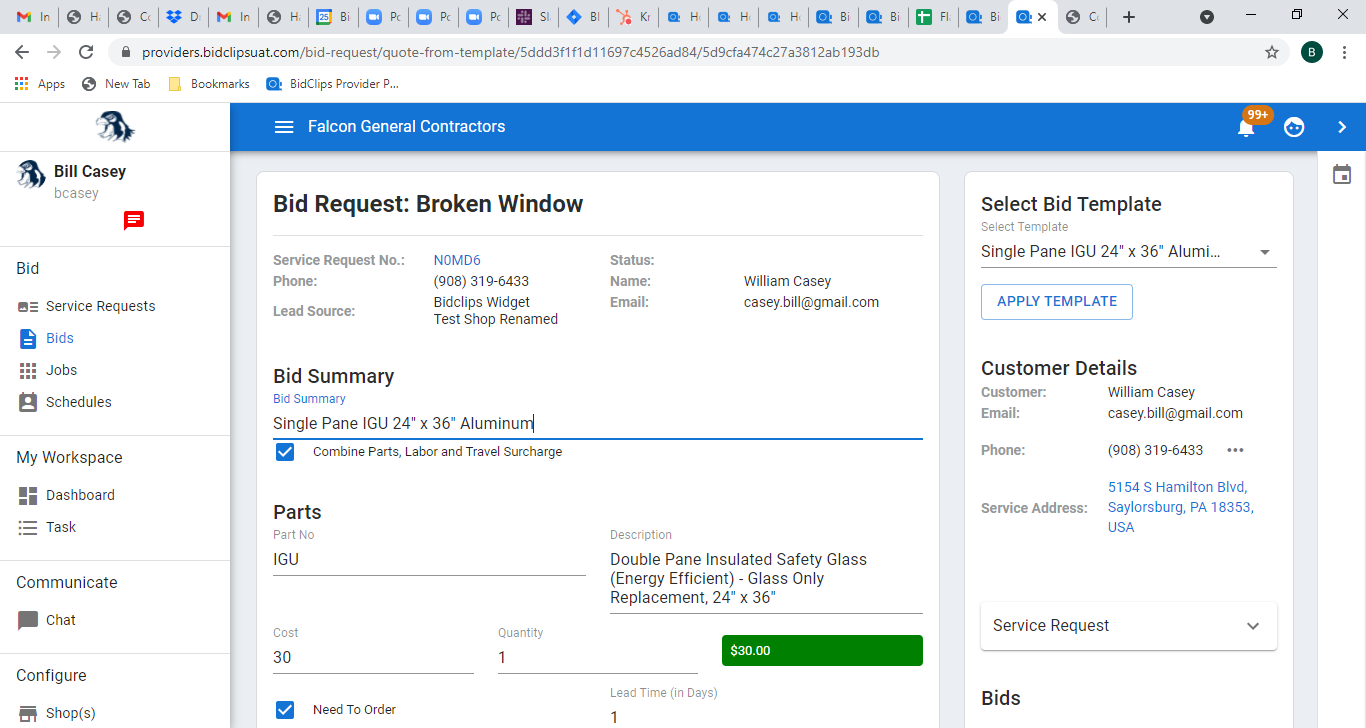
You will be redirected to the bid details page and will notice all of the information from the Bid Template has been imported into the bid:
- Bid summary
- Combine Parts, Labor, and Travel Surcharge (when this checkbox is selected, a customer will see only a total price and tax not a breakout of parts and labor)
- Parts
- Labor Items
- Pricing Options (profit margin and parts/labor cost distribution options are derived from global shop settings or individual service offering overrides)
- Discounts
- Service locations (shop/mobile)
- Add-ons
- Bid Message to Customer
- Down Payment Options
You are now in a position, pending a final review of the bid details, to send this bid to the customer. You are permitted to change any of the bid details that have been pre-populated if you choose to do so. If you want to read more about changing any aspect of the bid, please read the section on Creating a Bid Without a template below as that describes each component of the bid in detail. If you have reviewed the bid and are satisfied it is complete and accurate you now have three options at the bottom of the 'Bid Request' page:
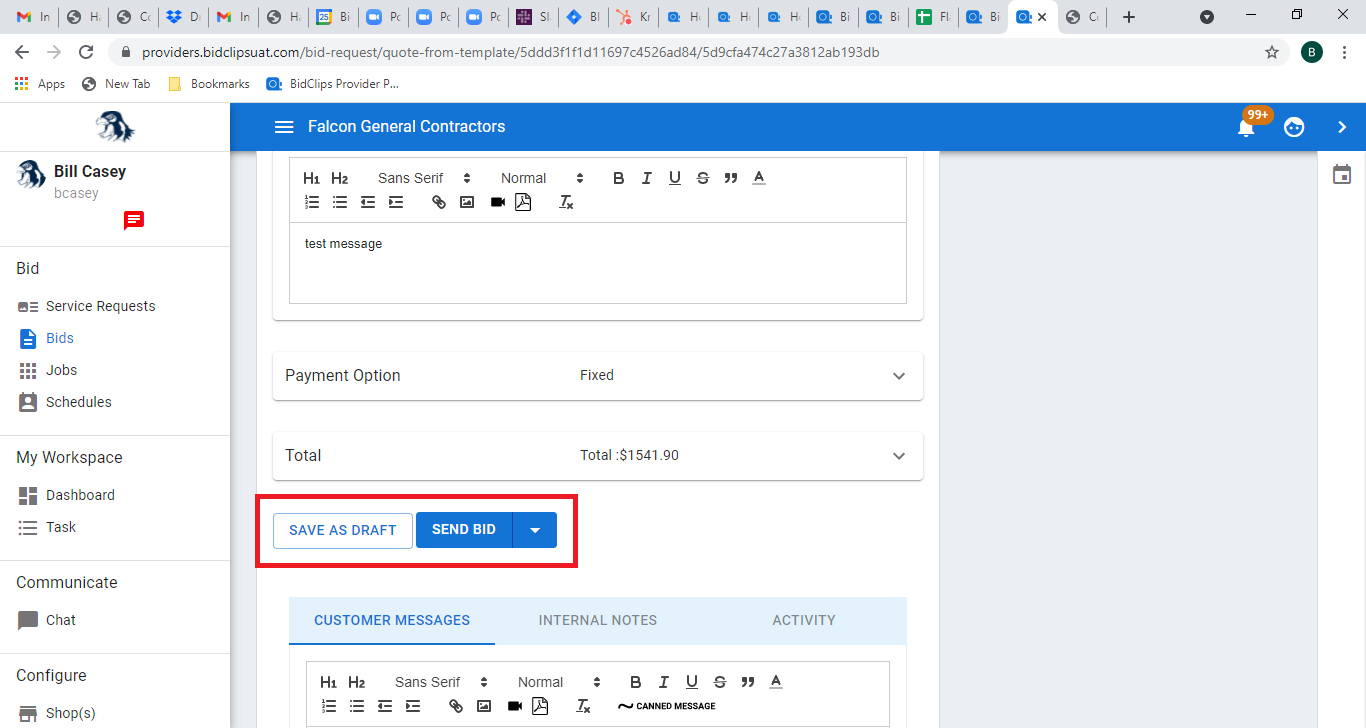
- Save as Draft-Click on the 'SAVE AS DRAFT' button to save the bid without sending it to the customer.
- Send to Customer-Click on the 'SEND BID' button to send the bid to the customer.
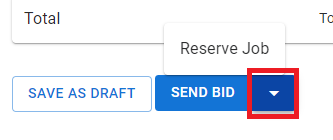
- OR, if you want to book a job without sending the bid to the customer for review and acceptance, click the down arrow next to the 'Send Bid' option and select 'Reserve Slot'. This is generally done when you have a customer on the phone who wants to accept your bid.
Creating a Bid without using a Bid Template
To create a bid without using a prebuilt Bid Template, you will click on the 'CREATE BID WITHOUT TEMPLATE' button.

You will now be at the bid details page where you will start creating your bid from scratch.
Bid Summary
Every bid in BidClips must have a Bid Summary so you will need to specify a bid summary when creating a bid without using a template. For this example we will use a value of 'Test Broken Window Bid-24" x 36" '
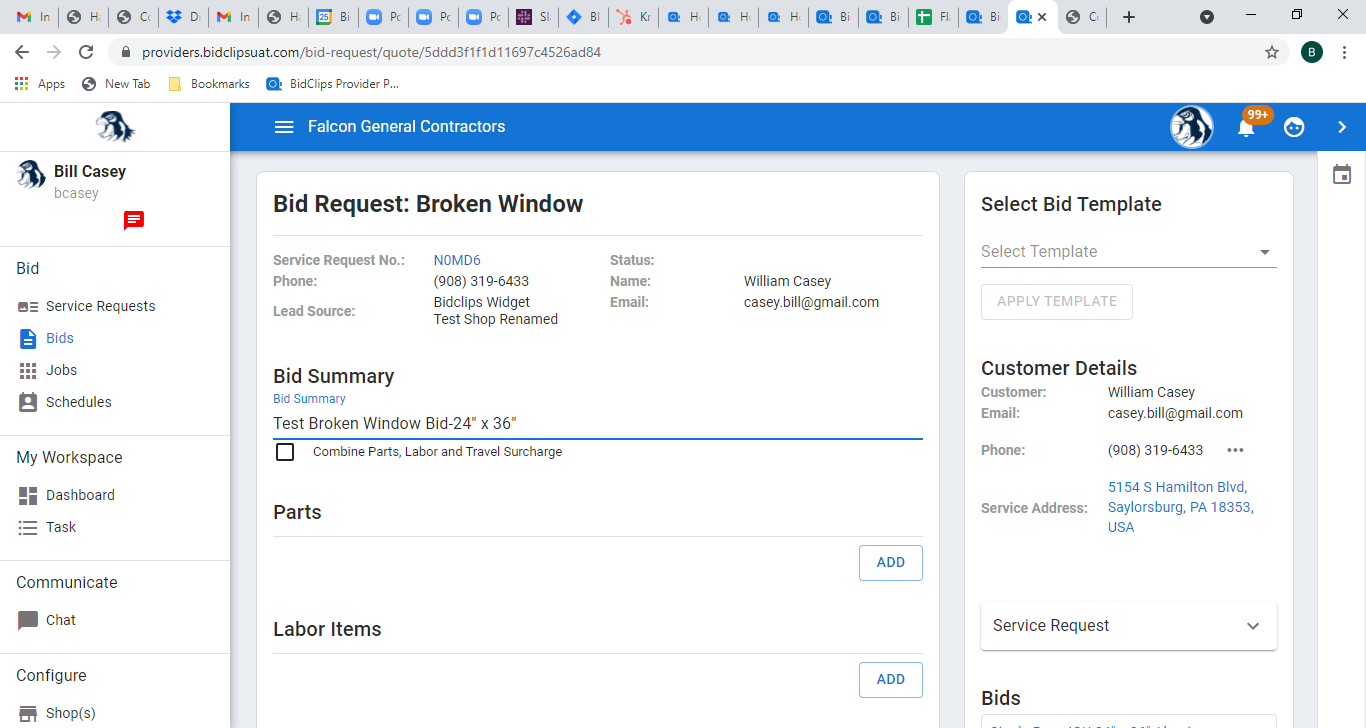
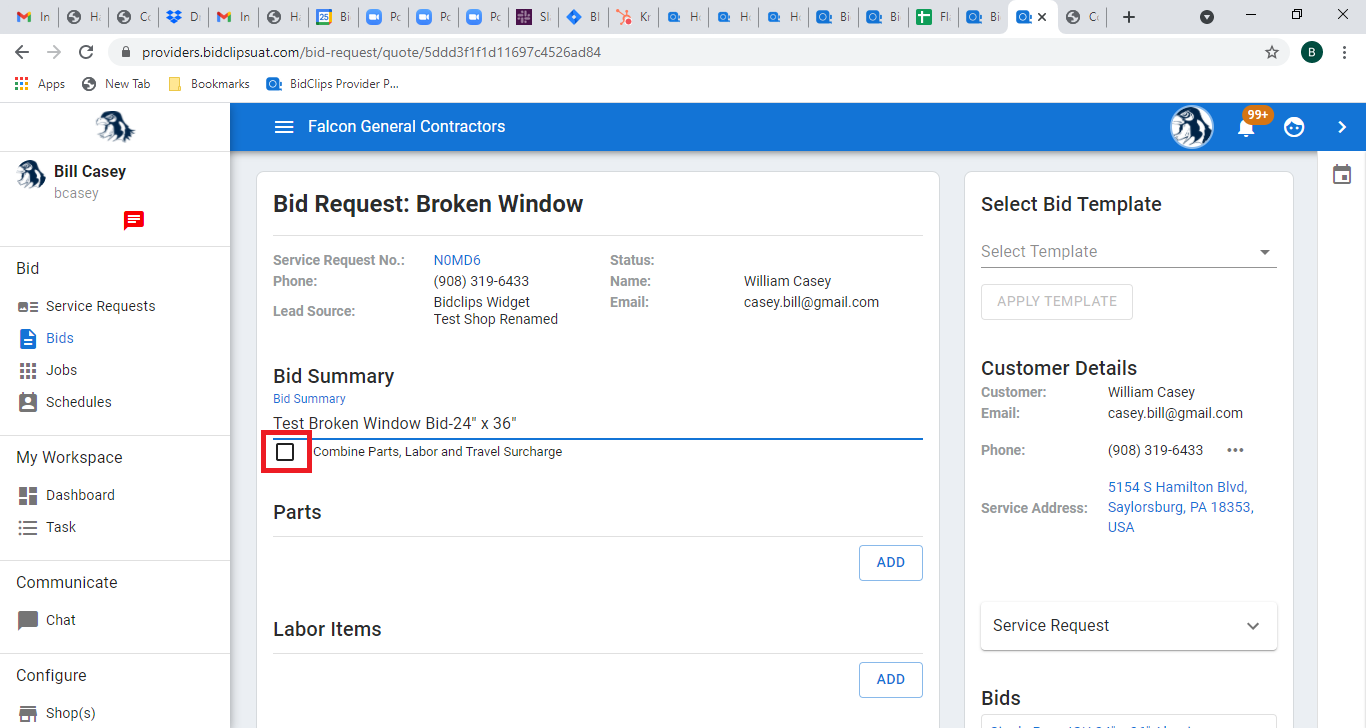
Combine Parts, Labor and Travel Surcharge
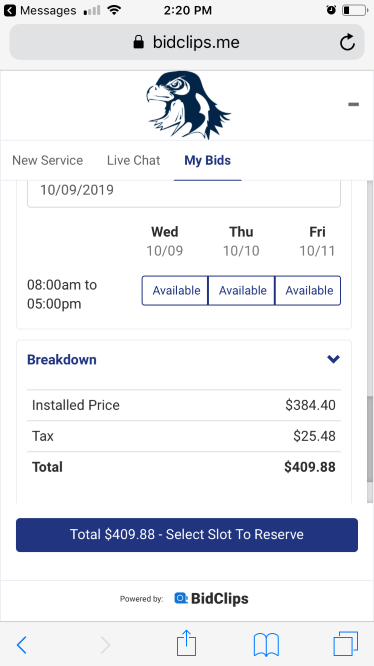
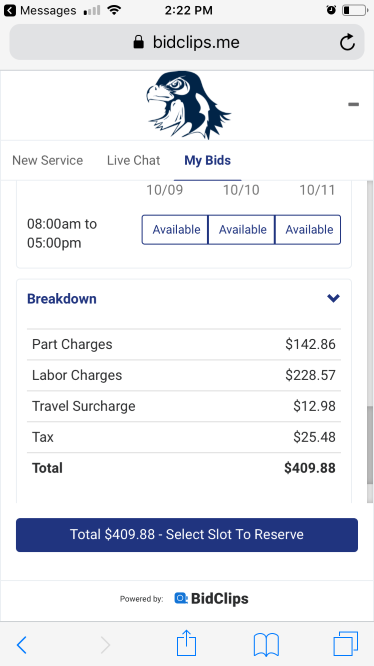
The combine parts, labor and travel surcharge option, if selected, will prevent a breakdown of parts, labor and travel from being displayed to your customer when they receive a bid. Instead, your customers will only see an installed price and associated tax amount.
Example of customer bid using the Combine Parts, Labor and Travel option:
Example of customer bid NOT using the Combine Parts, Labor and Travel option:
For this example, the combine parts, labor and surcharge option will NOT be selected.
 .
.
Parts
Here you will add all of the parts necessary to complete the service request to your bid. Note: You can either select an existing part for your shop or add a new part to the bid. This example will demonstrate how to add two parts: an IGU glass pane part that already exists for your shop and a Muntin Bar part that does not currently exist for your shop.
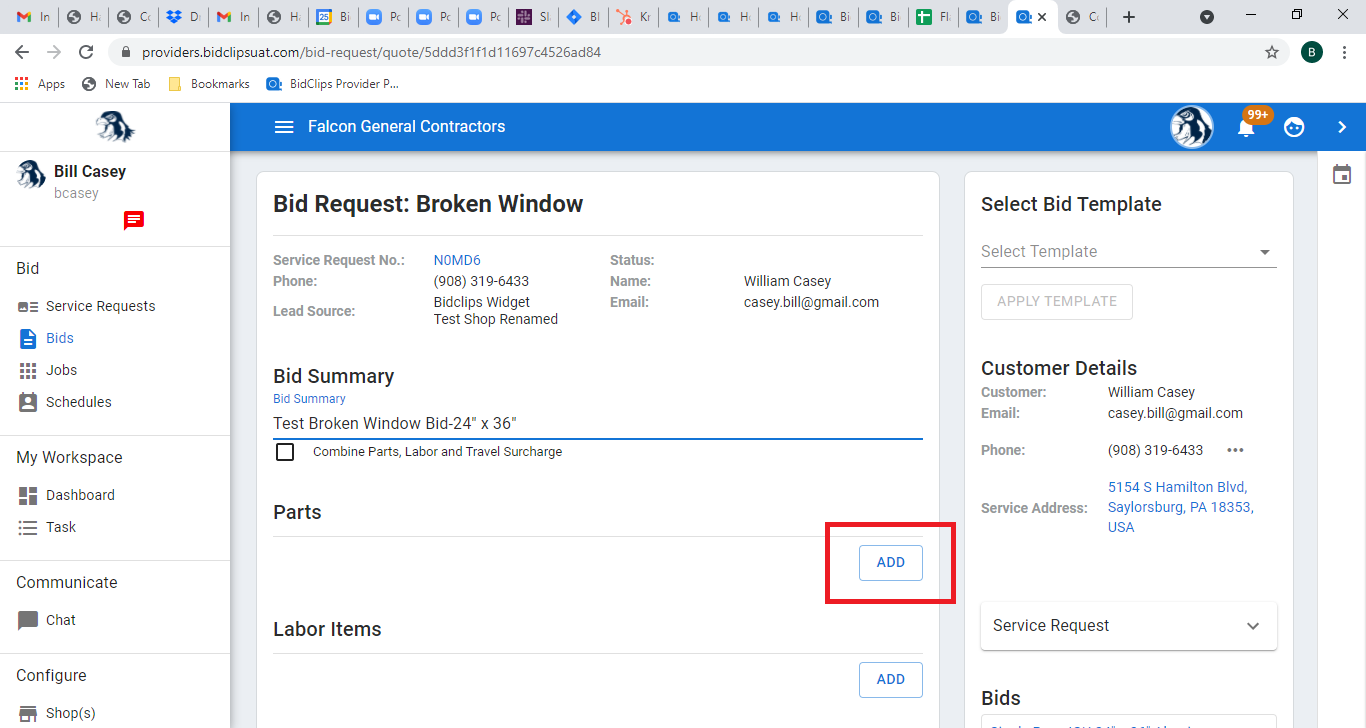
Click the 'ADD' button under the parts section to add parts to the bid.
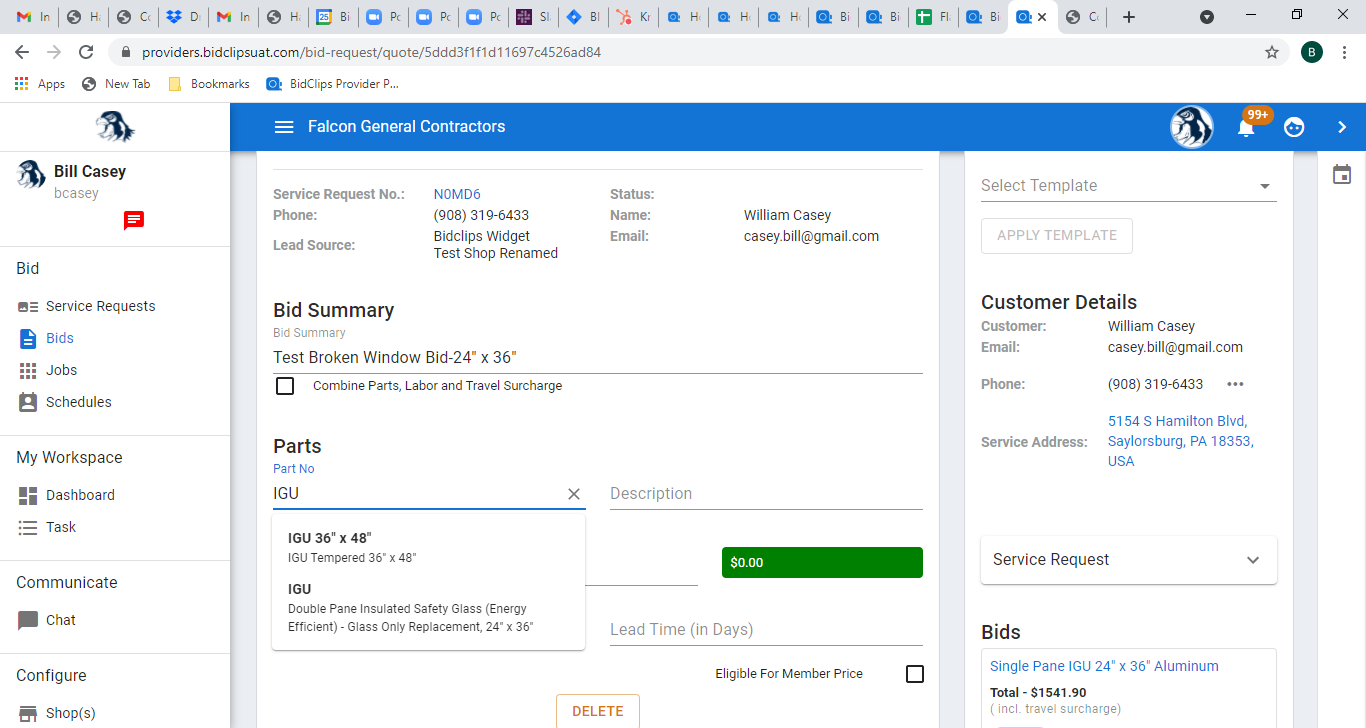
Click on the 'Part No.' field and start typing the name of the part you would like to add. If the part already exists for the shop, it will appear in the drop-down list as you are typing. Since this example will select the addition of an existing 'IGU' part, it will appear in the drop-down list.
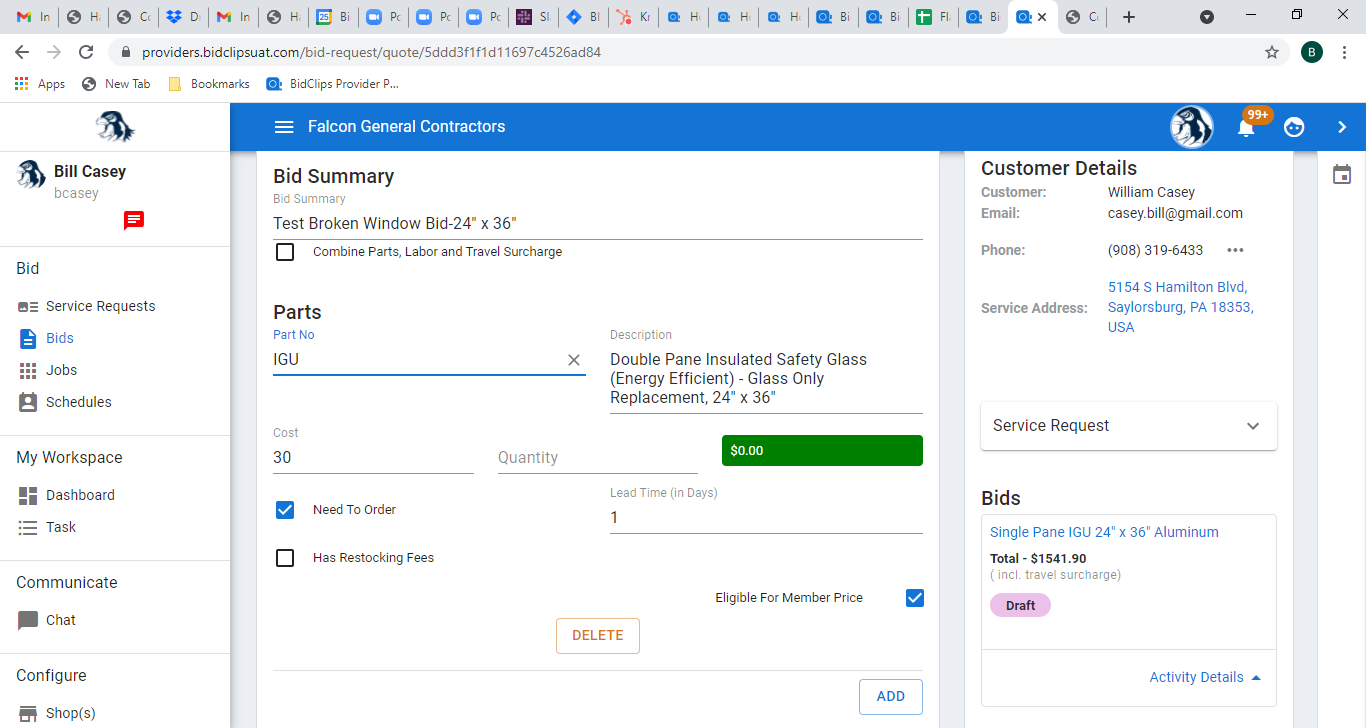
Once you see the appropriate part to be added to the template, click on it. You will notice that the existing 'IGU' part description, cost, ordering options, restocking fee values, and eligible for member pricing options have been imported into the bid after it has been selected.
You are able to change any of the imported part values: cost, ordering options including lead time, restocking fees, or eligible for member pricing-for this bid alone. However, since the part already exists for the shop, any changes made to the part settings for this specific bid will not be applied to the global part settings already established. In this example, we will change: the cost from $30 to $60, the ordering lead time from 1 day to 2 days, and remove the eligible for member pricing option.
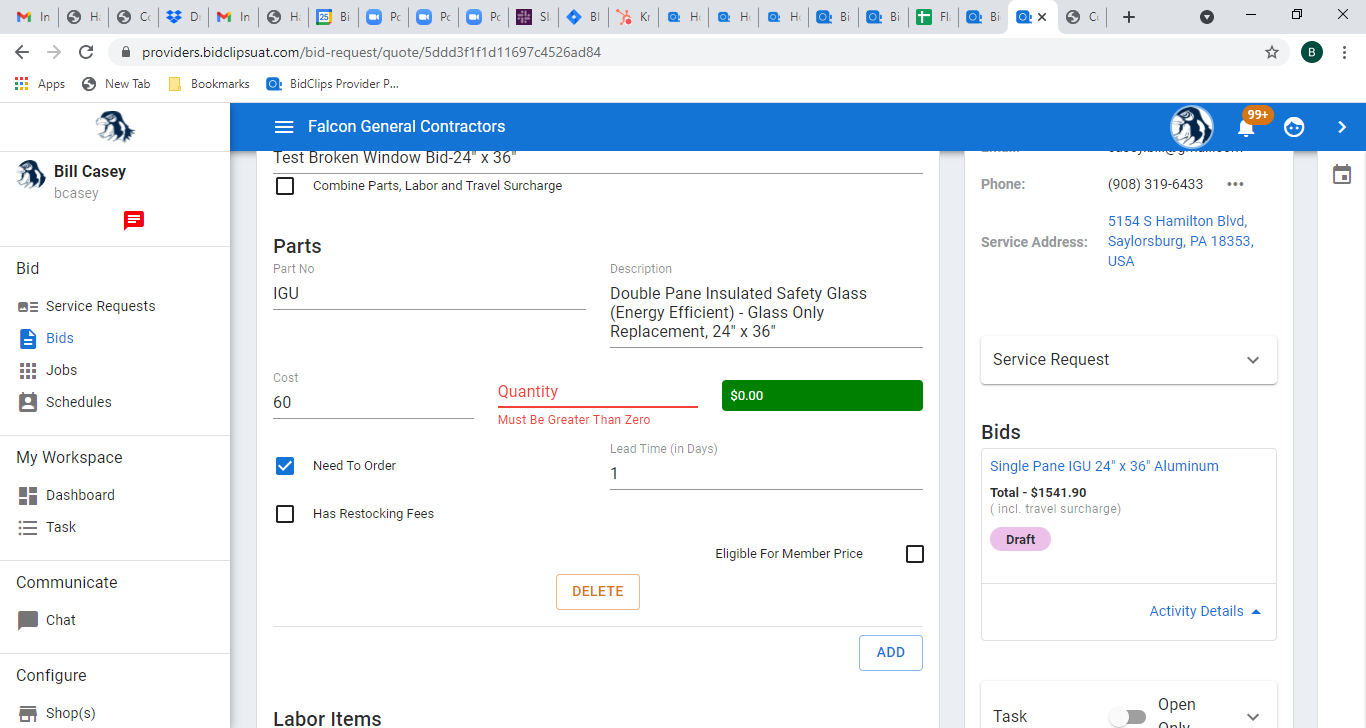
Next, you will click in the 'Quantity' field and enter the desired quantity. This example uses a quantity of '2'.
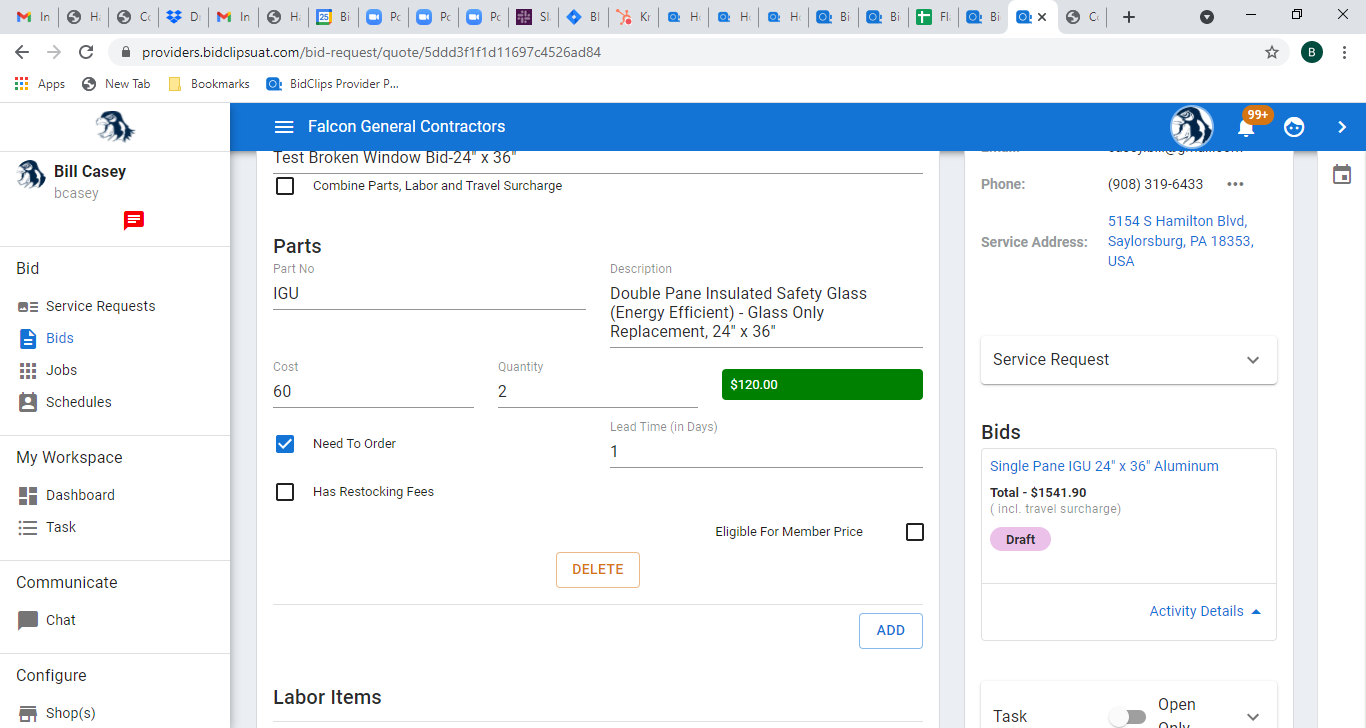
You are now ready to add the next part-'Muntin Bar'-to the bid. Click the 'ADD' button under the 'IGU' part you have just added to the bid.
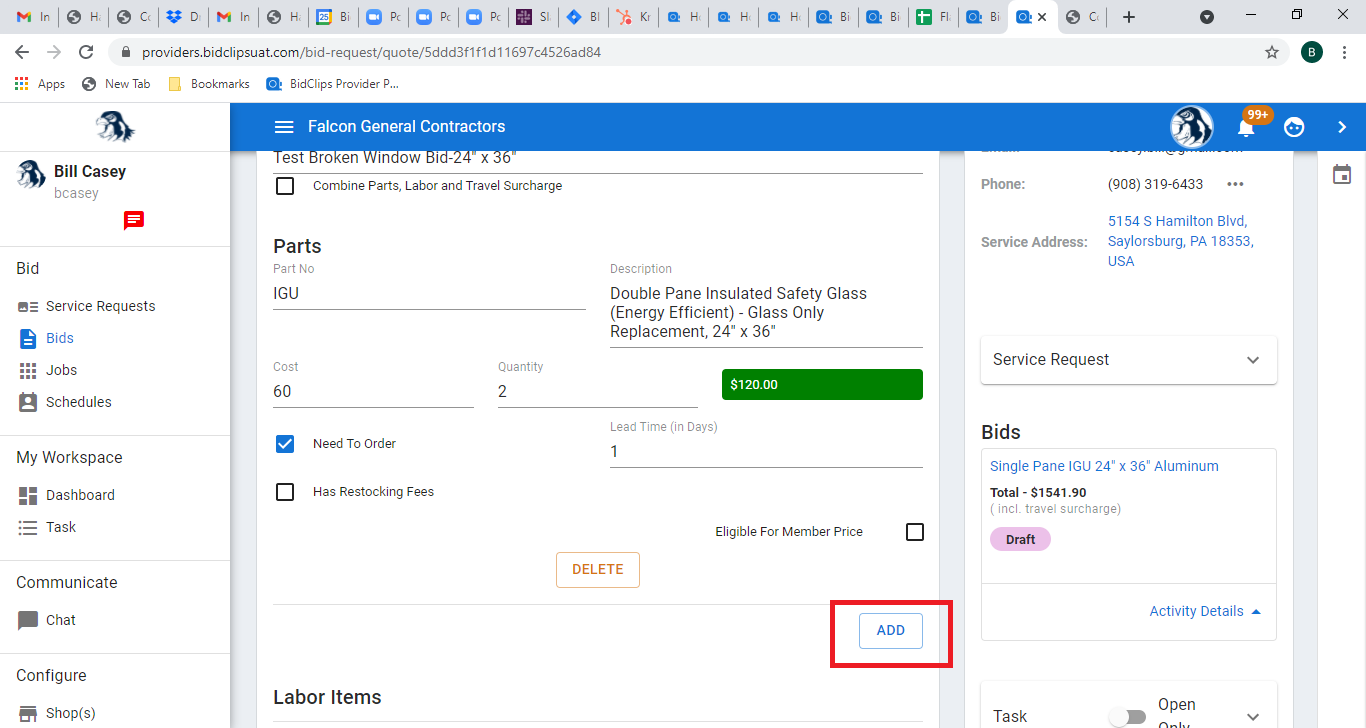
Note: The customer price for each of your parts and labor items will be shown in the green box next to the quantity field. If you are not using the BidClips margin pricing calculator, the customer price will equal cost x quantity. Conversely, if you are using the BidClips margin pricing calculator, the customer price in the green box will not equal cost x quantity; it will actually be cost x quantity/1 - margin %.
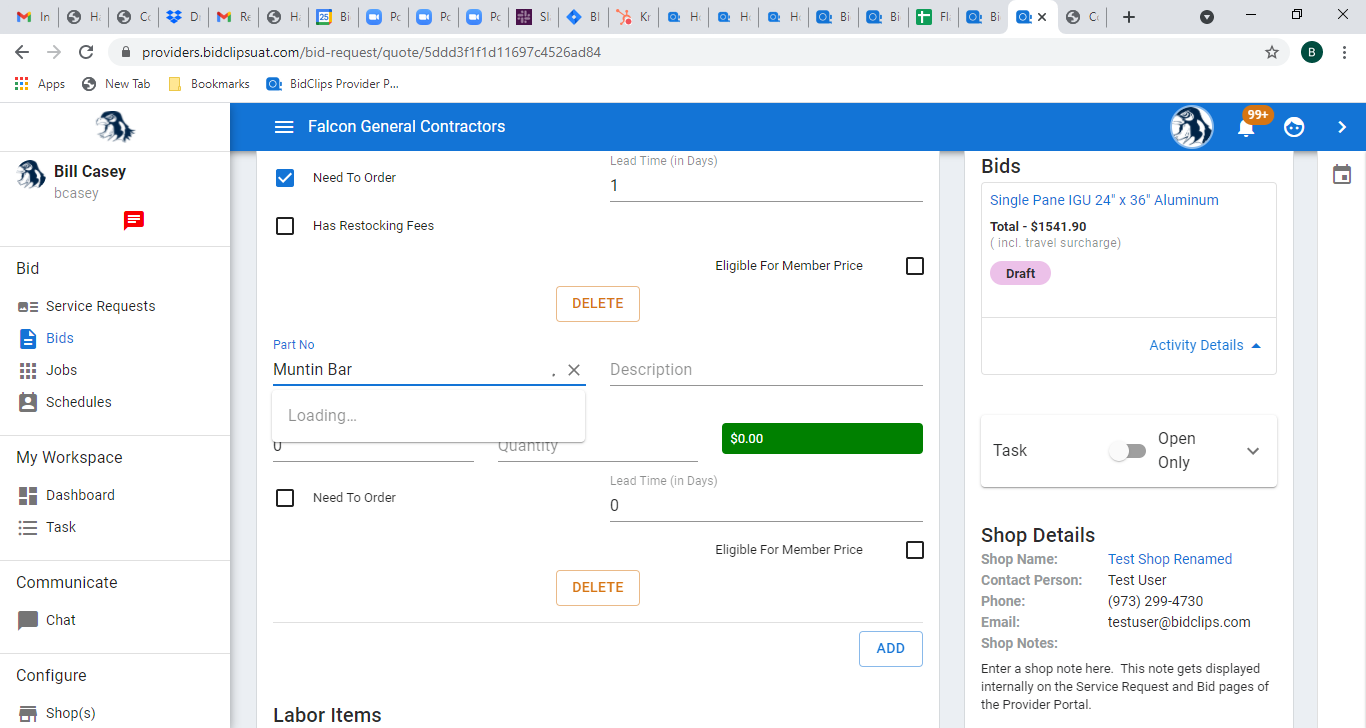
Click on the 'Part No.' field and start typing the name of the part you would like to add. If the part already exists for the shop, it will appear in the drop-down list as you are typing. Since this example will demonstrate the addition of a new part, type in 'Muntin Bar'. You will notice a "Loading" message when typing in a part number that does not exist for your shop. Ignore this message, BidClips is simply trying to update the search with every keystroke.
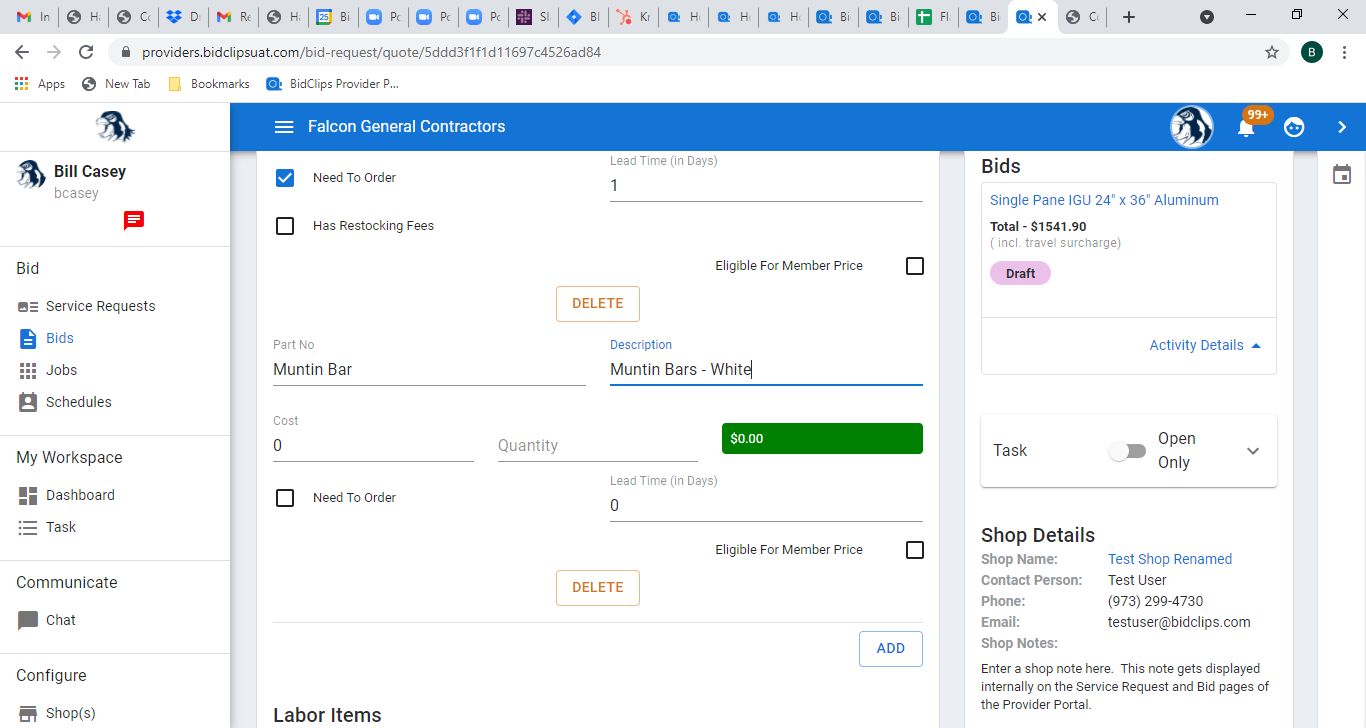
Click on, or tab, to the 'Description' field and give your new part a description. This example shows the use of 'Muntin Bars - White'.
Click on the 'Cost' field and give your new part a cost value. This example shows the use of '5'.
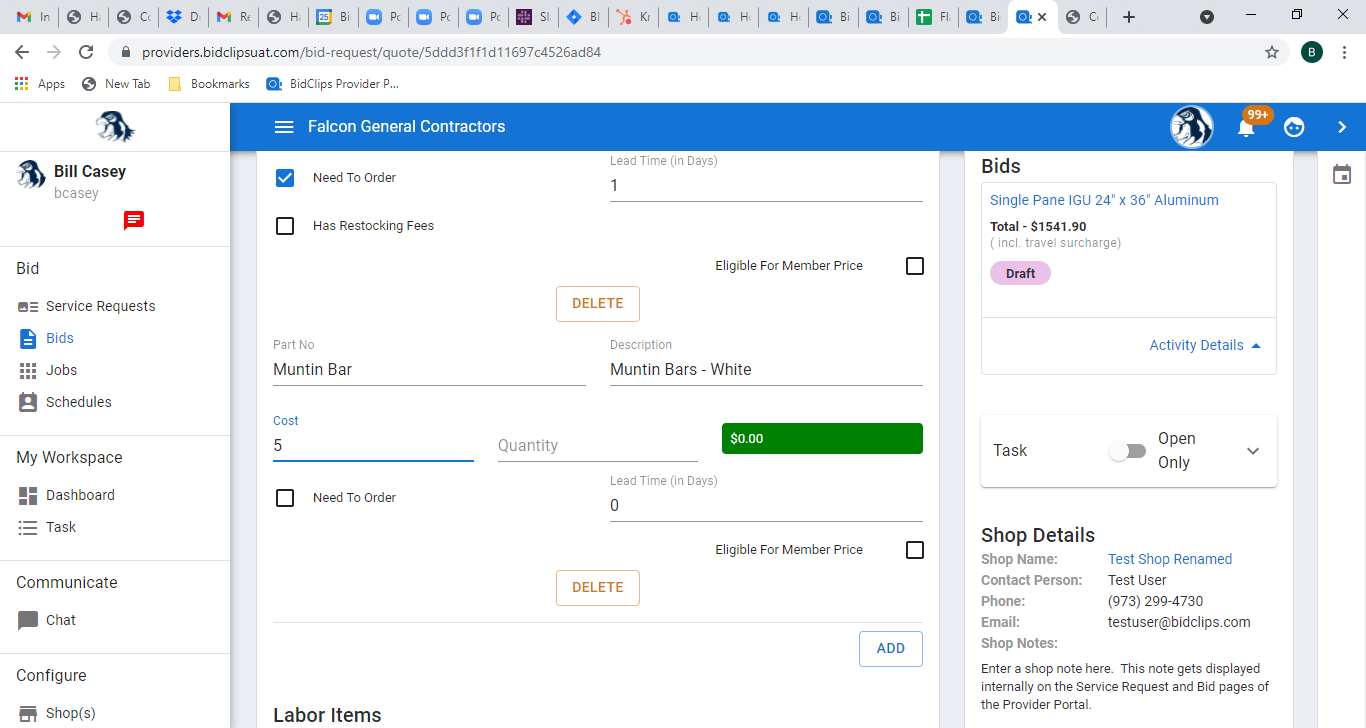
Next, you will click in the 'Quantity' field and enter the desired quantity. This example uses a quantity of '2'.
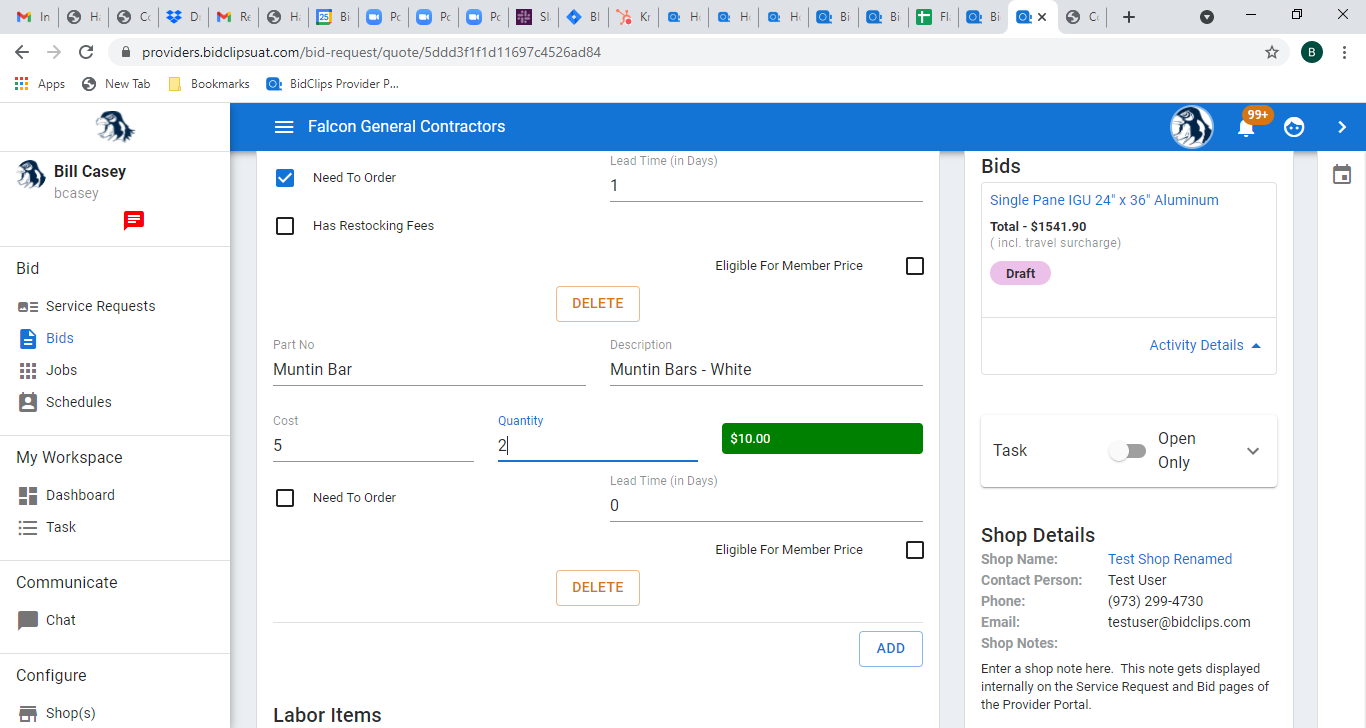
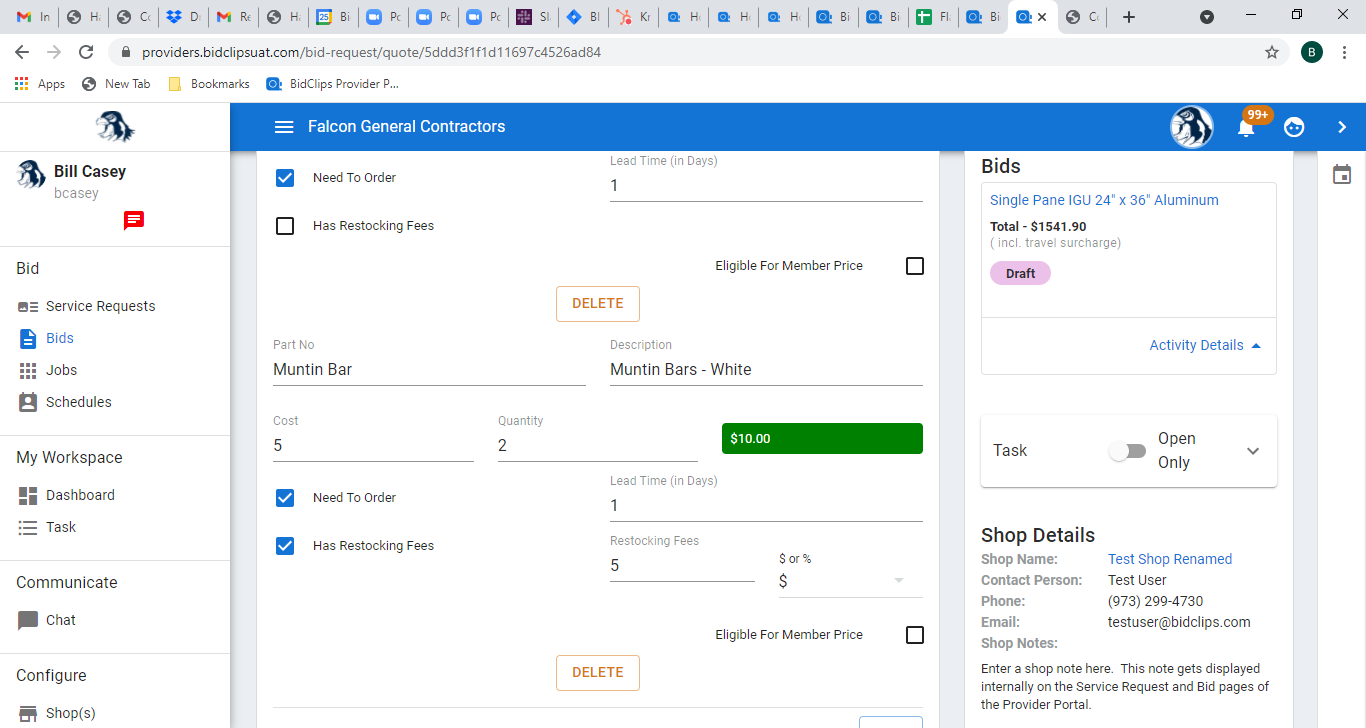
Next, you will add your ordering options including lead time and restocking fees if necessary. This example shows a need to order the part option selected with one (1) day of lead time and a $5 restocking fee.
Finally, you will select whether this part is eligible for member pricing or not. Selecting the 'Eligible for member price' check box here will make this part subject to a membership pricing discount should one be applied to the bid. To learn more about membership pricing and discounts in general within the BidClips platform, click here. For this example, the eligible for member price option will be selected for demonstration purposes.
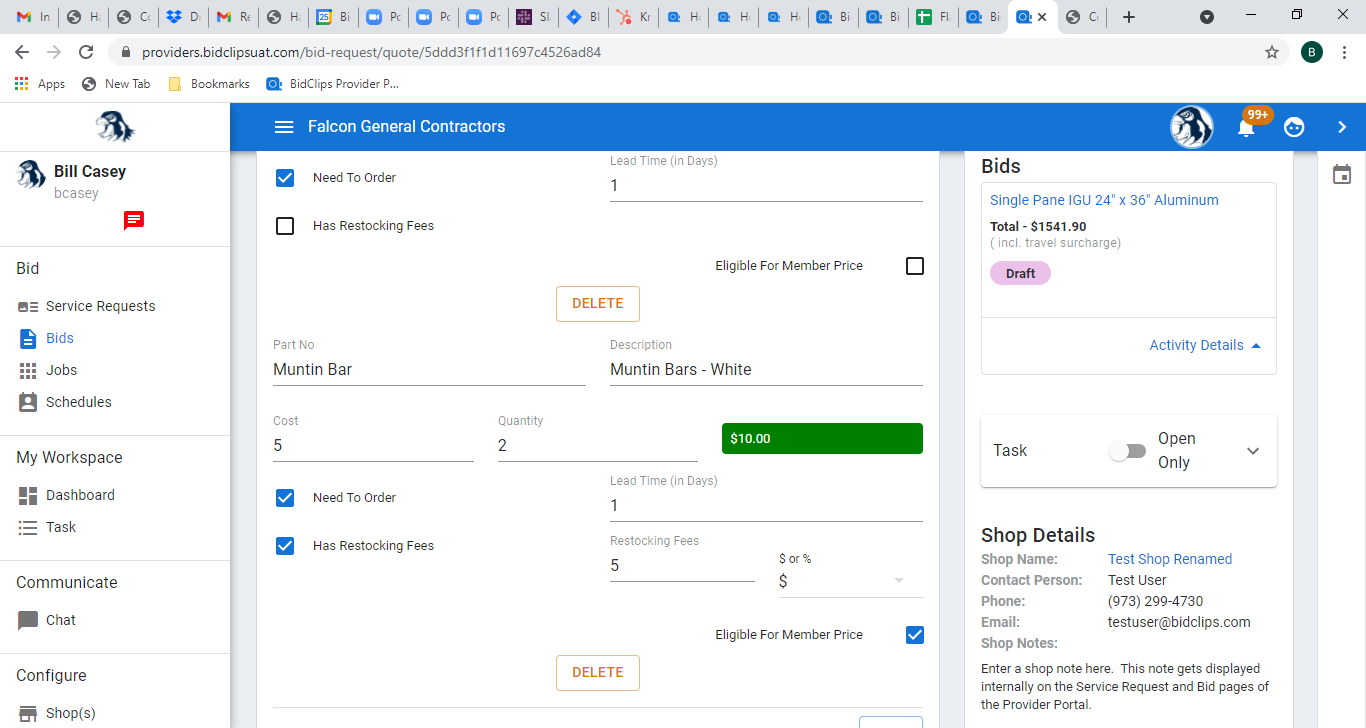
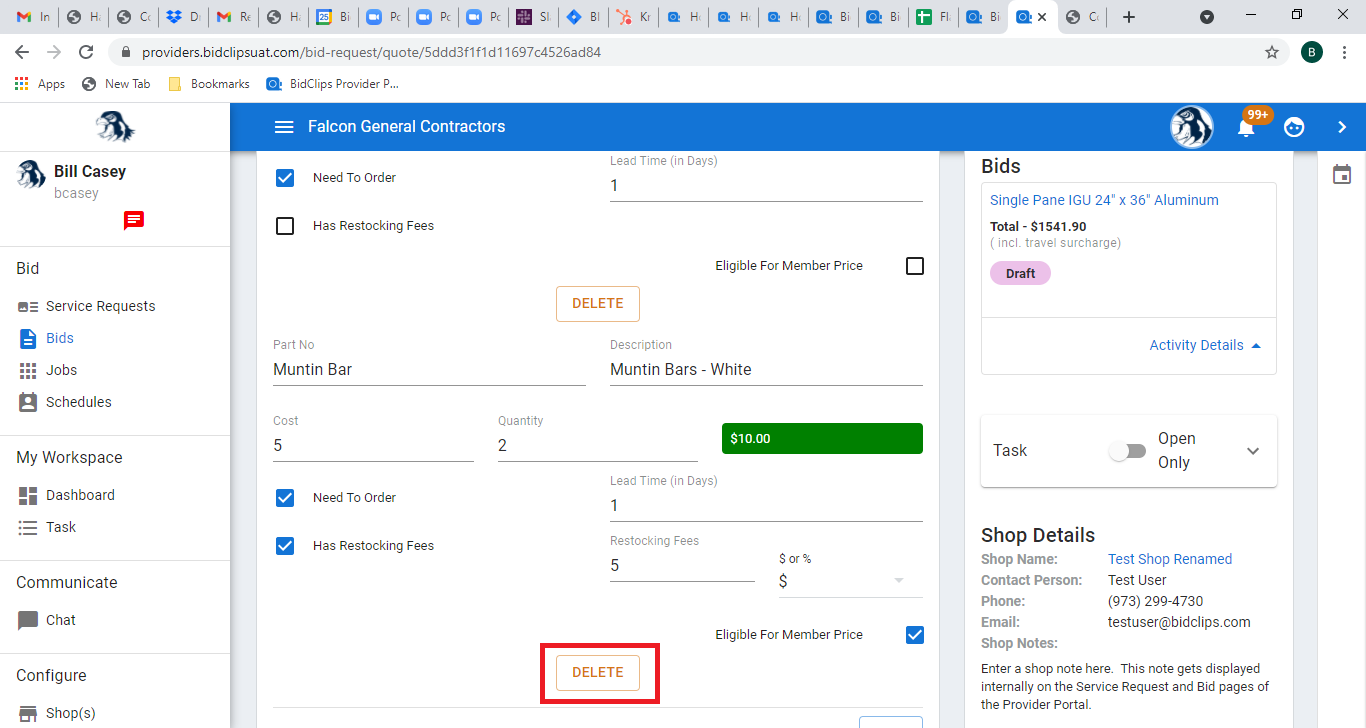
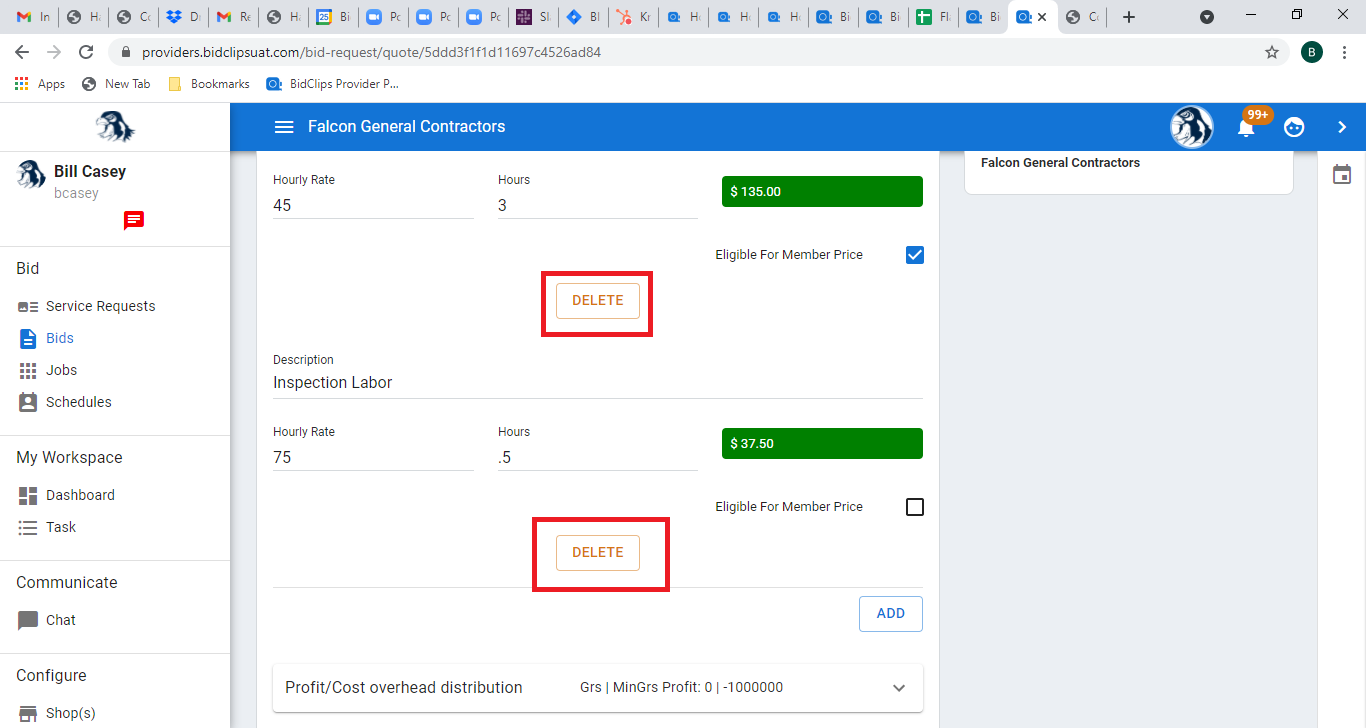
You can add as many parts you would like to the bid. If at any time you want to remove a part from the bid, simply click the 'DELETE' button below the part.
Labor Items
Next, you will add any labor items you wish to include in your bid. In this example, we will demonstrate the addition of two labor items: three (3) hours of installation labor at $45 per hour and one half (0.5) hours for an inspection at $75 per hour-to the bid. Click the 'ADD' button to add labor items to the bid.
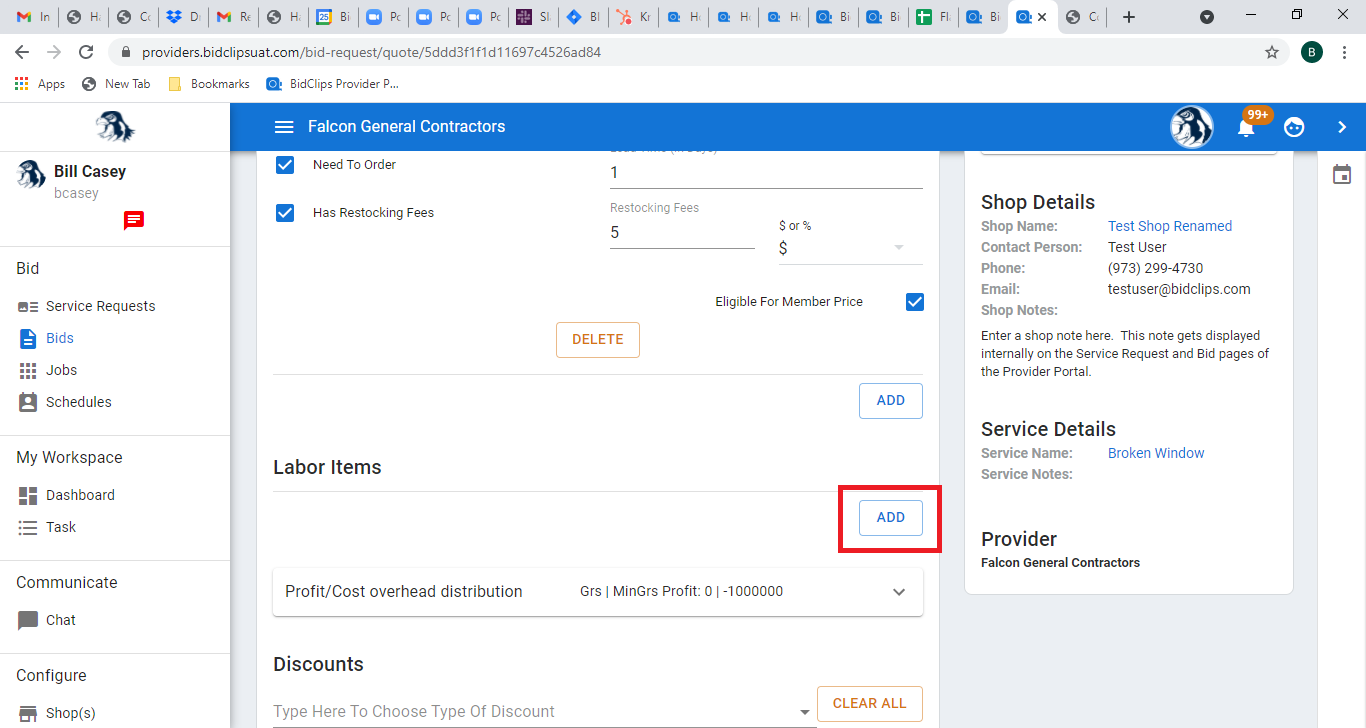
Click on the 'Description' field and enter a description for your labor item. This example shows the addition of Installation Labor.
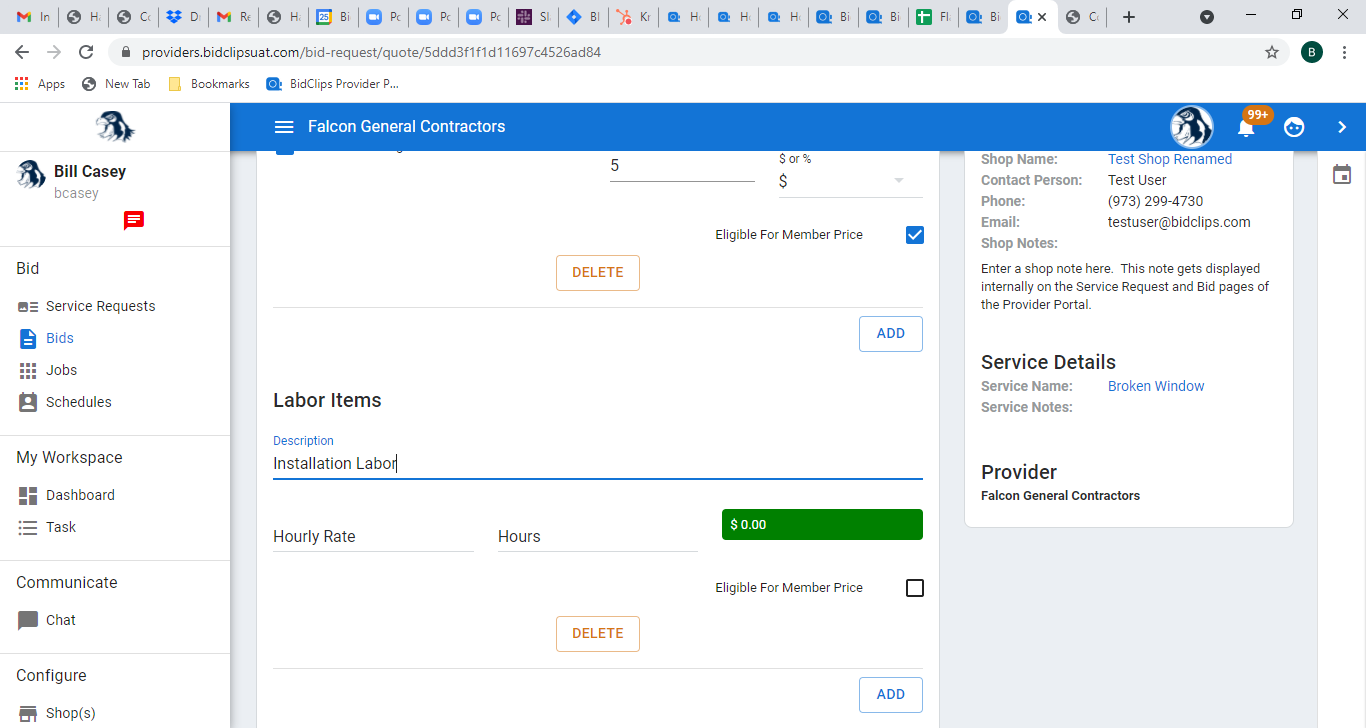
Next, you will click in the 'Hourly Rate' field and enter the desired labor rate. This example uses a hourly rate of '45'.
Next, you will click in the 'Hours' field and enter the desired number of hours for this labor item. This example uses a quantity of '3'.
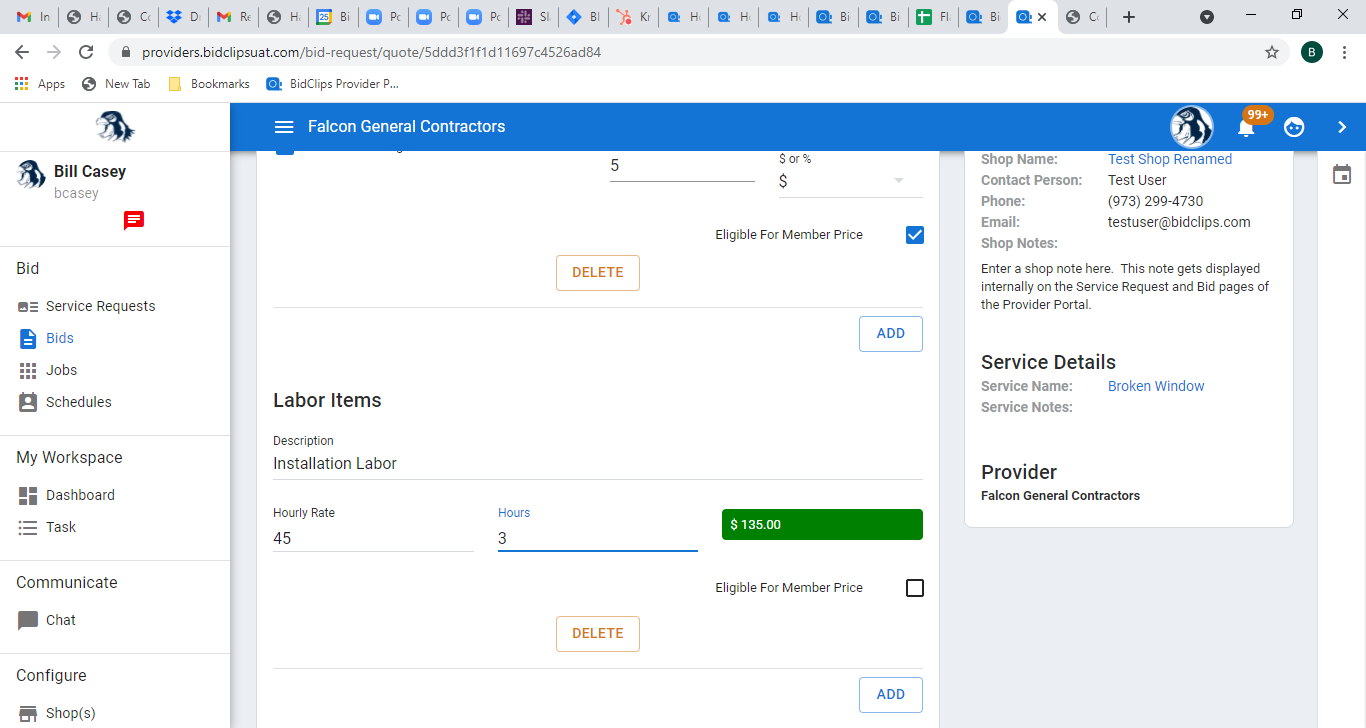
Finally, you will select whether this labor item is eligible for member pricing or not. Selecting the 'Eligible for member price' check box here will make this labor item subject to a membership pricing discount should one be applied to the bid. To learn more about membership pricing and discounts in general within the BidClips platform, click here. For this example, the eligible for member price option will be selected for demonstration purposes.
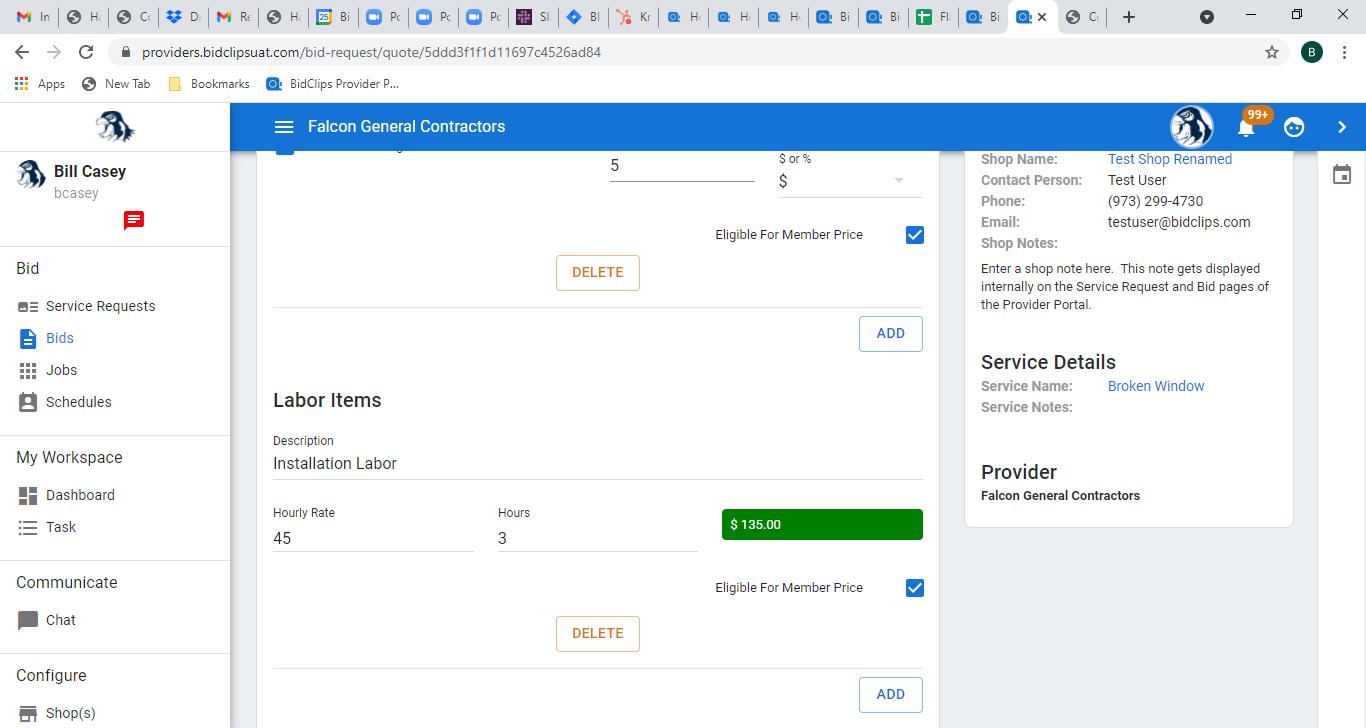
This example shows one additional labor item-a 0.5 hour of Inspection labor at $75 per hour that is not eligible for membership pricing-being added to the bid.
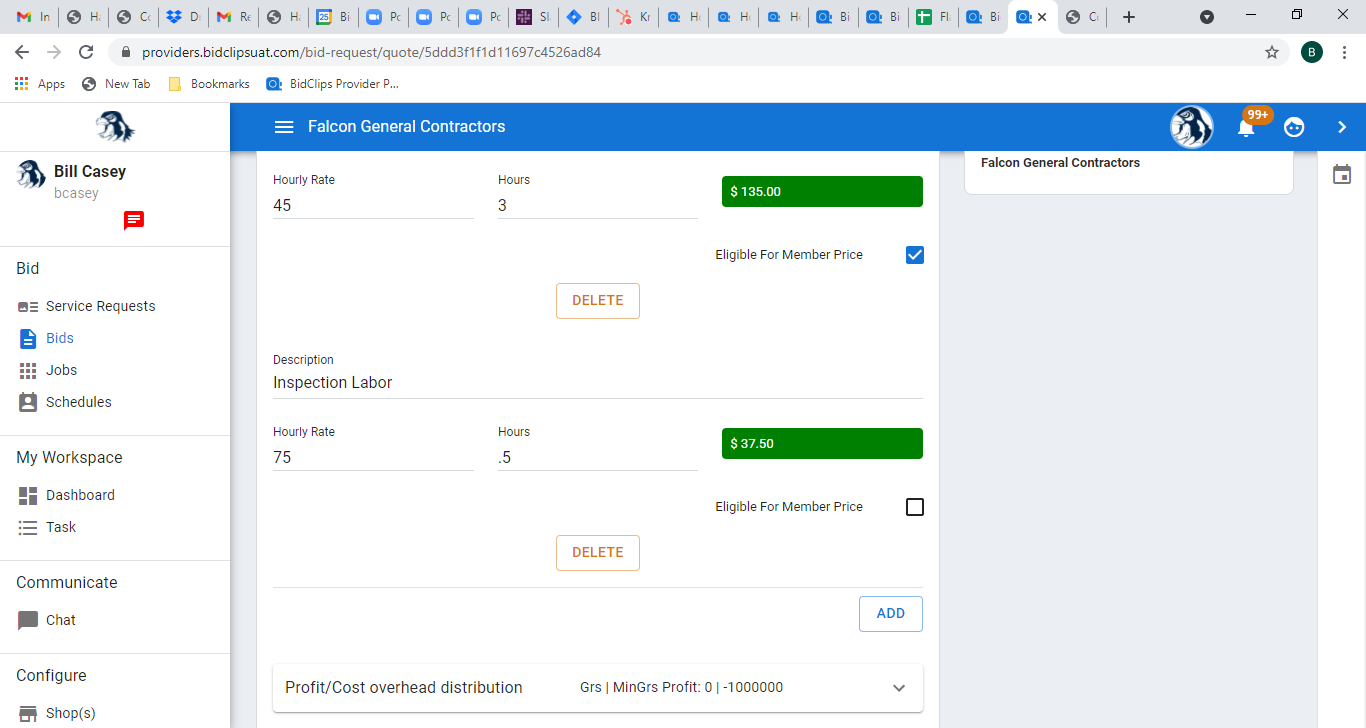
You can repeat the previous steps to add as many labor items you would like to add to the bid. If at any time you want to remove a labor item from the bid, simply click the 'DELETE' button located below the labor item.
Profit/Cost Overhead Distribution
If you expand the Profit/Cost Overhead section of the bid, you will first see the gross profit pricing percentage and minimum gross profit threshold settings.
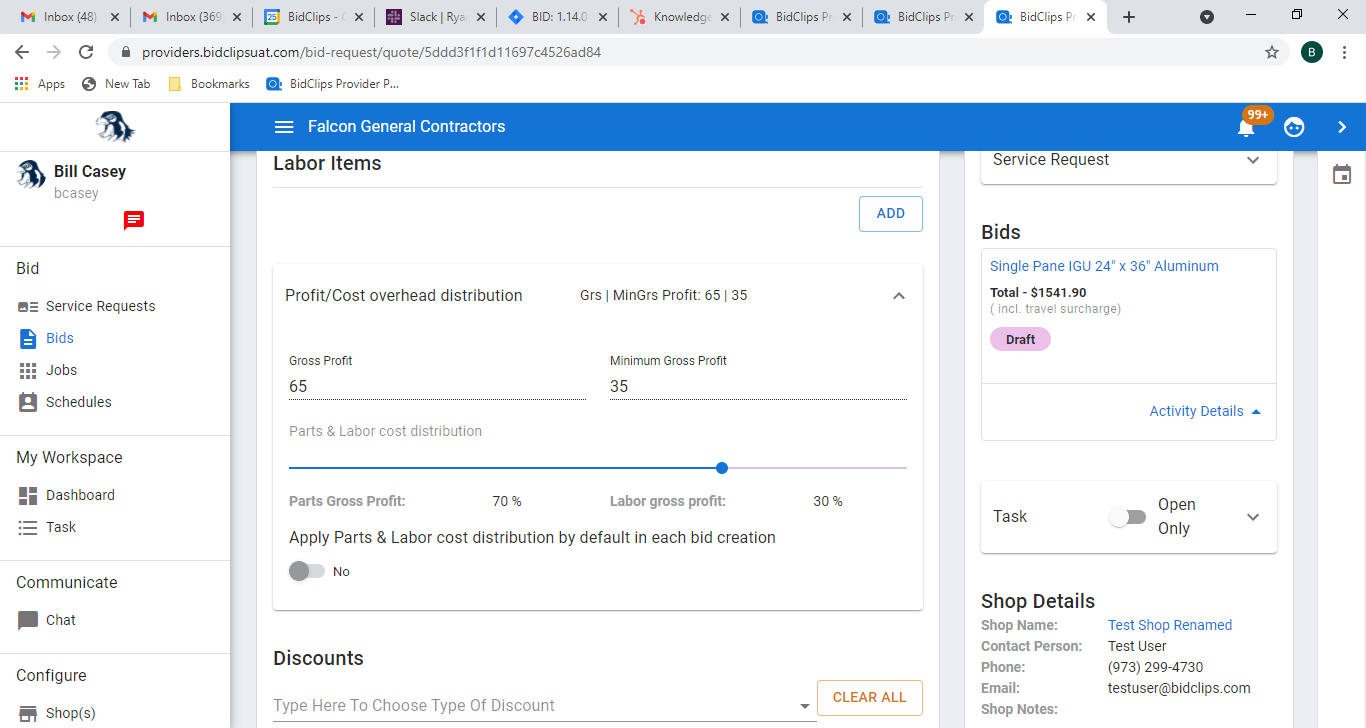
The gross profit pricing value, shown in the example as 65%, is the value that is used within the bid to calculate prices based on your part/labor item costs. The minimum gross profit percentage, shown in the example as 35% is used to warn your users if they have prepared a bid that is below the threshold. These values are derived from your global shop pricing configurations or individual service offering overrides and cannot be changed within a bid.
Next, you will see settings for parts and labor distribution percentages and a flag that specifies if that distribution should be applied to this bid. The values you see when first creating the bid are also imported from your global shop pricing configurations, or individual service offering overrides if they exist. You can, however, change the parts and labor distribution percentage values for a specific bid. If you change the values, the prices on your part and labor items will be adjusted in the bid so they comprise the desired distribution percentages specified here. This example shows how you would apply an 80%/20% parts and labor price distribution for this bid and turn that distribution option on.
Use the slider bar to set the desired percentage distribution values and make sure the 'Apply Parts & Labor cost distribution by default' flag is turned on as shown below:
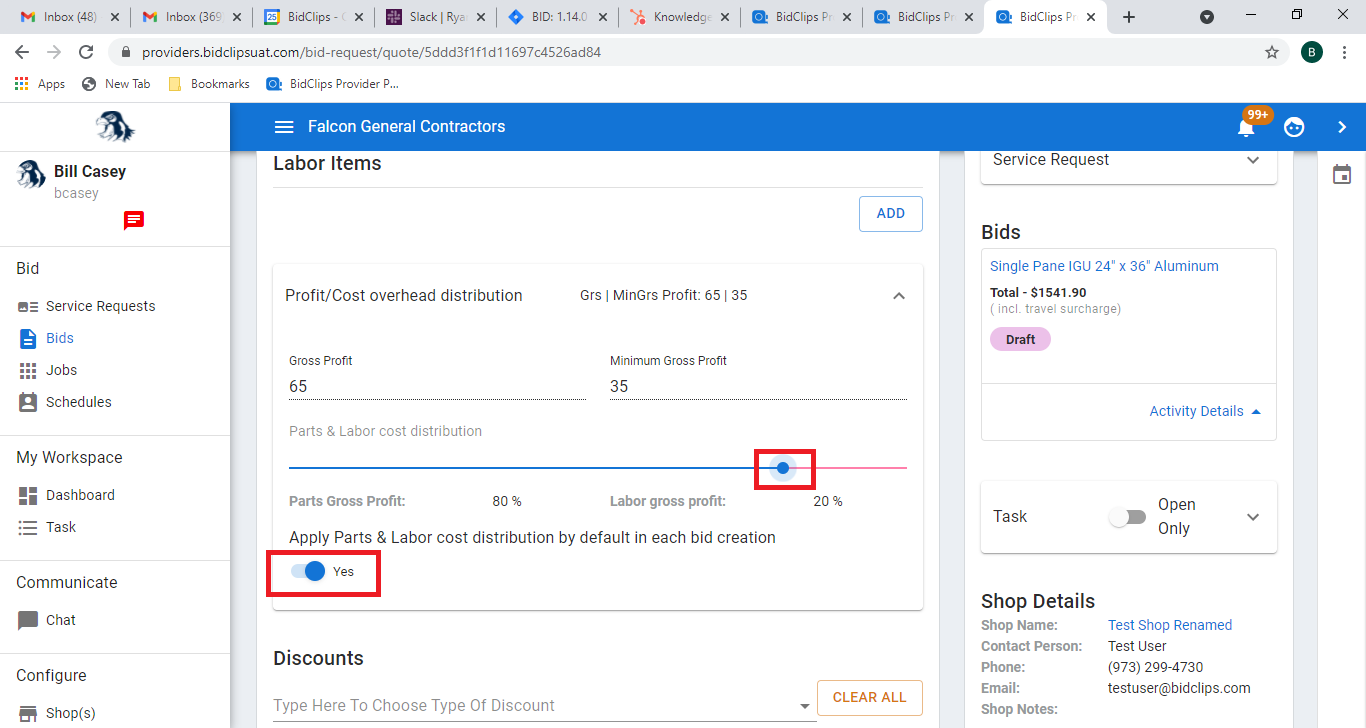
If at any time, while preparing the bid, you want to adjust the parts/labor distribution percentages use the slider bar to adjust your settings. If you would like to remove the parts/labor distribution application for this bid, turn off the 'Apply Parts & Labor cost distribution by default' flag.
Discounts
You are able to apply any of the discounts that have already been created for your provider to the bid. This example will show the inclusion of two discounts to the bid: Membership Pricing and a 5% discount on parts.
Click on the 'Type here to choose type of Discount' field and either select the discount from the drop-down list if it appears or start typing a discount name in the field.
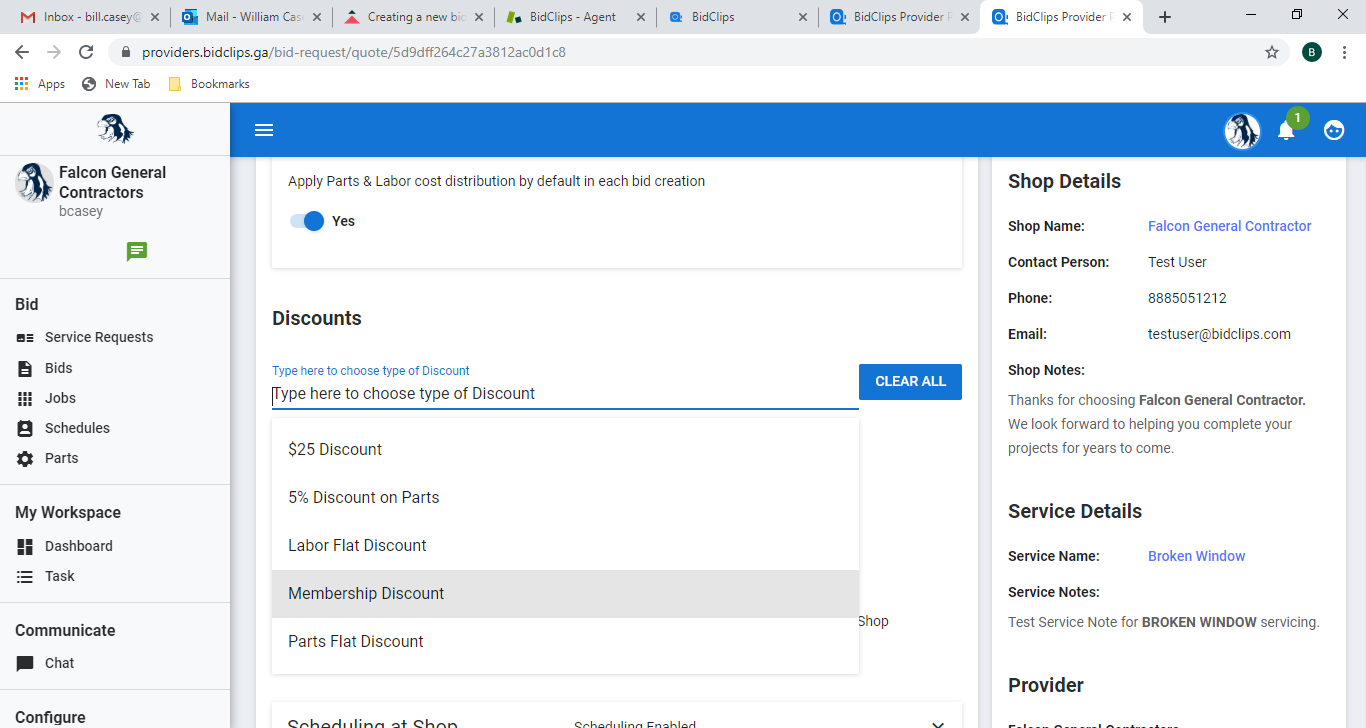
Once you see the appropriate discount to be added to the bid, click on it. The example shown below will first apply the Membership Discount option.
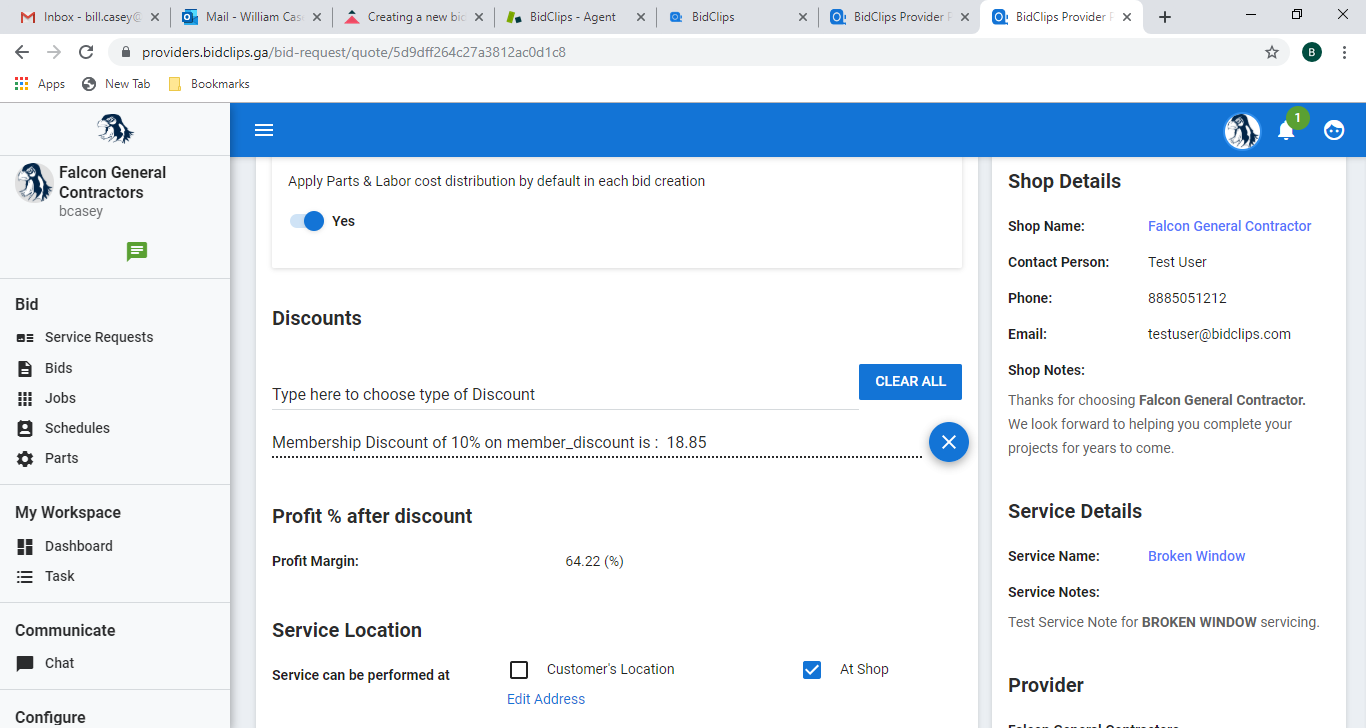
You will notice that, as you add discounts to the bid, your profit margin will decrease as each discount is applied to the bid. In this example, you started at a 65% profit margin before adding discounts. Once the 10% Membership discount was applied to parts/labor that were eligible for membership pricing, the profit margin decreased to 64.22%
This example shows one additional discount, a 5% discount on parts, being added to the bid.
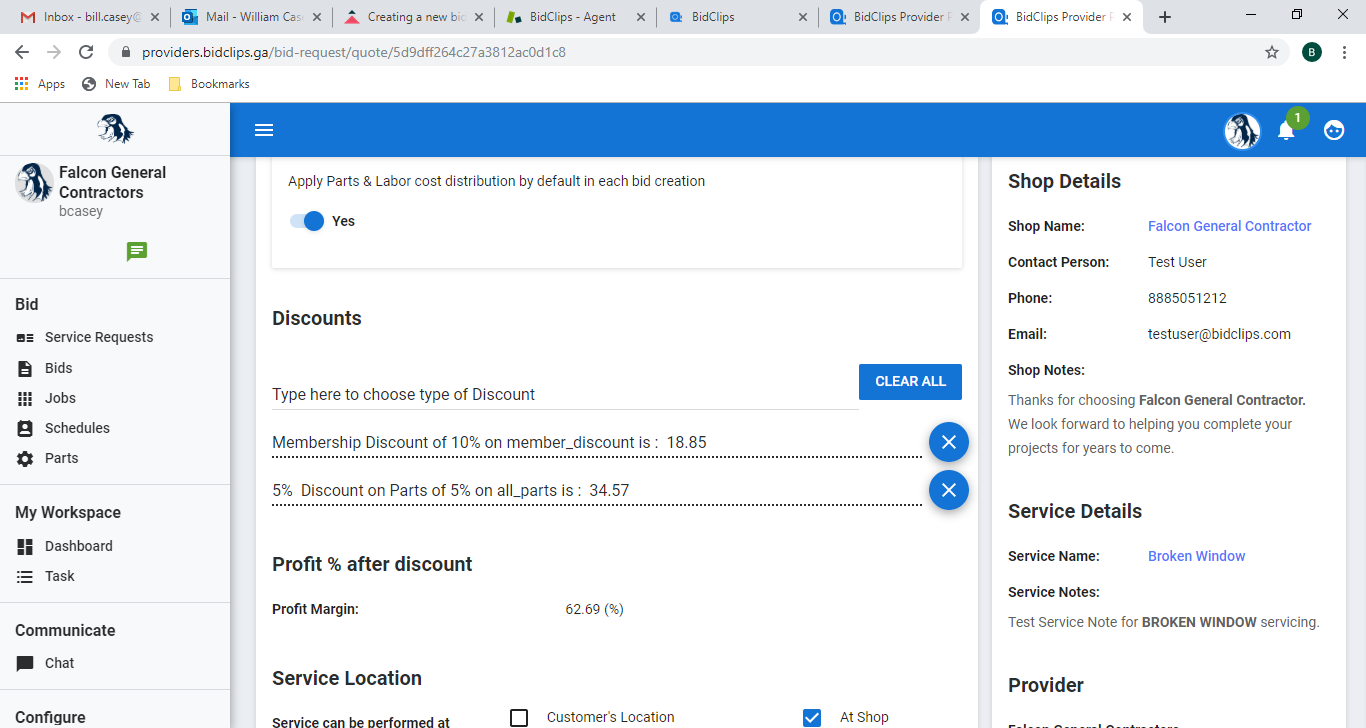
You will notice that the profit margin will decrease to 62.69% when the parts discount is applied. You can repeat the previous step to add as many discounts you would like to add to the bid. If at any time you want to remove a discount from the bid, simply click the 'X' button.
Service Location
You are able to specify whether the service can be performed at the shop only, the customer's location only, or both the shop and customer location in this section. The default option will be service at the shop only when you first create the bid as shown below:
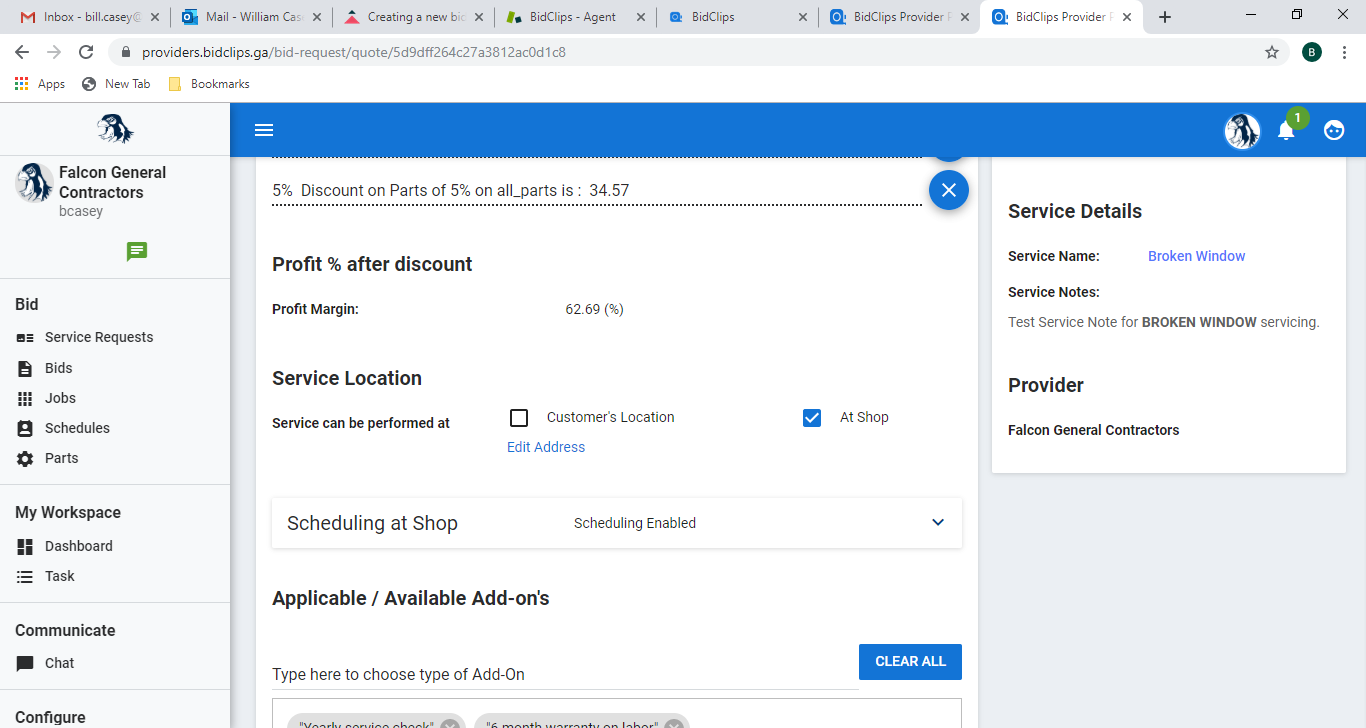
This example shows how you would change the bid to have service available at both the customer's location and the shop. To do so, you would select the 'Customer's Location' check box.
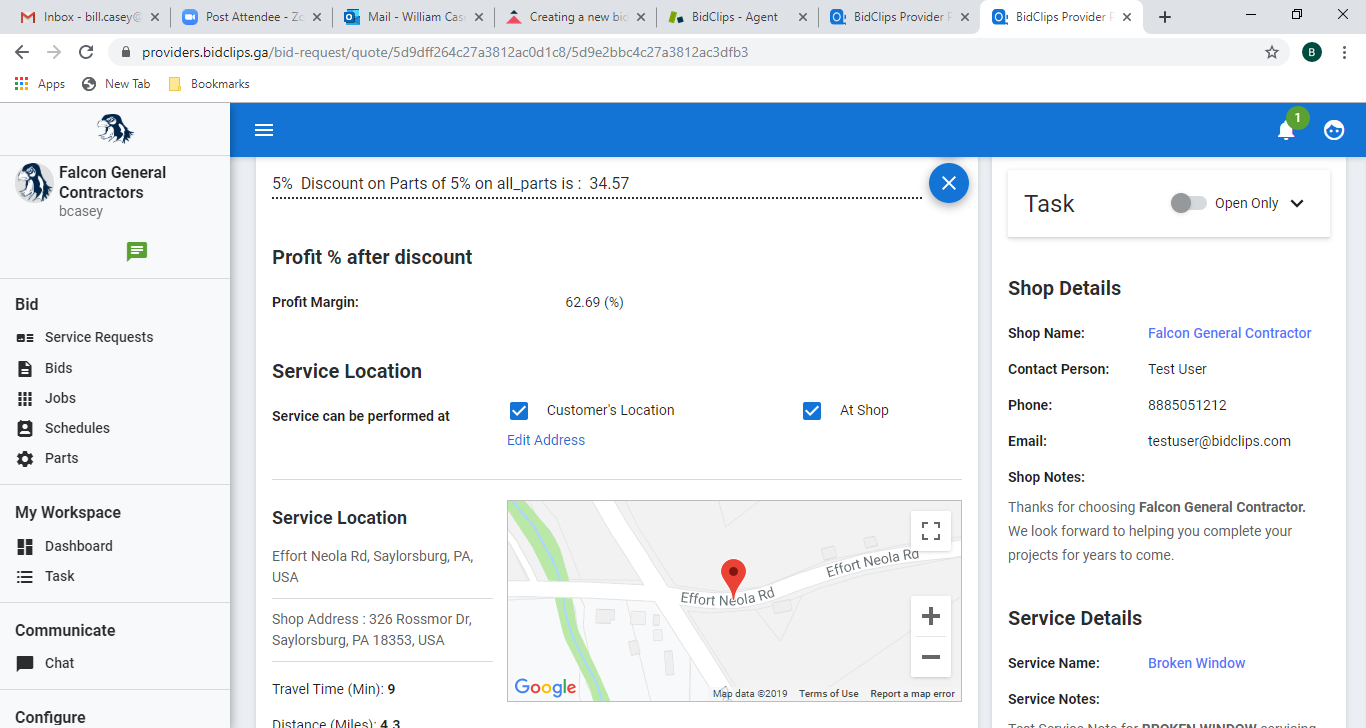
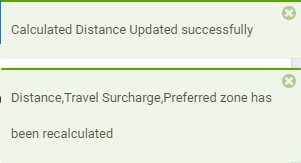
Once service at the customer location option is selected, you will see two messages in the upper right corner of the screen letting you know that travel calculations to the job site have been made and the most applicable travel zone you have previously configured for your shop, has been applied.
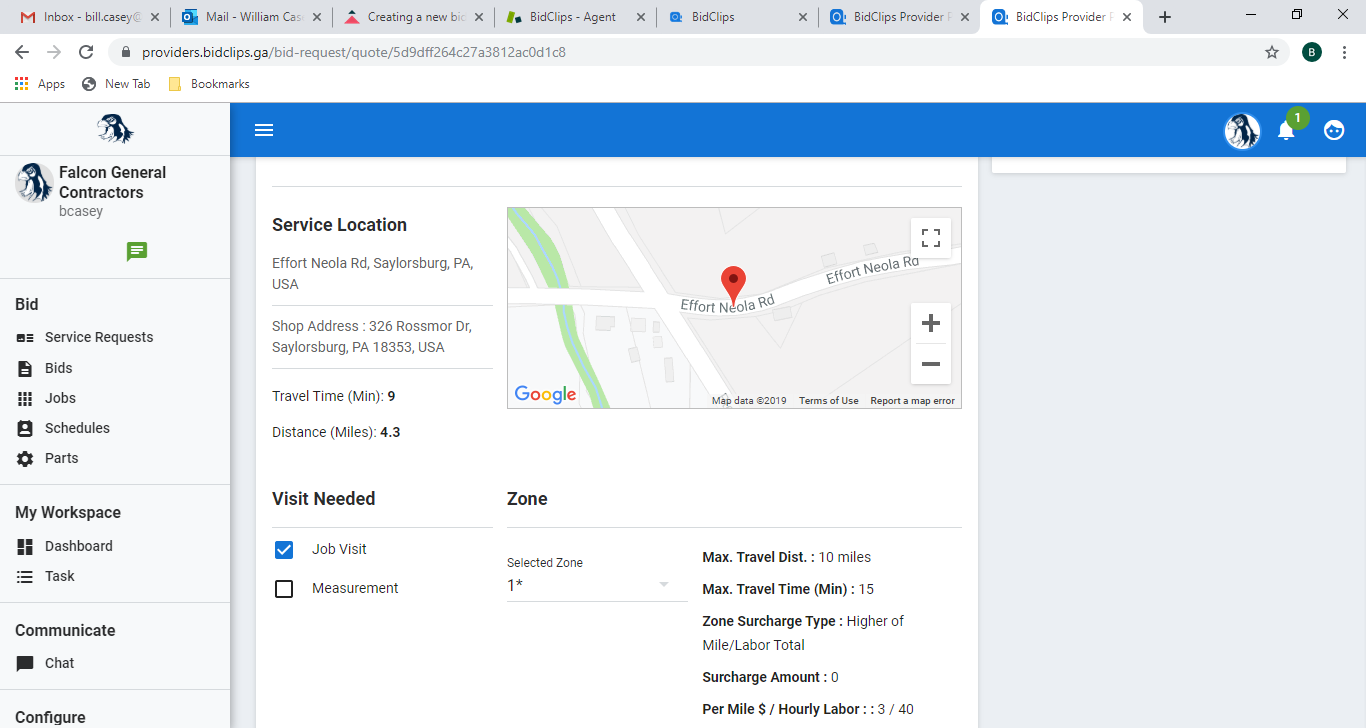
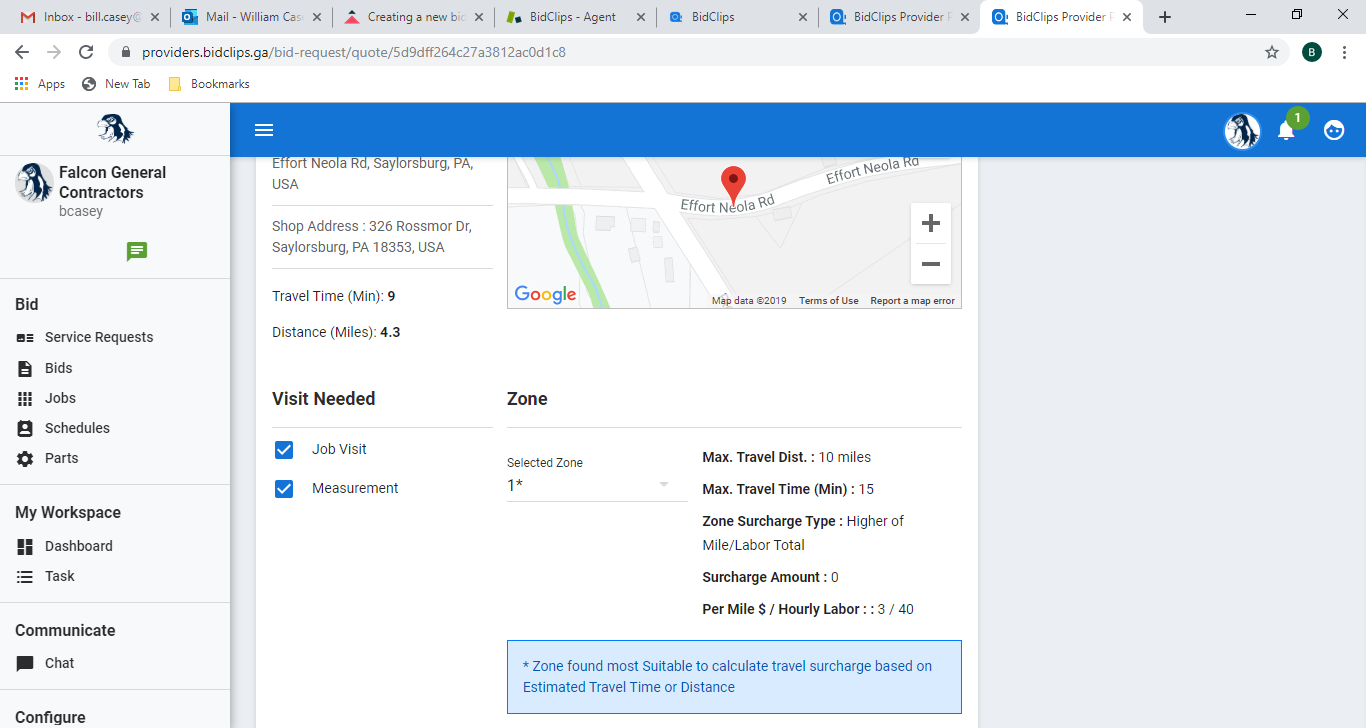
The default setting for 'Visit Needed' is 'Job Visit' only. If you would like to add an additional visit for measurements/job consultation, check the 'Measurement' box. Once you add the additional 'Measurement' selection, you will notice that your travel surcharge total will double. If you would like to change the travel zone applied to the job, click in the 'Selected Zone' field and choose the desired zone. This example shows the additional 'Measurement' option being selected and leaving the calculated zone designation alone.
Scheduling Options
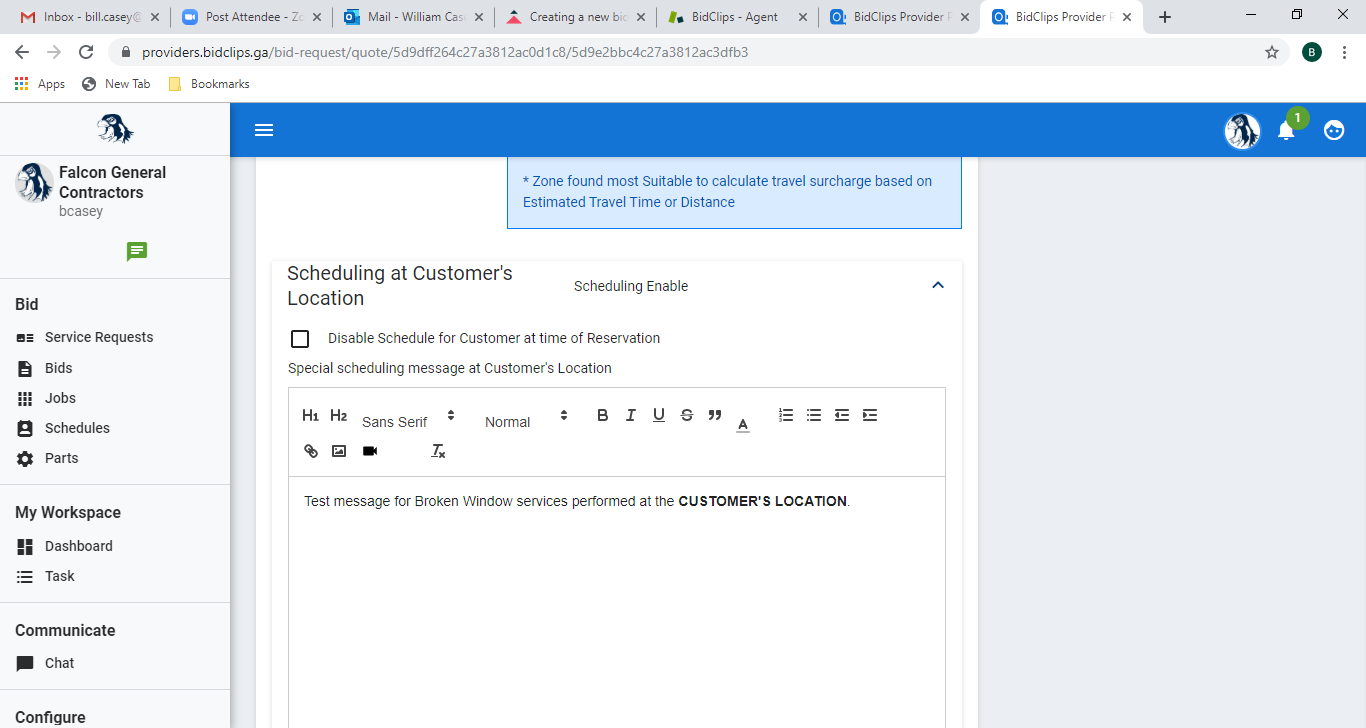
In the scheduling options section, you specify whether the customer can schedule a bid when they reserve a job. The configuration settings you have applied to the service being provided will be imported when the bid is created. In this example, scheduling has been enabled for the service both at the shop and the customer's location. Therefore, the 'Disable Schedule for Customer at time of Reservation' is unchecked.
You can opt to change whether the schedule is enabled or not for this specific bid without changing the global settings for this service at your shop. In this example, we will disable scheduling at the customer location during reservation. If you opt to disable the schedule for the customer, you will have to follow-up with the customer after the bid has been won to schedule the job.
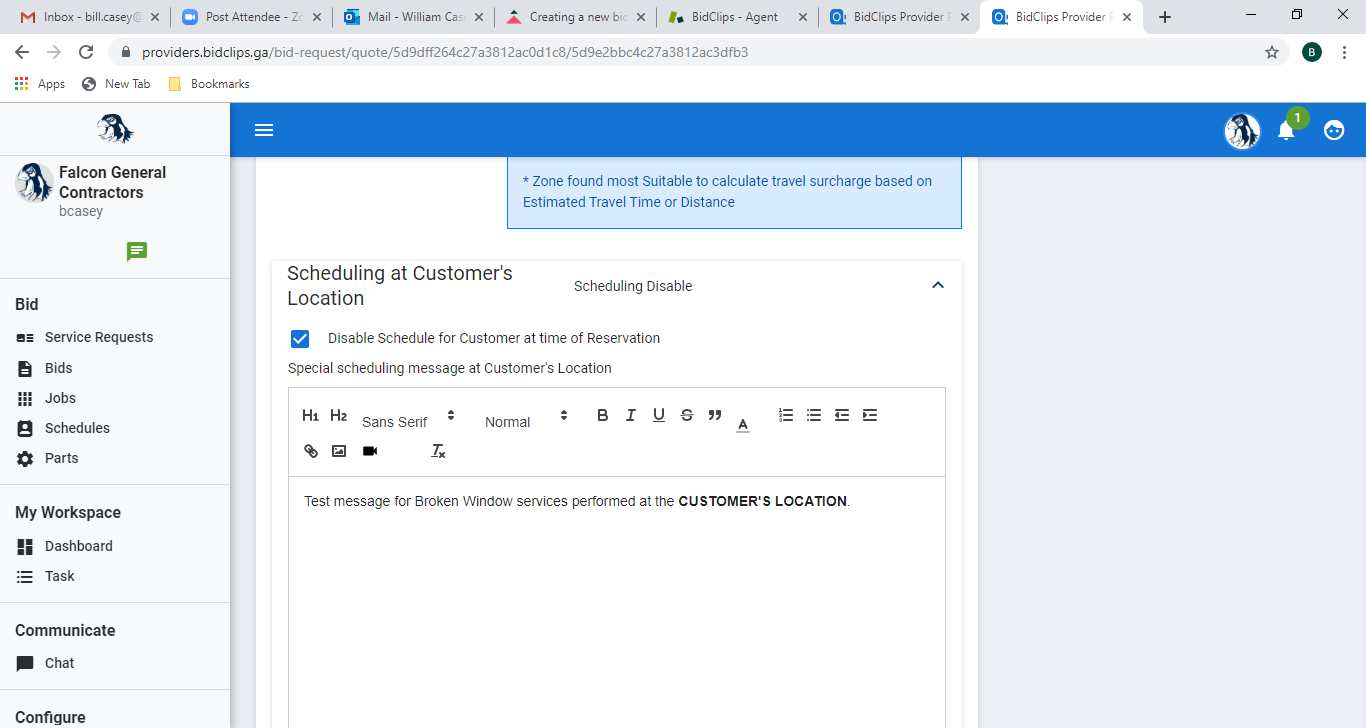
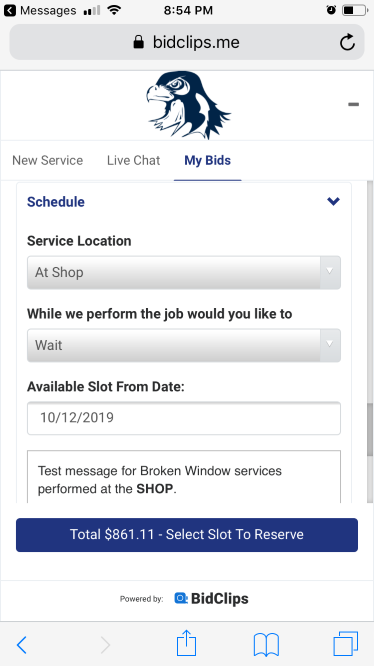
You will also notice that there is an area for a special scheduling message at each of the possible service locations. If you have added a note in the configuration settings for this service, it will be imported into the bid. You can modify the message for this specific bid without changing the global settings for this service at the shop. As with all message editing in BidClips, you can use rich-text editing and include web links, images, and/or videos in your messages. In this example, we will leave the global message settings in tact.
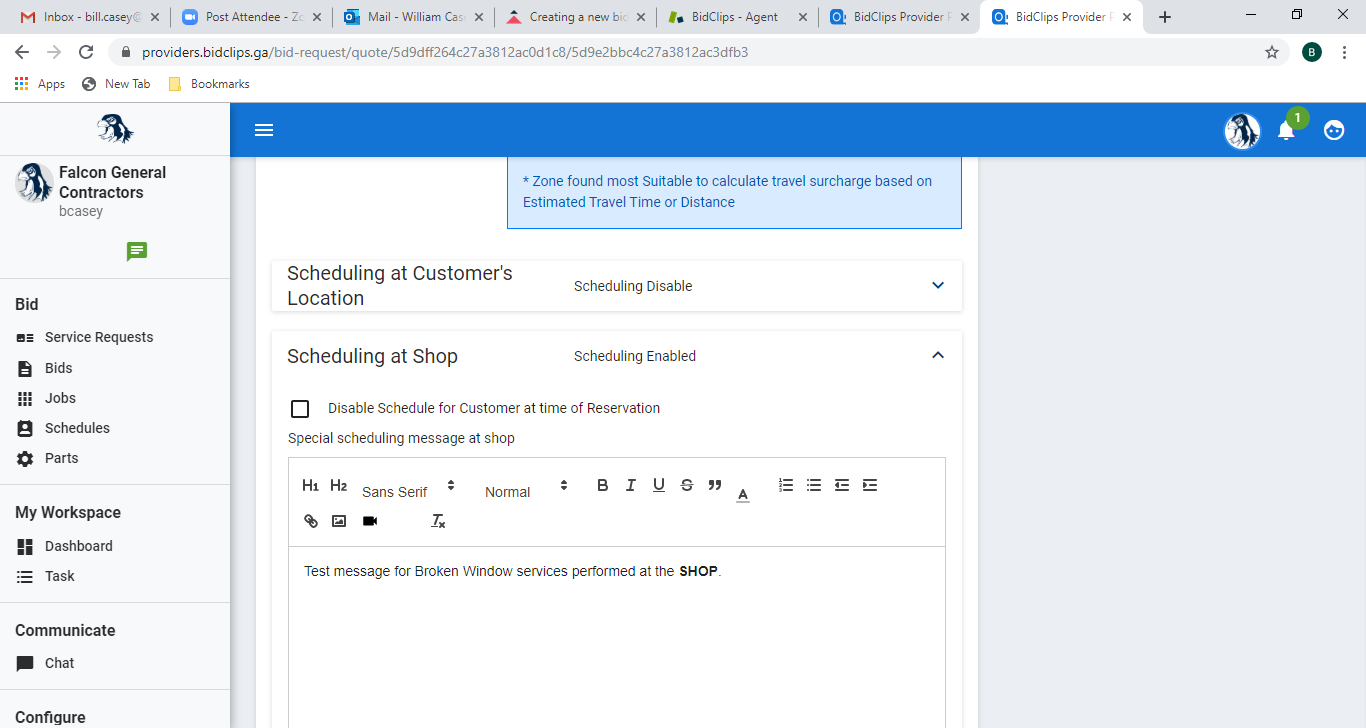
If you have specified that service can be provided at either the shop or the customer's location, you will see the same scheduling options for the shop. These settings, just as the customer location settings, are imported from the global settings for this service at your shop.
Add-Ons
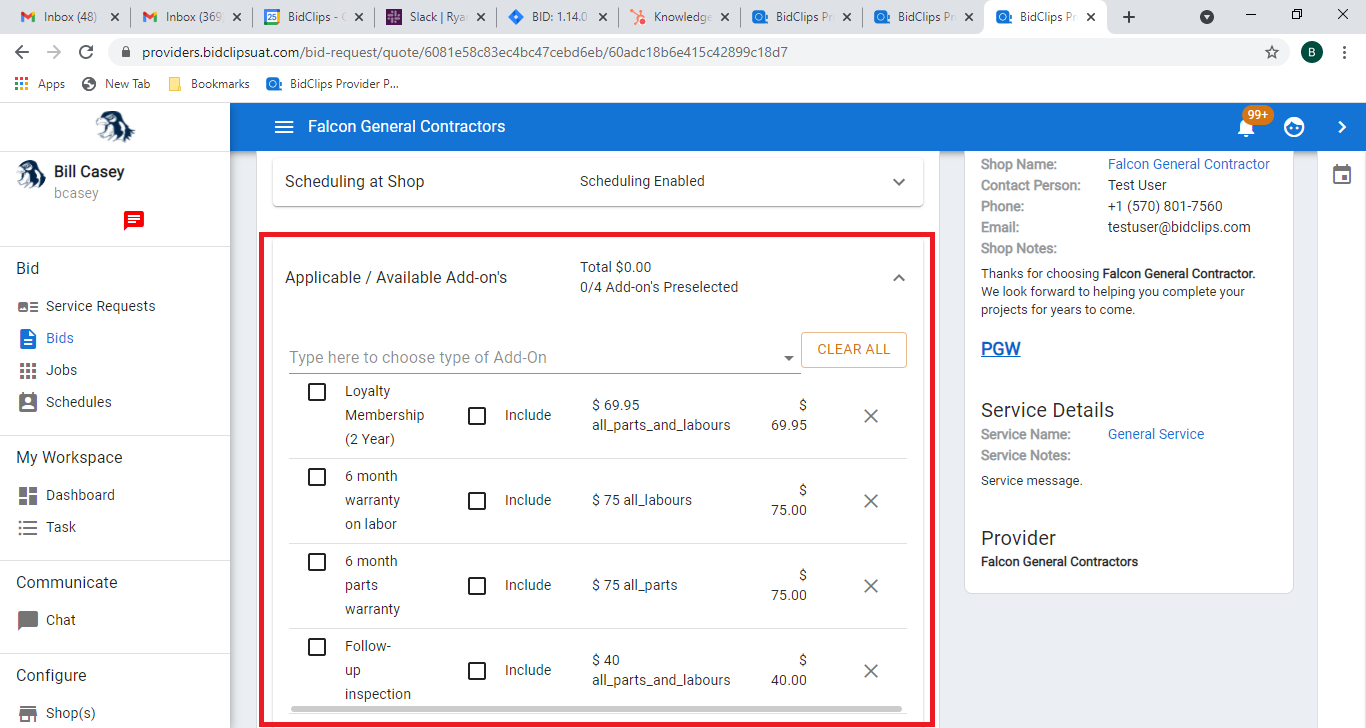
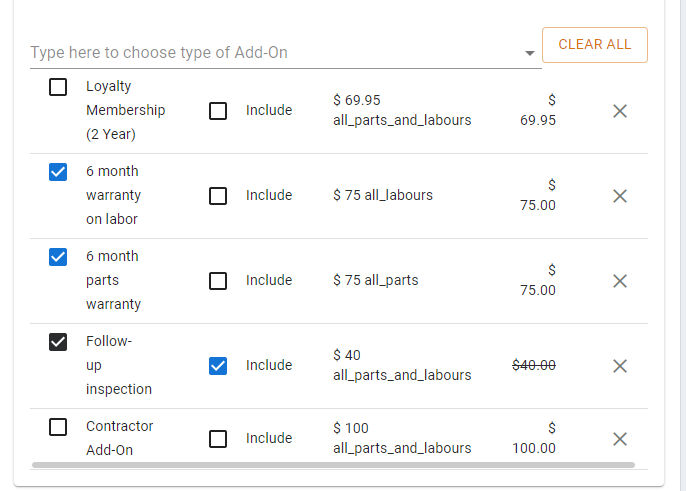
Just as you were able to apply discounts to the bid, you are also able to apply any of the add-ons you have created for your provider. You may notice that certain add-ons have already been applied to the bid. Add-ons are applied to individual services or all services when they are created. Any add-on that has been configured for all services or the particular service you which you are creating the bid, they will automatically be imported into the bid when it is first created. In this example, four (4) add-ons have been created for either all services or the Broken Window service for which the bid is being prepared.
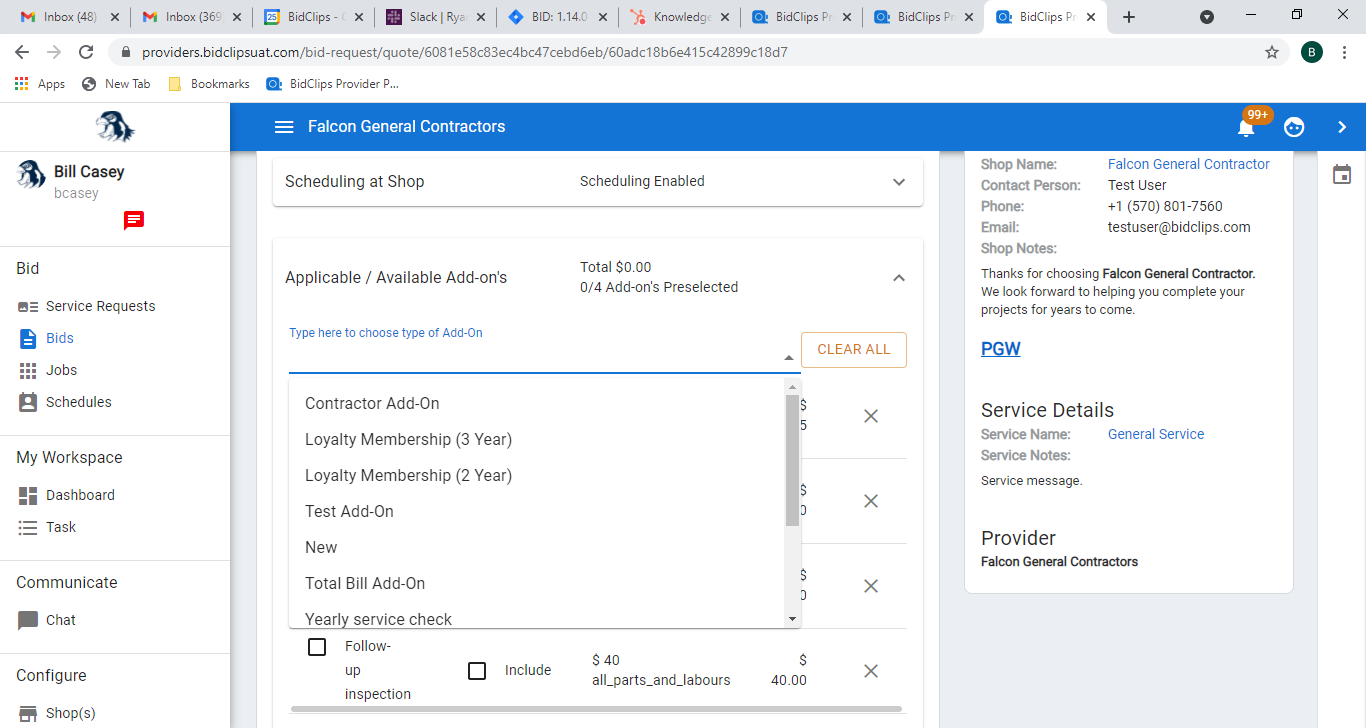
You can, however, include any add-on that has been created for your provider in the bid. This example will show the inclusion of one more add-on to the bid. Click on the 'Type here to choose type of Addon' field and either select the add-on from the drop-down list if it appears or start typing an add-on name in the field.
Once you see the appropriate add-on to be included in the bid, click on it. The example shown below will apply the Contractor Add-On.
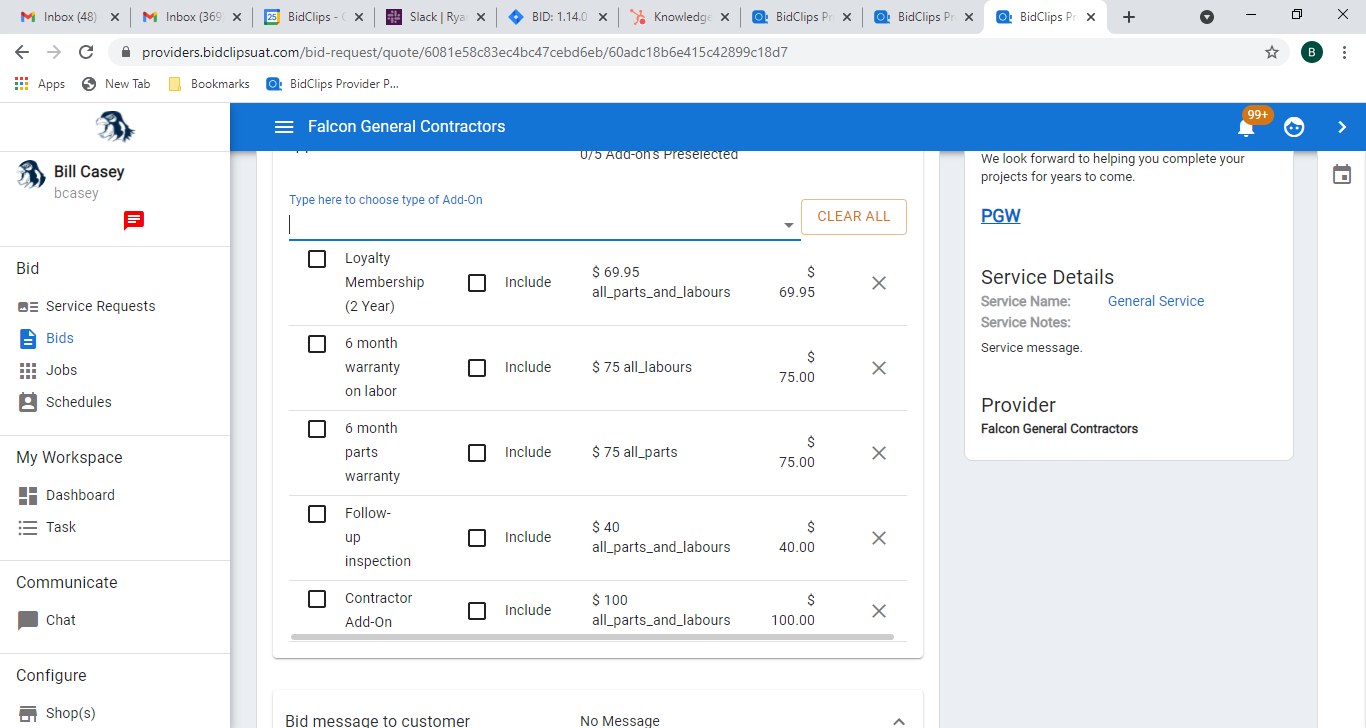
You can repeat the previous step to include as many add-ons you would like. If at any time you want to remove an add-on from the bid, simply click the 'X' next to the add-on name. You can also clear all add-ons from the bid by clicking the 'CLEAR ALL' button.
There are three options when applying an add-on to a bid:
- Unselected: The add-on is offered to the customer, but not included in the price of the bid when first viewed by the customer. The customer must select this add-on while reviewing and accepting the bid in order to apply it to the bid.
- Pre-selected: The add-on is included in the price of the bid when first viewed by the customer. The customer must deselect this add-on while reviewing and accepting the bid in order to remove it from the bid.
- Include: The add-on is given to the customer as a feature, free-of-charge, as an incentive to accept the bid.
In the example below, the Loyalty Membership (2 year) and Contractor add-ons are unselected and must be accepted by the customer to be applied to the bid. The 6 month parts and labor warranty add-ons are selected, will be applied to the bid when sent, and must be removed by the customer if they wish to remove either from the bid. The Follow-Up Inspection add-on will be given to the customer, free-of-charge, as an incentive to accept your bid.
Bid Message to Customer
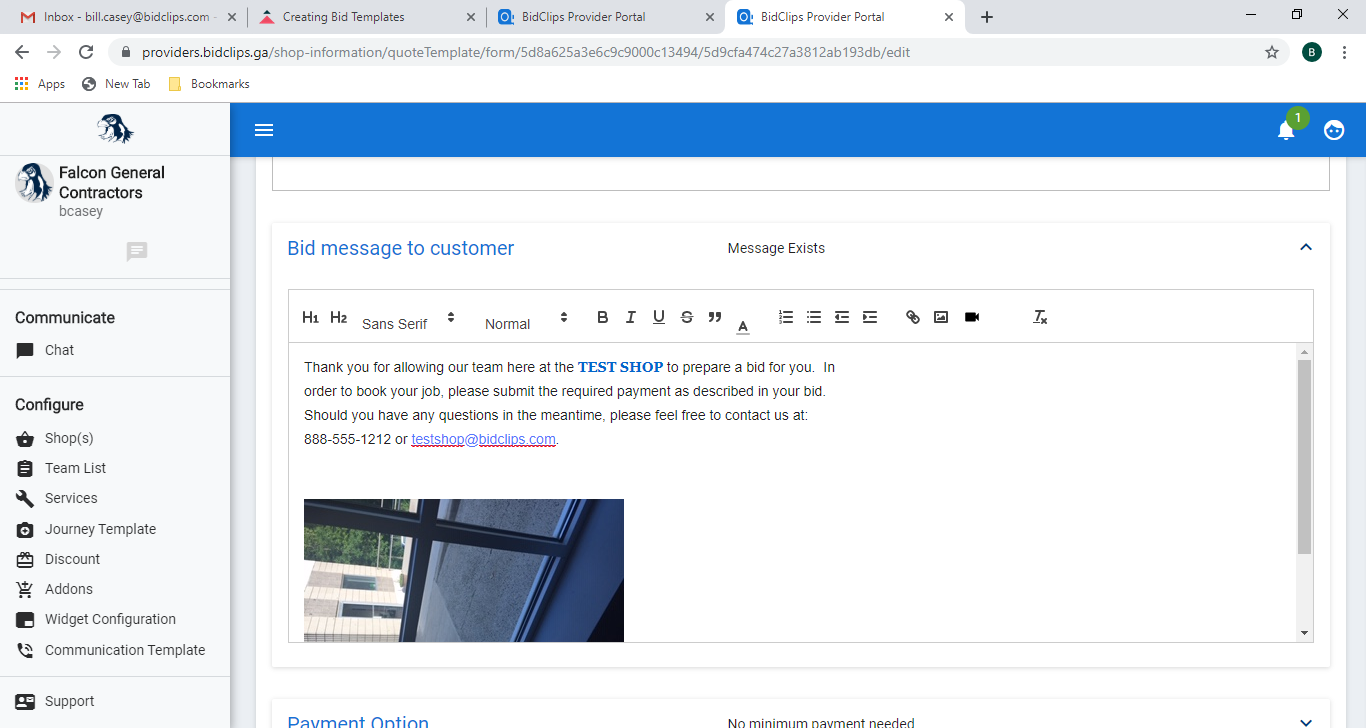
You are able to add a message to your customer in a bid. You can also utilize all of the same rich-text editing, web link, image, or video options that are available throughout the BidClips platform in your bid messages. The example below shows the use of rich-text editing, a contact email link and an image for this particular bid.
Payment Option
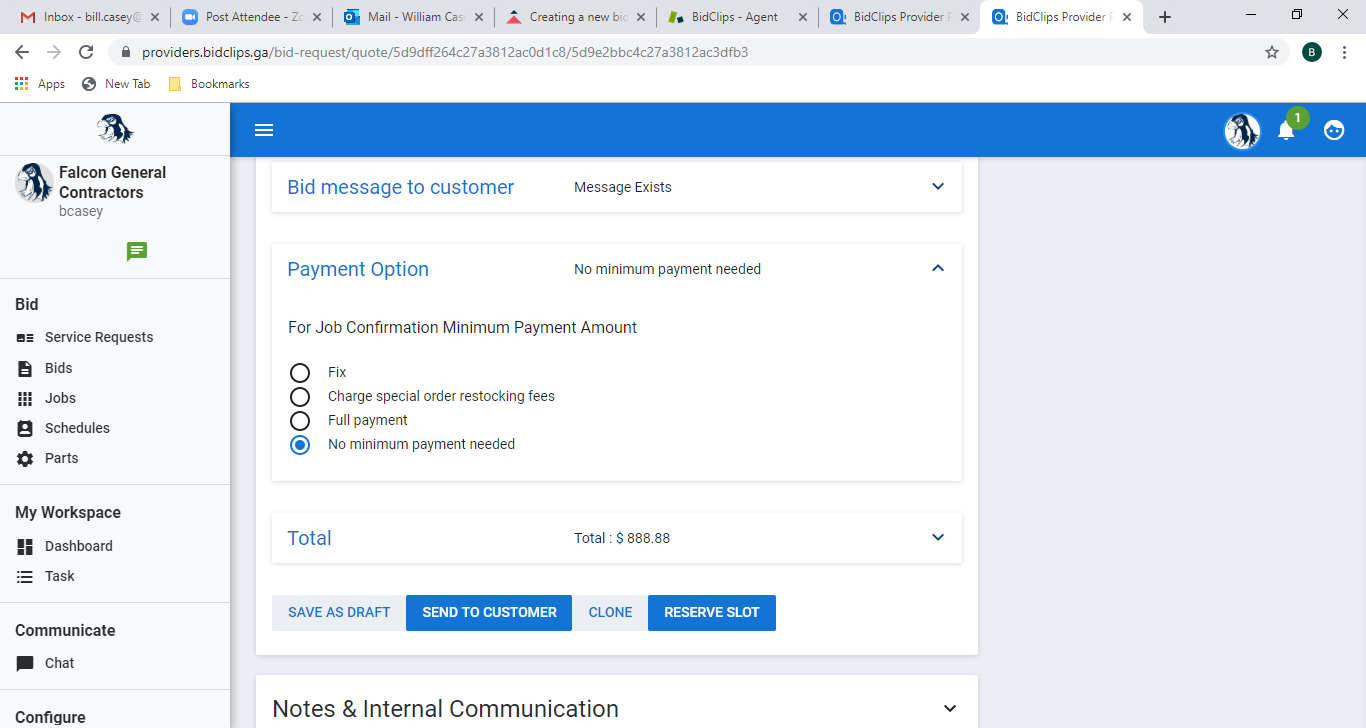
Here you will specify the reservation payment options and can choose from: fixed price amount (% or $), restocking fees, full payment, or no payment required. This will be the amount the customer will have to pay, when accepting the bid, to reserve a job. The default option will be 'No minimum payment needed' when you first create the bid as shown below:
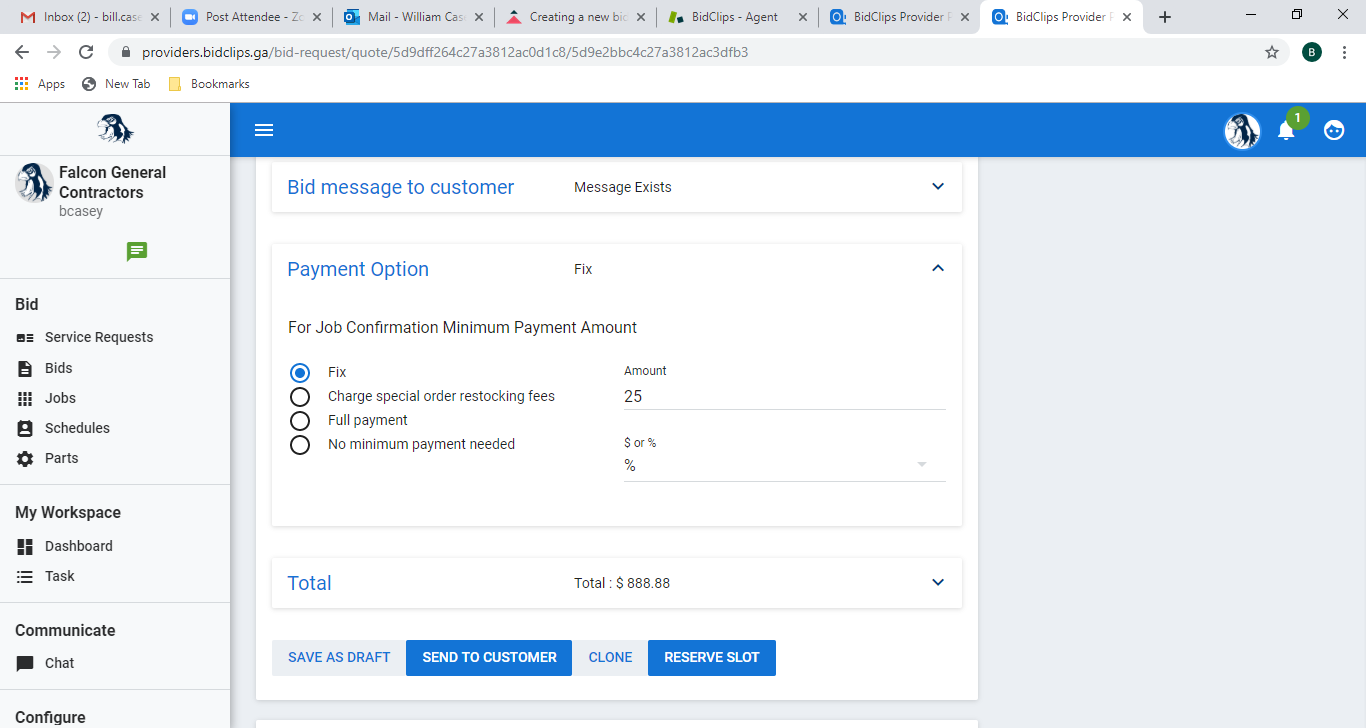
This example shows how you would change the bid to require a 25% down payment to reserve the job. To do so, you select the 'Fix' radio button. You would then enter '25' in the 'Amount' field and select the '%' option from the '$ or %' drop-down list.
Total
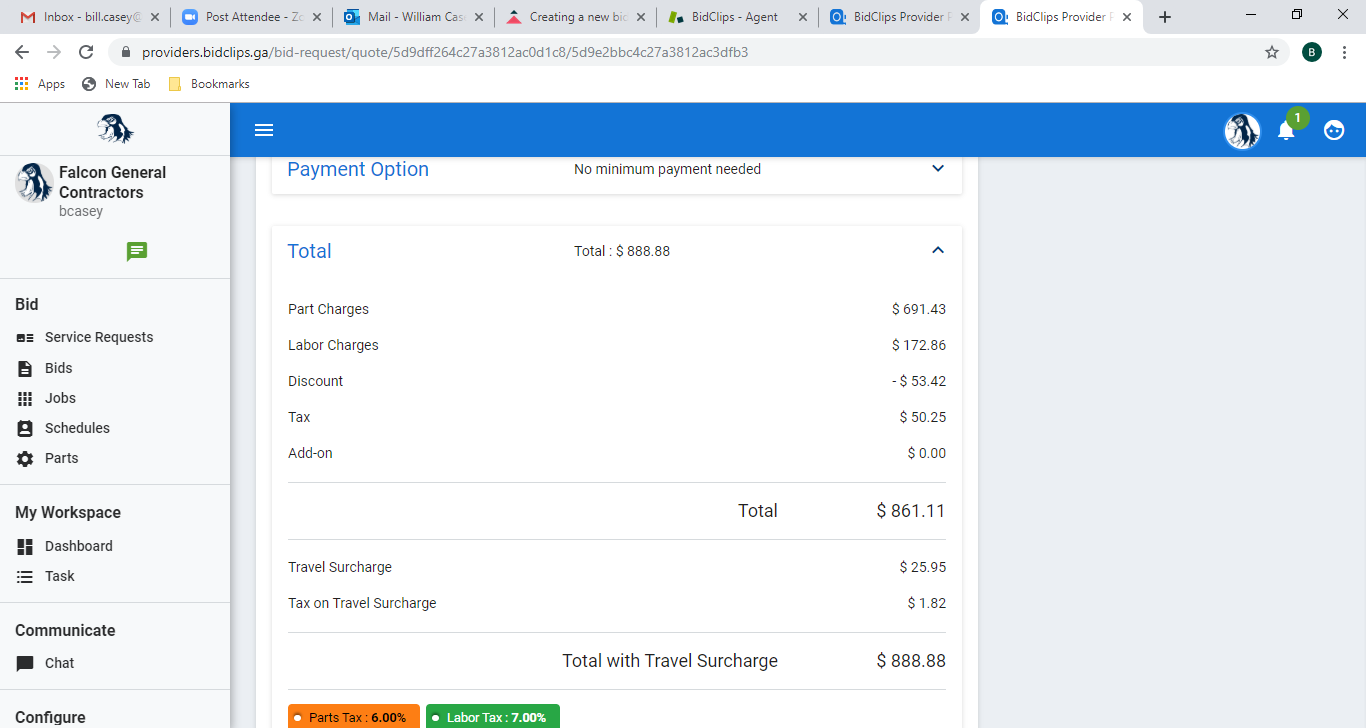
You can expand the Total section of the bid to see a breakdown of your parts, labor, discounts, tax and travel surcharge. Add-ons will reflect $0.00 at this point because the customer will select these options as they are accepting the bid.
Sending Bid Options
If you have reviewed the bid and are satisfied it is complete and accurate you now have four options at the bottom of the 'Bid Request' page:
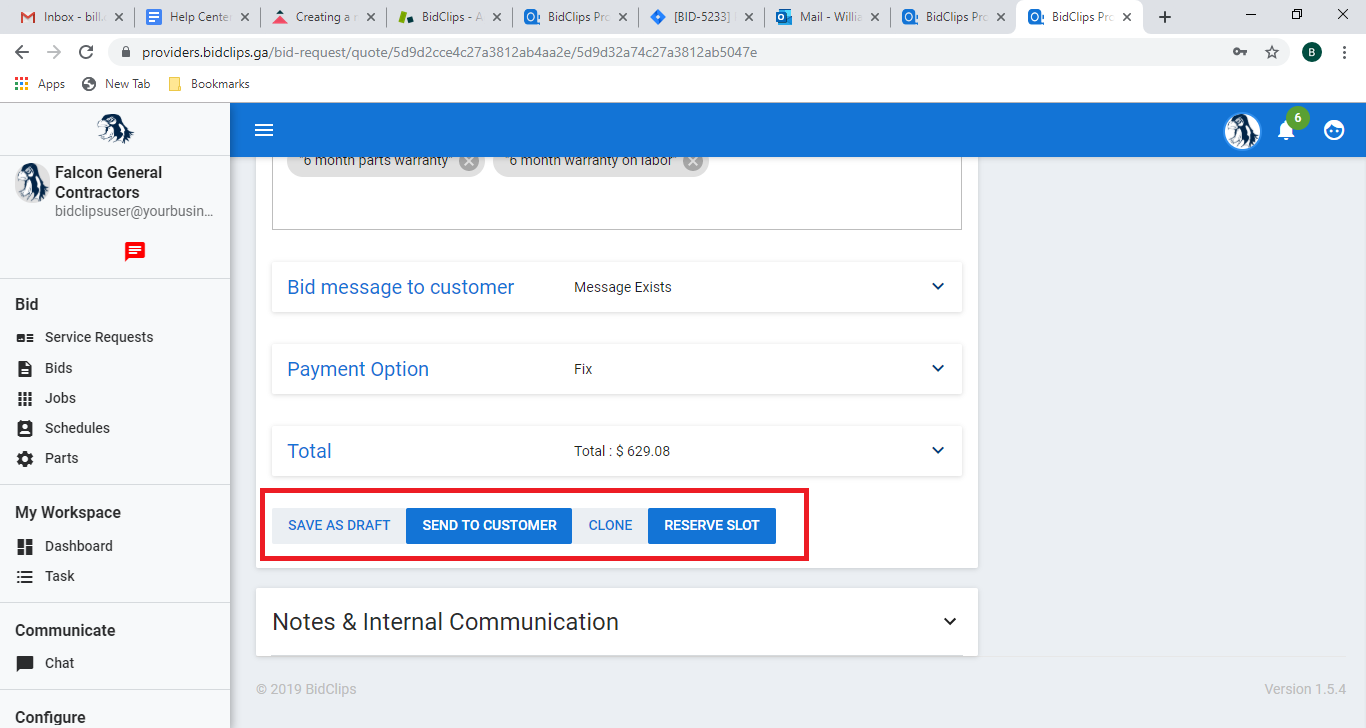
- Save as Draft-Click on the 'SAVE AS DRAFT' button to save the bid without sending it to the customer.
- Send to Customer-Click on the 'SEND TO CUSTOMER' button to send the bid to the customer.
- Clone-Click on the 'CLONE' button to make a copy of this bid without sending it to the customer at this time. This is generally done when you want to provide multiple bids for the customer.
- Reserve Slot-Click on the 'RESERVE SLOT' button if you want to finalize the bid and create a job for the service request. This is generally done when you have a customer on the phone who wants to accept your bid.
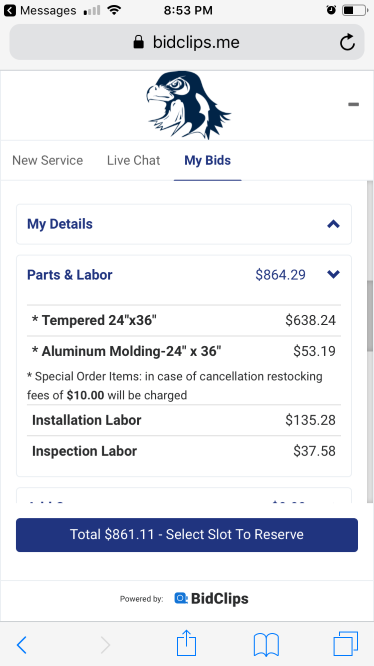
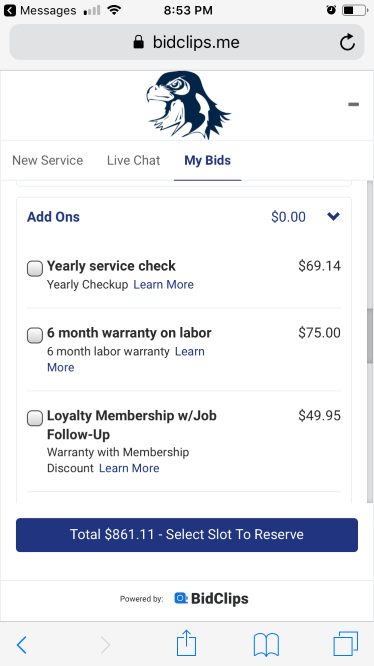
Examples of the bid created in this example as it would appear to the customer in the BidClips widget:
Parts & Labor Details:
Add-Ons Available:
Discounts Applied:
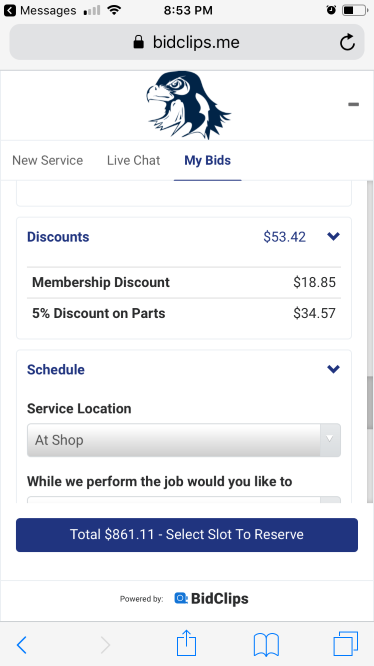
Shop Scheduling Options:
Customer Location Scheduling Options:
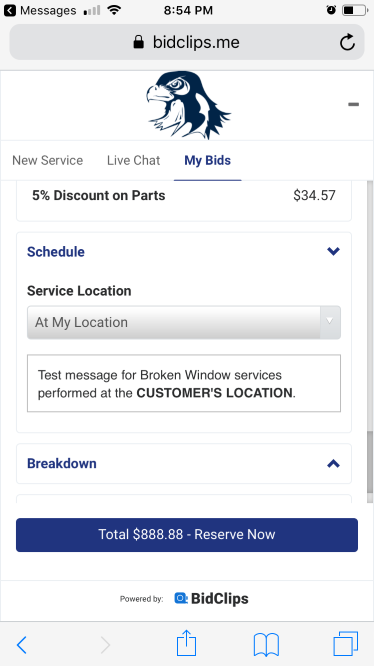
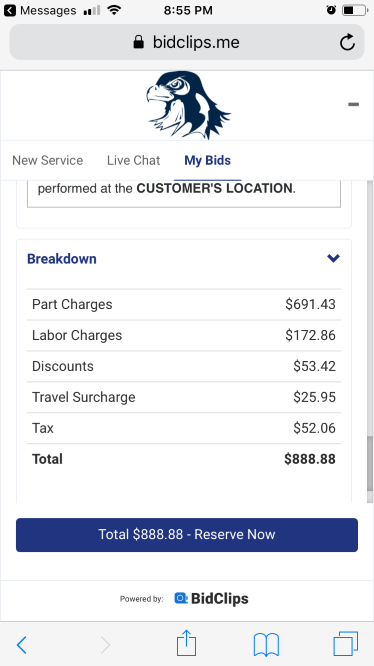
Breakdown of All Charges (Customer Location Service Selected):
